
Starting your holiday decorations with Christmas ornaments to hang on the tree.-Step by Step Tutorial is a wonderful way to bring warmth, creativity, and handmade charm into your festive home. This tutorial focuses on easy, beautiful ornaments you can create with simple materials and basic crafting knowledge. Whether you are crocheting, stitching, gluing, or shaping each piece, these handmade decorations bring a special meaning to the season. By following this detailed guide, you will feel confident in crafting ornaments that stand out and make your Christmas tree truly unique.
Many people search for ideas to create their own Christmas ornaments to hang on the tree.-Step by Step Tutorial, and this article brings together the most practical, beginner-friendly instructions. Throughout the guide, you will learn techniques to personalize colors, textures, and shapes, allowing each ornament to reflect your own holiday spirit. These crafts also work beautifully as gifts, because handmade items show care and creativity. By understanding each step in this tutorial, you will be able to recreate the designs as many times as you like and adapt them for different themes.
Choosing to make your own ornaments instead of buying them can make Christmas more meaningful. Crafting brings families together, encourages creativity, and creates long-lasting memories. With Christmas ornaments to hang on the tree.-Step by Step Tutorial, you will learn how to turn simple supplies into beautiful art. Before jumping into the main instructions, take your time to gather your materials, set up a comfortable workspace, and enjoy the relaxing nature of the process. Crafting Christmas decorations is not only fun but also a great way to add personality to your festive décor.
Understanding the Basics of Handmade Christmas Ornaments
When you start working with Christmas ornaments to hang on the tree.-Step by Step Tutorial, it is important to understand the basics of shapes, textures, and materials. Handmade ornaments can be made from yarn, felt, beads, foam, paper, or fabric scraps you already have at home. Each material offers a different look and feel, allowing you to choose what best suits your Christmas theme. Understanding how your materials behave helps you achieve neat and durable results.
Another important aspect is selecting the right colors. Classic Christmas colors like red, green, gold, and white never go out of style, but you can also explore more modern combinations such as blue and silver or pastel tones. When following this Christmas ornaments to hang on the tree.-Step by Step Tutorial, try to balance your chosen colors so your final ornaments look cohesive and visually appealing. Color contrast helps define shapes more clearly, especially when working with small details.
Patience plays a major role in ornament crafting. Even though the steps are simple, taking your time ensures cleaner finishes. Beginners often worry about making mistakes, but crafting is forgiving. You can redo parts, reposition glue, trim extra pieces, or adjust shapes without compromising the final look. This tutorial is designed to be beginner-friendly, so each step supports your progress.
Working in a well-lit area is also essential when crafting small ornaments. Proper lighting helps you see details more clearly and prevents eye strain. If you are working with materials like beads or yarn, organizing your supplies in small containers can make the process smoother. This improves the quality of your crafting and enhances your overall experience while applying the Christmas ornaments to hang on the tree.-Step by Step Tutorial.
Finally, remember that handmade ornaments are meant to be personal. They don’t need to look factory-perfect; their charm comes from your creativity and effort. Mixing styles, combining textures, or customizing details will make your decorations stand out. The goal of this Christmas ornaments to hang on the tree.-Step by Step Tutorial is to help you create unique pieces that bring joy to your holiday season.
Step-by-Step Guide to Creating Felt Ornaments
Working with felt is one of the easiest ways to create beautiful ornaments. Felt is soft, inexpensive, and available in many colors, making it perfect for beginners following this Christmas ornaments to hang on the tree.-Step by Step Tutorial. Start by selecting your preferred shapes, such as stars, trees, hearts, bells, or snowflakes. You can draw the shapes yourself or use printed templates to cut them out.
After cutting two identical shapes, align them and begin stitching around the edges. Blanket stitch or running stitch both work beautifully, depending on the style you prefer. Leave a small opening so you can add stuffing. Lightweight stuffing helps the ornament keep its form without becoming too heavy for the tree. After filling it, continue stitching until the shape is fully closed.
Next, focus on decoration details. You can sew tiny beads, glue sequins, or add embroidery designs to enhance the ornament. These details give your piece texture and personality. The great thing about felt is that it holds embellishments securely, so you can experiment with different looks while following this Christmas ornaments to hang on the tree.-Step by Step Tutorial.
Adding a loop at the top is essential so your ornament can hang neatly on the tree. You can use ribbon, yarn, or even a small piece of felt shaped into a thin strip. Secure it tightly between the two felt layers or sew it directly onto the top of the ornament. Make sure the loop is strong enough to support the ornament for repeated use over the years.
Once your ornament is complete, fluff it gently to even out the stuffing and smooth any edges. Handmade felt ornaments bring a warm, rustic look to your holiday décor. Each piece is lightweight, durable, and customizable, making felt a popular choice in many Christmas ornaments to hang on the tree.-Step by Step Tutorial projects.
Finally, repeat the process with new shapes and colors to create a full set of ornaments. Because felt is so versatile, you can experiment with themes such as Scandinavian design, classic red and green, or modern minimalistic styles. This allows you to expand your crafting skills while building a collection of ornaments that reflect your personality.
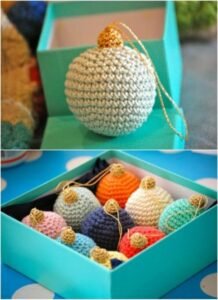
Crocheting Simple Christmas Ornaments
Crochet lovers will enjoy transforming yarn into charming decorations. This section of the Christmas ornaments to hang on the tree.-Step by Step Tutorial focuses on basic crochet shapes suitable for beginners. Small items like stars, snowflakes, wreaths, and miniature hats are great starting points. You only need a small amount of yarn, making this a wonderful project for using leftovers.
Begin by choosing a crochet hook recommended for your yarn weight. Starting with a magic ring or chain is typical for small ornaments. Basic stitches such as single crochet, double crochet, and slip stitch are often enough to complete the shapes. Even if you are new to crochet, these stitches are easy to learn and repeatedly used throughout ornament patterns.
As you crochet, keep your tension smooth and consistent. This helps your ornament keep its shape and stay neat. If your stitches feel too loose or too tight, adjust your grip or switch to a slightly different hook size. Following the Christmas ornaments to hang on the tree.-Step by Step Tutorial carefully ensures that your pieces turn out well-defined and symmetrical.
Once your crochet shape is complete, you can block it lightly if needed. Blocking helps flatten stars or snowflakes, giving them a more polished look. After blocking, consider adding a small decorative touch, such as a bead in the center of a snowflake or a ribbon bow on a tiny wreath. These small extras enhance your ornament’s charm.
To finish the ornament, attach a hanging loop. Crochet a small chain or use a piece of yarn or ribbon. Make sure the loop is securely attached so your ornament hangs properly on the tree. As you follow each step in this Christmas ornaments to hang on the tree.-Step by Step Tutorial, you will notice how small touches bring the entire piece together.
Crocheted ornaments add warmth and texture to your holiday décor. They also make thoughtful gifts or stocking fillers. By practicing different shapes and colors, you can create an entire set of ornaments that match your Christmas theme. The more you experiment, the more confident you will become with creative crochet projects.
Creative Ways to Decorate and Personalize Your Ornaments
Personalization brings your ornaments to life. With this Christmas ornaments to hang on the tree.-Step by Step Tutorial, feel free to go beyond the basic shapes and add creative details that match your style. Names, initials, dates, or meaningful symbols can make ornaments extra special. Adding embroidery, glitter, or layered shapes creates depth and visual interest.
One creative idea is to use fabric scraps to add texture. You can cut tiny scarves, hats, or accessories to attach to your felt or crochet ornaments. This makes each piece unique and adds a playful touch. Personal touches like these turn simple ornaments into cherished keepsakes. You can even create themed sets, such as woodland animals, angels, or gingerbread shapes.
Consider mixing materials to enhance your designs. Combining felt with beads, crochet with fabric, or paper with ribbon can make ornaments more dynamic. When following this Christmas ornaments to hang on the tree.-Step by Step Tutorial, don’t be afraid to experiment with layers and combinations that add character to your pieces.
Adding fragrance is another special detail you can include. A tiny piece of cinnamon stick or a drop of holiday-scented oil on felt can make the ornament not only beautiful but pleasantly aromatic. Be sure to keep scents subtle and safe for indoor use. This enhances the overall holiday experience.
Once your ornaments are personalized, store them carefully to use again in future years. A dedicated ornament box helps protect them from dust and damage. Good storage ensures that the time and effort invested in creating these pieces are preserved. By revisiting this Christmas ornaments to hang on the tree.-Step by Step Tutorial each year, you can continue adding new ornaments to your collection.
Whether you make ornaments for yourself or as gifts, handmade decorations have a sentimental value that store-bought items cannot match. They reflect the love, time, and creativity you put into crafting them. Personalizing your ornaments is the final step that makes them truly your own.
FAQ
How long does it take to make handmade Christmas ornaments?
Most simple ornaments take between 10 and 40 minutes, depending on the material and level of detail. Felt and crochet ornaments are generally quick to complete.
What materials are best for beginners?
Felt, simple yarn, basic fabric, and lightweight stuffing are excellent for beginners following the Christmas ornaments to hang on the tree.-Step by Step Tutorial.
Can children make these ornaments too?
Yes, with adult supervision. Felt, paper, and glue-based ornaments are especially child-friendly and fun.
How do I make ornaments more durable?
Use strong stitching, high-quality glue, and secure hanging loops. Proper storage also increases ornament lifespan.
Can I use leftover craft materials?
Absolutely! Reusing leftover yarn, felt pieces, beads, or ribbon makes the process economical and eco-friendly.
Do handmade ornaments make good gifts?
Yes. Personalized ornaments are thoughtful and meaningful gifts for friends, family, and coworkers.
Conclusion
Throughout this detailed Christmas ornaments to hang on the tree.-Step by Step Tutorial, you learned how to craft felt ornaments, crochet decorations, and personalized pieces to enhance your holiday décor.
With simple materials, patience, and creativity, you can create beautiful handmade ornaments that reflect your holiday spirit.
These decorations add charm, warmth, and meaning to your Christmas celebrations. I hope this guide inspires you to craft your own ornaments and enjoy every moment of the process. Please leave your honest opinion and any suggestions you may have—I would love to hear your thoughts!