
Creating a Crocheted star garland: DIY Christmas ornament–Step by Step Tutorial is one of the most enjoyable and meaningful ways to prepare your home for the holiday season. In this guide, you will learn how to craft delicate crochet stars and transform them into a beautiful garland that adds charm and warmth to your Christmas décor. Whether you’re a beginner or experienced crocheter, this tutorial provides simple instructions, helpful tips, and creative ideas to ensure a rewarding experience from start to finish. This festive project combines tradition, craft, and creativity, making it a perfect addition to your holiday celebrations.
The popularity of the crocheted star garland has grown each year, especially among crafters who love handmade decorations. These little stars can be customized with different colors, stitch textures, and embellishments, allowing you to personalize your garland completely. The best part is that the process is simple, relaxing, and easy to complete in a single afternoon. Throughout this Step by Step Tutorial, you will understand each part of the process—from choosing yarn to assembling your final garland—while enjoying a cozy and creative Christmas crafting moment.
Making a DIY Christmas ornament like a crocheted star garland brings a special touch to holiday decorating. It offers a sense of accomplishment, sparks creativity, and creates memories that last longer than store-bought decorations. This tutorial emphasizes clarity, accessibility, and a smooth learning experience, even for beginners. You’ll learn how to crochet stars, block them if needed, and assemble your garland beautifully. Now that you have an overview of the project, let’s move on to the materials and tools you will need to begin this delightful Christmas craft.
Materials and Tools for a Crocheted Star Garland
To start this Crocheted star garland: DIY Christmas ornament–Step by Step Tutorial, you need a few basic materials that are easy to find. Yarn is the most important item, and choosing the right type will affect the look and durability of your garland. Cotton yarn is ideal because it holds shape well and provides a smooth finish, but acrylic yarn also works wonderfully if you prefer softer or more colorful options. A festive palette such as white, gold, red, or green brings a classic holiday feel.
Equally important is selecting the right crochet hook size. Most crocheted stars are made using smaller hooks to create tighter stitches that help the ornament keep its shape. A hook size between 2.5 mm and 3.5 mm is often preferred. Always check your yarn label and experiment with a few test stitches before starting the full project. A tight and even tension is key to achieving crisp, clean star points.
Additional materials include scissors, a yarn needle, and optionally, fabric stiffener. The yarn needle will help you weave in ends and sew your stars onto the garland cord. If you want your stars to be extra firm, a light application of stiffener or diluted glue will help them stay flat and maintain their shape. This is especially useful if you live in a humid climate where yarn tends to soften.
For assembling the garland, you can use yarn, string, or even a crocheted cord. The choice depends on the look you prefer—simple and rustic or elegant and refined. Some crafters like to add small wooden beads or tiny bells between each star to enhance the Christmas charm. These accessories are optional but can make your garland even more special and personalized.
Gathering all materials before starting helps streamline the process and ensures a smooth crafting experience. With your supplies ready, you can focus fully on creating your stars without interruption. Now that everything is prepared, you’re ready to begin crocheting the stars themselves.
How to Crochet the Stars
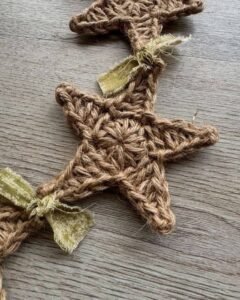
The main part of this Crocheted star garland: DIY Christmas ornament–Step by Step Tutorial is learning how to crochet the stars. Stars are typically made in the round, starting from the center and building outward to form symmetrical points. Begin with a magic ring, which creates a tight and professional-looking center. Work several single or double crochet stitches into the ring, depending on the pattern style you prefer.
Once the center circle is complete, you’ll start creating the star points. Each point is formed by a combination of chain stitches, increases, and decreases. This helps the star maintain its shape and gives each point a delicate and sharp appearance. Counting stitches carefully is essential during this step, as even a small mistake can affect the symmetry of your star. Using a stitch marker can help you stay on track.
After completing each point, you will slip stitch back into the center circle before beginning the next. This technique ensures that all points are evenly spaced. Repeat the process five times for a classic five-pointed star. If you want a more unique ornament, you can create six-pointed or even multi-textured stars by adjusting the stitch counts. This flexibility is one of the best features of crochet work.
Once your star is complete, fasten off and weave in the ends using your yarn needle. At this point, the star may appear slightly soft or curved, especially at the tips. This is normal, and blocking or shaping your stars will help them look perfect and flat. Blocking is simple and only takes a few minutes—it’s especially recommended for cotton yarn.
You can also experiment with embellishments. For example, adding a round of slip stitches in a contrasting color around the edge of each star gives it a beautiful decorative outline. Small beads, glitter threads, or metallic yarn can make your stars sparkle under Christmas lights. The creative possibilities are endless and allow you to personalize your DIY Christmas ornament.
Repeat this star-making process until you have the number of stars you want for your garland. A standard length usually includes between 8 and 20 stars, depending on your desired spacing. Once all stars are ready, it’s time to assemble your garland.
Assembling the Star Garland
This part of the Crocheted star garland: DIY Christmas ornament–Step by Step Tutorial focuses on how to assemble your garland beautifully. Begin by choosing the yarn or cord you will use to connect the stars. A simple chain cord is an easy and elegant option: just crochet a long chain, making sure to leave enough length at each end for hanging.
Before attaching your stars, decide on the spacing. Many crafters prefer spacing stars evenly so the garland looks balanced across a fireplace, window, or Christmas tree. You can lay the stars on a flat surface and arrange them visually before final attachment. This helps you preview how the finished garland will look.
To attach each star, thread the coordinating yarn needle with a bit of yarn and sew the top point of the star onto the cord. Make sure the stitches are tight enough to hold the star securely but discreet enough not to show too much. If you are using a crocheted chain cord, you can also slip stitch the stars directly into specific chain spaces.
Continue attaching each star, keeping the spacing consistent. Take your time during this process; careful positioning makes a big difference in the appearance of the final product. If you want to add extra decorations like beads or bells, thread them onto the cord before sewing the next star. This will add variety and enhance the festive look of your crocheted star garland.
Once all stars are attached, lift the garland gently to ensure everything hangs correctly. Adjust any stars that twist or tilt until they sit just right. A well-assembled garland should hang evenly and show each star clearly. If you applied stiffener earlier, your stars will hold their shape beautifully as the garland drapes across your chosen area.
Your garland is now complete, but you can always add finishing touches if you like. Small bows, mini pom-poms, or even extra stars can be placed at the ends for added charm. With your handmade garland finished, you have a lovely DIY Christmas ornament ready to brighten any space.
Decorating and Displaying Your Crocheted Star Garland
One of the best parts of this Crocheted star garland: DIY Christmas ornament–Step by Step Tutorial is deciding how to display your finished piece. A crocheted garland adds warmth and handmade charm to any room, making it a versatile décor item during the holiday season. You can hang it above a fireplace, drape it across a wall shelf, or use it as a decorative accent on your Christmas tree.
The versatility of these stars means you can customize the décor to suit different themes. For a rustic holiday look, use neutral or natural-colored yarn and pair the garland with wooden or linen accents. For a bright and festive Christmas feel, choose red, gold, green, or sparkly yarns. Your garland will fit beautifully with other decorations and enhance any space where it’s displayed.
Another creative way to display your garland is to incorporate it into table decorations. You can drape it down the center of a holiday table or wrap it around a candle arrangement. This adds texture and a handmade touch that guests are sure to admire. The stars also reflect soft light wonderfully, especially if paired with warm candlelight.
If you want to make your garland even more special, consider adding personalized stars. Each family member could have their own star with a specific color, bead, or embroidered detail. This transforms the garland into a sentimental holiday keepsake that can be displayed year after year. Handmade decorations like this often become treasured family traditions.
Because crocheted garlands are lightweight, they’re easy to store and reuse. Simply fold the garland gently and place it in a box or fabric pouch after the holidays. When next Christmas comes around, your garland will be ready to hang again, looking just as beautiful as the day you made it.
With your beautiful garland displayed, you now have a handmade piece that not only decorates your home but also represents creativity, care, and holiday spirit.
Crocheted Star Garland
How many stars do I need for a garland?
Most garlands use between 8 and 20 stars, depending on length and spacing.
What yarn works best for crochet stars?
Cotton yarn is ideal for structure, but acrylic yarn also works well and offers more color variety.
Can beginners follow this tutorial?
Yes. This Crocheted star garland: DIY Christmas ornament–Step by Step Tutorial is designed to be simple and beginner-friendly.
How do I keep my stars from curling?
Blocking or using a light stiffener helps stars lay flat and keep their shape.
Can I attach stars without sewing?
Yes, you can slip stitch stars directly into a crocheted chain cord, depending on your preference.
Is this garland reusable?
Absolutely. With proper storage, a crocheted garland lasts for many years.
Conclusion
In this Crocheted star garland: DIY Christmas ornament–Step by Step Tutorial, you learned how to gather materials, crochet beautiful stars, assemble your garland, and display it creatively during the holiday season.
This project is easy, enjoyable, and perfect for adding a handmade touch to Christmas décor. I hope this tutorial inspires you to create your own charming garland.
Please leave your sincere opinion and share suggestions—your feedback helps create even better tutorials!