
Starting your crafting journey with a Crocheted Christmas ornament-Step by Step Tutorial is one of the most heartwarming ways to prepare for the holiday season. This guide allows you to create decorative pieces filled with charm, personality, and handmade love. Whether you are a beginner or an experienced crocheter, working with crocheted Christmas ornaments can bring joy to your crafting time while also helping you decorate your home in a unique and meaningful way. Using this Crocheted Christmas ornament-Step by Step Tutorial, you will learn essential stitches, helpful techniques, and the best way to assemble your ornament beautifully.
When crafting for the holidays, many people seek simple yet visually stunning DIY projects, and this Crocheted Christmas ornament-Step by Step Tutorial provides exactly that. Handmade ornaments are more than just decorations—they are keepsakes, gifts, and symbols of warmth. By following a clear, well-structured guide, you can easily complete unique pieces that brighten your Christmas tree and bring extra holiday magic to your home. The charm of crochet is that each stitch is built with intention, and each finished ornament tells a story that lasts for years.
In this article, we will explore materials, stitches, helpful suggestions, and a full process for making your ornament from start to finish. The goal is to give you a complete Crocheted Christmas ornament-Step by Step Tutorial that is simple to follow and beautifully detailed. With four carefully structured sections, you will gain confidence in each step of the process. Let’s begin this creative journey and learn how to turn yarn into timeless Christmas magic.
Choosing Materials for Your Crocheted Christmas Ornament
Selecting the right materials is an essential first step when following a Crocheted Christmas ornament-Step by Step Tutorial. Quality materials help ensure that your ornament holds its shape, displays vibrant colors, and lasts for many Christmas seasons. Start by choosing medium-weight cotton or acrylic yarn, as these fibers offer great stitch definition and are easy to work with for both beginners and experienced crafters.
For the hook, most ornaments are crocheted using smaller hook sizes. This helps keep the stitches tight and prevents stuffing from showing through. A 3.0 mm to 4.0 mm hook is often the best choice. As you work through this Crocheted Christmas ornament-Step by Step Tutorial, you’ll notice how the hook size directly affects the overall appearance and firmness of the ornament.
Another important material is stuffing. Use fiberfill stuffing that is lightweight and washable. It gives your ornament shape and volume without adding unnecessary weight. Consistency in stuffing helps your ornament look polished and professional. Many crafters gently roll the stuffing before inserting it into the ornament for an even finish.
You will also need a yarn needle, especially when working on the final assembly steps. A needle will help you close the ornament neatly and strengthen structural points. This Crocheted Christmas ornament-Step by Step Tutorial emphasizes clean finishing because well-constructed ornaments remain beautiful even after years of use.
Safety eyes or embroidery thread can also be added if your ornament has a character design. However, simple designs can be just as beautiful with minimal additions. The key is to choose embellishments that match your style and holiday theme. Creativity is encouraged throughout this tutorial.
Finally, consider adding decorative elements such as small bows, beads, or glitter yarn. While these are optional, they can elevate your crocheted ornament and make it even more unique. With the right materials in hand, you’re ready to move into the next step of the Crocheted Christmas ornament-Step by Step Tutorial.
Crocheting the Base Shape of the Ornament
To begin forming the structure of your ornament, this Crocheted Christmas ornament-Step by Step Tutorial starts with creating a simple round or oval shape. Most Christmas ornaments have a spherical base, which is achieved by crocheting in continuous rounds using a magic ring. This method ensures that your ornament begins with a clean, closed center.
Make your magic ring, then crochet six single crochets into the ring. Pull the yarn gently to close the ring. As you move into the next rounds, increase each round evenly. For example, round two will have twelve stitches, round three eighteen, and so on. This structure creates a smooth and well-proportioned base. Following this Crocheted Christmas ornament-Step by Step Tutorial precisely ensures your ornament grows evenly without gaps or irregular shapes.
Once the increase rounds are completed, you will reach the width of your ornament. Maintain this stitch count for several rounds to create depth and volume. This middle section contributes to the fullness and roundness of the ornament. Work slowly and consistently, allowing your stitches to stay uniform and tight.
When shaping the bottom half of the ornament, begin decreasing evenly just as you increased earlier. The key is to reduce stitches in a balanced pattern to create a clean sphere. This Crocheted Christmas ornament-Step by Step Tutorial recommends decreasing over several rounds until you reach a small opening where stuffing will be inserted.
Before closing the last few stitches, gently fill the ornament with stuffing. Make sure it is evenly distributed to avoid bumps or distortions. Too much stuffing can stretch the stitches, while too little may cause the ornament to collapse. Find a balanced amount that gives shape without strain.
Finish the shape by stitching the last round and closing the opening tightly. Secure your yarn with a knot and weave in the ends. Your ornament base is now complete, and you can move forward with adding details and decorative touches.
Adding Decorative Details to Your Ornament
This Crocheted Christmas ornament-Step by Step Tutorial encourages personalization, allowing you to create a one-of-a-kind decoration. Adding decorative details brings charm and character to your crocheted ornament. Begin by selecting colors that match your Christmas theme—traditional green, red, and gold tones, or modern pastel shades.
One popular detail is adding stripes. You can change yarn colors between rounds or crochet surface slip stitches once the ornament is completed. Stripes can be subtle or bold depending on the colors you choose. This technique adds texture and dimension, enhancing the overall look of your crocheted piece.
If you prefer a more playful design, consider adding small appliqués such as stars, snowflakes, or hearts. These can be crocheted separately and sewn onto the ornament securely. The Crocheted Christmas ornament-Step by Step Tutorial supports creative freedom, so feel free to experiment with different shapes and patterns.
Another beautiful detail is using sequins or beads. Sew them carefully onto the ornament to avoid loose attachments. These additions catch the light and give your ornament a festive sparkle, perfect for holiday décor. Ensure they are placed evenly for a professional appearance.
Embroidery is also a wonderful way to personalize your ornament. Simple stitches such as backstitch or French knots can form faces, swirls, initials, or decorative patterns. Crocheters often find embroidery enjoyable because it transforms a simple ornament into a keepsake with meaning.
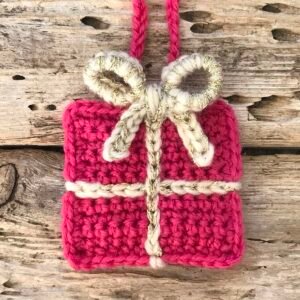
Finally, consider adding a decorative top. Many ornaments feature a small crocheted cap made from a contrasting color. This cap imitates the metal top found on store-bought ornaments. It also provides a sturdy place to attach your hanging loop. This finishing touch completes the decorative details section of your Crocheted Christmas ornament-Step by Step Tutorial.
Assembling, Hanging, and Final Touches
The last stage of this Crocheted Christmas ornament-Step by Step Tutorial focuses on assembling and preparing your ornament for display. Begin by creating a secure hanging loop. You can crochet a small chain, tie a yarn loop, or even use a ribbon that complements your design. Attach it securely to the top of the ornament to ensure durability.
If your ornament includes a decorative top piece, sew it on gently but firmly. Make sure it sits centered and covers the upper stitches neatly. This helps the ornament hang straight on the tree and adds a polished finishing touch. Little details like this make your ornament look refined and professional.
Check your ornament for any loose ends. Use a yarn needle to weave in remaining threads, especially around the joining points. This step is essential for long-lasting results. A tidy finish ensures that your ornament remains intact through years of holiday storage and reuse.
Next, shape your ornament with your hands. Gently press and smooth the surface to ensure an even round shape. Sometimes stuffing shifts during the assembly process, so this final shaping step keeps everything consistent. This Crocheted Christmas ornament-Step by Step Tutorial emphasizes neatness to create beautiful, eye-catching results.
If desired, add final embellishments such as tiny bows or glitter yarn accents. Be careful not to add too many, as simplicity often enhances elegance. Choose additions that highlight your design rather than overshadow it.
Once finished, your ornament is ready to hang proudly on your Christmas tree. Enjoy the satisfaction of creating a beautiful handmade decoration that holds sentimental value and festive charm.
Crocheted Christmas Ornaments
1. Are crocheted Christmas ornaments beginner-friendly?
Yes, many ornament designs are very beginner-friendly, especially those that follow a clear Crocheted Christmas ornament-Step by Step Tutorial. Simple stitches and repetitive rounds make the process easy to learn.
2. What type of yarn works best for Christmas ornaments?
Medium-weight cotton or acrylic yarn is recommended because it provides great stitch definition and keeps the ornament lightweight but sturdy.
3. How do I keep my ornament from losing its shape?
Use firm stitching, quality stuffing, and tight shaping. Ensure the stuffing is evenly distributed before closing the ornament.
4. Can I personalize my ornament?
Absolutely! Add embroidery, appliqués, beads, or color changes to make your ornament unique. Personalization is encouraged.
5. Do I need special tools for this project?
No. You only need yarn, a hook, stuffing, and a yarn needle. Optional embellishments can be added based on your preference.
6. How long does it take to make one ornament?
Depending on the design and the crocheter’s skill level, most ornaments can be completed in one to two hours.
Conclusion
This complete Crocheted Christmas ornament-Step by Step Tutorial showed you how to choose materials, form the base, add beautiful decorative details, and assemble your ornament with care.
Handmade Christmas decorations bring warmth and personality to your home, and creating them is both relaxing and rewarding.
I hope this tutorial helped you feel confident and inspired to create your own crocheted ornaments for the holidays. Please leave your sincere opinion and suggestions—your feedback helps improve future tutorials and inspires new creative ideas!