
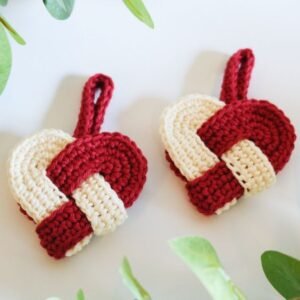
Beginning your crafting journey with a How To Crochet Heart Keychain-Step by Step Tutorial is a wonderful way to create meaningful, handmade accessories that are both beautiful and practical. This project is perfect for beginners and experienced crocheters alike, offering a quick and enjoyable experience with charming results. Using this guide, you will learn how to shape a heart, assemble your keychain, and personalize it with small details that enhance its uniqueness. The simplicity of a crocheted heart makes it an ideal gift or a keepsake that adds a special touch to your bag, set of keys, or even as a small gesture to someone you love.
Handmade keychains are becoming increasingly popular because they combine creativity with functionality. By following this How To Crochet Heart Keychain-Step by Step Tutorial, you gain the opportunity to express your personality through yarn and stitches. Crochet hearts are not only decorative but can also serve as tokens of appreciation or symbols of friendship. Many people enjoy making them as party favors, craft fair items, or thoughtful handmade gifts. This tutorial will guide you through each stage carefully, offering an easy-to-understand approach that ensures a polished final result.
In addition to offering a charming crafting project, this How To Crochet Heart Keychain-Step by Step Tutorial is designed to help you feel confident and capable, even if you are new to crocheting. The goal is to create a heart with a clean shape, firm structure, and a professional finish. You will learn how to choose the right materials, form the heart shape, assemble the keychain, and add decorative elements. By the end of this tutorial, you will be ready to create multiple hearts in different colors and sizes, each with its own special touch.
Materials Needed for Your Heart Keychain
Choosing the right materials is an essential step when following this How To Crochet Heart Keychain-Step by Step Tutorial. The items you select will determine the durability, appearance, and overall feel of your finished heart. A medium-weight cotton yarn is highly recommended because it offers excellent stitch definition and durability. Cotton also holds its shape well, ensuring your heart remains firm and visually appealing even after long use.
You will also need an appropriate crochet hook, usually between 3.0 mm and 4.0 mm. Smaller hooks help keep your stitches tight and compact, which is ideal for small projects like keychains. Loose stitches may cause gaps that allow stuffing to show through, so choosing the correct hook size will give your heart a cleaner appearance. This How To Crochet Heart Keychain-Step by Step Tutorial encourages you to test a few stitches before beginning to find the tension you prefer.
For the stuffing, fiberfill is the best option because it is lightweight, washable, and easy to work with. Try to distribute the stuffing evenly inside the heart to avoid bumps or uneven shapes. The amount of stuffing you use should be enough to give the heart a full, plush look without overstretching the yarn. This ensures a smooth and professional result.
You will also need a yarn needle. This tool is important for weaving in ends and assembling the heart. A sturdy keychain ring or lobster clasp is another essential component, as it transforms your crocheted heart into a functional accessory. Many crafters prefer rings that open easily while staying secure once attached.
Optional materials include small bows, beads, or charm accents. These embellishments can add personality to your heart keychain but should be used sparingly to maintain a balanced look. Always ensure attachments are secure, especially if the keychain will be handled frequently. With all your materials ready, you can confidently continue to the next stage of this How To Crochet Heart Keychain-Step by Step Tutorial.
Creating the Heart Shape
The most important part of this How To Crochet Heart Keychain-Step by Step Tutorial is forming the heart shape. This step requires crocheting two identical pieces that will later be joined together. Begin by creating a magic ring, which ensures the starting point is tight and secure. Work single crochets into the ring and increase evenly to create a circular shape that will form the top curve of the heart.
Once the circle is formed, you will begin shaping the upper lobes of the heart. This is achieved by working half double crochets, double crochets, and slip stitches in a specific sequence around the circle. These variations create soft curves that define the heart’s iconic shape. The combination of stitches is what gives the heart its character, and this How To Crochet Heart Keychain-Step by Step Tutorial helps you follow the correct order effortlessly.
After completing one lobe, you will repeat the same sequence on the opposite side of the circle. Precision is important to ensure both sides are symmetrical. Take your time and make sure your stitch count matches the instructions. This step is often a favorite among crocheters because watching the heart take shape feels rewarding and motivating.
Once you complete the first piece, you will crochet a second heart following the same pattern. The two pieces must align perfectly during assembly, so maintaining consistency is essential. This approach allows the heart to be stuffed, giving it a soft and rounded appearance that makes it ideal for use as a keychain. The How To Crochet Heart Keychain-Step by Step Tutorial ensures your heart looks even and polished.
Before moving on to assembly, compare both heart pieces to ensure they match in size and shape. If one piece looks slightly larger or looser, you can lightly adjust the stitches or recreate it to achieve perfect symmetry. A well-formed heart guarantees a beautiful final result once attached to your keychain.
Finally, after preparing both pieces, you can move on to the next stage of assembly. This step marks the moment when your project starts to come together visually and structurally.
Assembling and Stuffing Your Heart Keychain
In this section of the How To Crochet Heart Keychain-Step by Step Tutorial, you will learn how to join the two heart pieces and stuff them properly. Place the two heart shapes together with the right sides facing outward. Hold them firmly while you prepare to crochet around the edges. This will close the heart and give it strength, ensuring it withstands daily use on a keychain.
Begin by attaching your yarn to one corner of the heart. Work single crochets around the edges, making sure your stitches catch both layers securely. This creates a sturdy seam and prevents stuffing from escaping. As you work your way around, maintain consistent tension to avoid gaps or looseness. This step is crucial for giving your keychain a professional finish.
Before closing the final portion of the heart, insert small amounts of stuffing. Use a gentle touch and distribute the fiberfill evenly into the heart’s shape. Too much stuffing can distort the form, while too little may leave the keychain looking flat. The goal is a firm yet soft heart that feels pleasant to hold. This How To Crochet Heart Keychain-Step by Step Tutorial emphasizes precision during stuffing for the best results.
Once the heart is stuffed, complete the remaining stitches to close the seam fully. After the last stitch, fasten off and weave in any loose ends using your yarn needle. This step ensures that the heart remains intact even when used daily. Weaving in ends neatly is essential for longevity and appearance.
Finally, gently shape the heart with your hands. Push the stuffing into the curves and smooth the edges to perfect the heart shape. A few minutes of shaping helps your keychain look well-crafted and balanced, reflecting the care put into each stitch.
With your heart fully assembled, you’re ready to attach the keychain ring and make your creation functional.
Adding the Keychain Ring and Final Details
The last part of this How To Crochet Heart Keychain-Step by Step Tutorial involves transforming your crocheted heart into a practical accessory. Begin by attaching a small yarn loop, jump ring, or metal keychain clasp to the top center of the heart. This area typically aligns with the dip formed by the heart’s upper curves. Positioning the ring correctly helps the heart hang straight.
If using a metal jump ring, thread it through one or two stitches at the top of the heart. Ensure the ring closes securely to prevent the heart from slipping off during use. If using a yarn loop, crochet a small chain and fasten it firmly to the heart. Each method provides a sturdy connection, but metal hardware often adds a more polished look.
Once the keychain ring is attached, you can begin adding decorative touches. Bows, embroidered initials, small charms, or beads can personalize your heart and make it more meaningful. If giving the keychain as a gift, adding the recipient’s initial is a simple but thoughtful detail. This How To Crochet Heart Keychain-Step by Step Tutorial encourages creativity in this stage.
Check for loose ends or uneven stitches and make any necessary adjustments. Cutting excess yarn and tightening the seam ensures your keychain is durable and neat. Small finishing details make a significant difference in the appearance of the final product.
After adding decorations, test the keychain’s strength by gently pulling the ring. A secure attachment ensures the keychain is ready for everyday use. Proper finishing ensures your handmade heart withstands handling without losing shape.
At this point, your heart keychain is complete! You now have a beautiful crocheted accessory that showcases your time, effort, and creativity.
Crocheting a Heart Keychain
1. Is a heart keychain difficult for beginners?
No. This How To Crochet Heart Keychain-Step by Step Tutorial is beginner-friendly and uses simple stitches that are easy to learn.
2. What yarn type works best for crochet keychains?
Cotton yarn is recommended because it holds shape well and provides excellent stitch definition.
3. Do I need stuffing for a heart keychain?
Yes, stuffing helps give the heart volume and creates a soft, plush shape.
4. Can I personalize my keychain?
Absolutely! You can add charms, embroidery, beads, or color changes.
5. How long does it take to make a crochet heart keychain?
Depending on your skill level, it can take between 30 minutes to 1 hour.
6. Are crochet heart keychains good for gifts?
Yes, they make wonderful handmade gifts for friends, family, and special occasions.
Conclusion
This complete How To Crochet Heart Keychain-Step by Step Tutorial guided you through choosing materials, shaping your heart, assembling it, and adding final touches.
Creating a heart keychain is a fast, enjoyable, and meaningful project suitable for crafters of all skill levels.
I hope this tutorial inspired you to make your own keychains in many colors and styles. Please leave your sincere opinion and suggestions—your feedback helps improve future tutorials and encourages more creative projects!