
The Crocheted tulip bookmark-Step by Step Tutorial is a delightful guide designed for crafters who love creating small, meaningful items with a personal touch. This charming tutorial introduces you to the world of crochet bookmarks with an elegant tulip design that brings beauty and functionality together. Throughout this article, you will learn how to create an adorable tulip-inspired bookmark using simple stitches, accessible materials, and techniques suitable for all skill levels. By following this step-by-step guide, you can make a unique handmade accessory perfect for gifting, decorating journals, or adding a special flair to your favorite book.
Creating a crocheted tulip bookmark is not just about making a craft item – it is a relaxing and rewarding experience that allows you to enjoy the soothing rhythm of crochet. With the help of this Crocheted tulip bookmark-Step by Step Tutorial, you will discover how easy and enjoyable it is to bring a small flower to life using yarn and a hook. This type of project is quick, inexpensive, and satisfying for beginners, while still offering a delightful creative outlet for experienced crocheters. Its minimal materials, portability, and charming design make it ideal as a gift, craft-fair item, or personal keepsake.
As you read through this comprehensive tutorial, you will gain useful knowledge about the best yarn choices, hook sizes, stitch combinations, and finishing touches for your tulip bookmark. The Crocheted tulip bookmark-Step by Step Tutorial also includes essential tips for achieving clean stitches, shaping the tulip petals, and creating a long, elegant stem that slips easily into the pages of your book. With the right guidance, you will find that this project is simple enough for beginners yet engaging enough to spark joy in every crafter who loves handmade art.
Understanding the Crocheted Tulip Bookmark Design
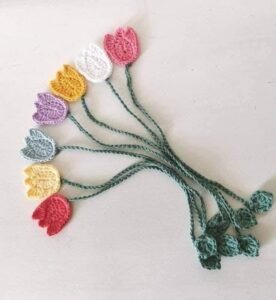
The crocheted tulip bookmark design is based on a realistic flower structure, making it both decorative and practical for everyday use. The tulip shape is formed using basic crochet stitches, allowing even beginners to achieve a neat and recognizable pattern. Each part of the bookmark plays a role in creating its overall charm and functionality, from the bloom to the stem.
The tulip bloom is typically worked in the round or built up in layers to give it a gentle three-dimensional look. This small amount of texture is what makes the bookmark visually appealing without becoming too bulky inside a book. The clear instructions in the Crocheted tulip bookmark-Step by Step Tutorial guide you through shaping the petals evenly.
The stem is long and slim, created with single crochet or chain stitches reinforced for stability. This helps the bookmark slide naturally between the pages without damaging the paper. Many crafters choose green yarn for the stem to give it a natural appearance, enhancing the botanical theme.
Some versions also include small leaves to complete the floral style. These leaves can be attached directly to the stem or slightly below the tulip bloom. The Crocheted tulip bookmark-Step by Step Tutorial explains how to keep these additions lightweight so the bookmark remains practical.
When selecting yarn, choose a smooth, non-fuzzy fiber that will not shed onto book pages. Cotton is highly recommended because it creates defined stitches and excellent durability. The tutorial suggests choosing vivid colors for the flower to add brightness and personality.
Finally, the design is incredibly versatile. You can experiment with color combinations, yarn sizes, or slightly different petal shapes while still following the main structure of the Crocheted tulip bookmark-Step by Step Tutorial. This flexibility makes the project exciting and uniquely customizable.
Materials Needed for the Tulip Bookmark
To create the project demonstrated in the Crocheted tulip bookmark-Step by Step Tutorial, you will need just a few simple materials that are easy to find and budget-friendly. Start with lightweight cotton yarn for a smooth, crisp finish. Cotton helps the petals and stem keep their shape and withstand regular use as a bookmark.
Choose at least two colors of yarn: one for the tulip bloom and one for the stem. Popular choices include pink, purple, yellow, or red for the flower, paired with green for the stem. These color combinations create a realistic and visually attractive bookmark.
A small crochet hook is also necessary, usually between 2.0 mm and 3.5 mm depending on your yarn thickness. The tutorial recommends using a hook size that produces tight and tidy stitches. This ensures the bookmark stays slim and steady between book pages.
You will also need a pair of scissors to trim yarn ends cleanly. Craft scissors or small embroidery scissors work well for this type of delicate project. A yarn needle is another important tool, used for weaving in yarn tails and attaching the flower and stem.
Stitch markers may be helpful for beginners. Even though the tulip bookmark pattern is simple, markers can help keep track of rounds or stitch counts when shaping the petals. This adds precision and clarity to your work.
By gathering all these materials ahead of time, you will be fully prepared to begin creating your tulip bookmark with confidence. With the Crocheted tulip bookmark-Step by Step Tutorial, every step is clearly explained, ensuring a smooth and enjoyable crafting experience.
Step-by-Step Instructions for Making the Tulip Bloom
The flower portion of the crocheted tulip bookmark begins with a small series of stitches that gradually expand to form the base of the bloom. Start with a magic ring or a small chain loop, depending on which technique you prefer. The tutorial provides both options to accommodate beginners.
Once the base circle is complete, you will begin working in rounds. Single crochet and half-double crochet stitches are commonly used to build the body of the tulip. These stitches create a stable structure that holds its shape well.
As you continue building the bloom, you will increase stitches at evenly spaced points around the circle. This helps the flower widen gradually and take on a natural form. The Crocheted tulip bookmark-Step by Step Tutorial explains how to position these increases correctly.
After the flower reaches the desired width, the stitches typically taper slightly to create a curved petal shape. Some patterns include small clusters or picots at the top of the petals to add texture and realism. These features make the tulip instantly recognizable.
When the bloom is complete, you will fasten off the yarn and leave a tail for sewing. This tail is later used to attach the bloom securely to the stem. Proper attachment ensures the bookmark remains durable and maintains its structure.
At this stage, you may also choose to slightly shape the petals with your fingers. Cotton yarn holds its form nicely, allowing you to adjust the bloom’s appearance without using additional tools. The tutorial encourages gentle shaping to bring your flower to life.
Creating the Stem and Finishing the Bookmark
The stem is one of the most important parts of the crocheted tulip bookmark, as it must be slim, flexible, and durable enough for regular use. You will typically begin with a long chain, adjusting its length based on your preferred bookmark size. The Crocheted tulip bookmark-Step by Step Tutorial includes helpful suggestions.
After completing the chain, many crafters work a row of single crochet stitches back across it. This reinforces the stem and gives it a polished look. If you want a firmer structure, you can add a second row, though this is optional.
Once the stem is finished, it is time to attach the tulip bloom. Using the yarn needle, sew the bloom securely to the top of the stem. Keep your stitches tight and discreet to ensure a clean appearance.
If you choose to add leaves, this is the stage to incorporate them. Leaves are typically created using small chains and single crochet stitches worked into a pointed shape. These leaf motifs can be sewn directly onto the sides of the stem.
Weaving in loose ends is essential for a neat finish. Make sure all yarn tails are trimmed and hidden to enhance the professionalism of your completed bookmark. The tutorial emphasizes proper finishing techniques to elevate your handmade item.
With all the components assembled, your crocheted tulip bookmark is now complete and ready to be enjoyed. This simple yet elegant project is both functional and decorative, making it an ideal handmade gift or personal accessory.
Frequently Asked Questions
1. Is the Crocheted tulip bookmark suitable for beginners?
Yes, this project is great for beginners because it uses basic stitches and simple construction methods.
2. What type of yarn works best for the tulip bookmark?
Cotton yarn is recommended because it creates crisp stitches and maintains shape well.
3. How long does it take to complete the bookmark?
Most crafters can finish it in under an hour, making it a quick and enjoyable project.
4. Can I make the tulip bloom larger?
Yes, you can add extra rounds or increase stitches to make the flower bigger.
5. Do I need special tools?
Only basic tools are required: yarn, a hook, scissors, and a yarn needle.
6. Are the leaves optional?
Yes, the leaves are decorative additions and can be skipped if you prefer a simpler design.
7. Can I use acrylic yarn instead of cotton?
You can, but cotton is preferred for its structure and durability.
8. Will the bookmark damage book pages?
No, the thin and soft structure makes it safe for all types of books.
Conclusion
The Crocheted tulip bookmark-Step by Step Tutorial offers a charming, creative, and accessible project suitable for all crochet enthusiasts.
From the delicate tulip bloom to the slim and practical stem, each part of this tutorial guides you through crafting a beautiful handmade bookmark.
By applying the techniques shared here, you can create a thoughtful gift, a personal keepsake, or a lovely accessory for your reading routine. If this tutorial inspired you or helped you learn something new, please share your honest opinion and leave your suggestions—I would love to hear your thoughts!