
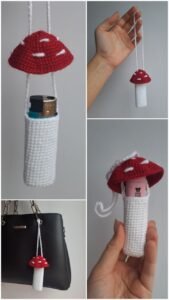
The Crocheted mushroom-shaped lipstick holder-Step by Step Tutorial is a fun, creative, and practical project perfect for crochet lovers who enjoy making adorable and functional accessories. This beginner-friendly tutorial teaches you how to create a charming mushroom-inspired container that can hold lipsticks, lip balms, or other small cosmetics. Whether you want a cute item for your vanity, a handmade gift, or a unique craft fair product, this mushroom-shaped holder adds a delightful touch to everyday beauty routines. Throughout this article, you will learn not only how to crochet the piece but also how to personalize it to match your style.
Crocheting a mushroom-shaped lipstick holder is a relaxing and rewarding craft activity. Because it uses basic stitches and simple shaping techniques, it is ideal for beginners while still enjoyable for advanced crafters. The whimsical mushroom design makes the piece visually appealing, and the sturdy structure ensures it can hold your items securely. In this Crocheted mushroom-shaped lipstick holder-Step by Step Tutorial, you will find clear explanations, helpful tips, and step-by-step guidance to help you complete the project smoothly. The small size and quick creation time make this item perfect for using leftover yarn or practicing new techniques.
This project is also a great way to explore the creative possibilities of crochet. With the Crocheted mushroom-shaped lipstick holder-Step by Step Tutorial, you can experiment with colors, textures, and embellishments to create a personalized piece that reflects your personality. From classic red-and-white mushrooms to pastel or themed versions, the options are endless. As you work through this guide, you will learn how to shape the mushroom cap, form the stem, create a secure base, and assemble everything neatly. Whether you prefer a cute, minimalist, or vibrant design, this lipstick holder can be easily adapted to suit your taste.
Understanding the Design of the Mushroom Lipstick Holder
The mushroom lipstick holder is designed to resemble a whimsical mushroom with a rounded cap and a cylindrical stem. The Crocheted mushroom-shaped lipstick holder-Step by Step Tutorial breaks down each part of the design into simple, manageable steps. The mushroom cap acts as the decorative top, while the stem serves as the container that holds your lipstick or balm. Together, these elements form a charming accessory that is both playful and functional.
The cap is typically worked in the round, starting from the center and expanding outward to create its signature dome shape. In many designs, the cap includes contrasting spots to mimic a classic mushroom look. These spots can be crocheted separately and sewn on or added directly with surface stitching. The tutorial explains how to maintain a smooth curvature and avoid uneven shaping.
The stem is crocheted as a straight or slightly tapered cylinder, depending on your chosen style. It must be sturdy enough to stand upright while holding cosmetic items. The Crocheted mushroom-shaped lipstick holder-Step by Step Tutorial recommends using tight stitches to ensure the container keeps its structure well over time. Choosing cotton or acrylic yarn helps enhance durability.
A flat or slightly rounded base is essential for stability. This base prevents the holder from tipping over, especially when storing taller lipsticks or balms. The tutorial guides you through creating a firm foundation that supports the entire piece while keeping the overall design lightweight and practical.
Color choice plays an important role in bringing the mushroom to life. Traditional designs use red for the cap and white for the stem, but other combinations can create soft, elegant, or playful variations. You can choose any palette that complements your personal taste or matches your cosmetic collection.
Finally, the overall size of the lipstick holder can be adjusted by modifying the number of rounds or rows. The Crocheted mushroom-shaped lipstick holder-Step by Step Tutorial emphasizes flexibility, encouraging crafters of all levels to customize their project to fit different lipstick sizes or to create matching sets with different heights and widths.
Materials Needed for the Mushroom Lipstick Holder
To complete the project outlined in the Crocheted mushroom-shaped lipstick holder-Step by Step Tutorial, you will need a few basic materials that are easy to find and budget-friendly. Start with your yarn selection. Cotton yarn is often recommended because it offers excellent stitch definition and forms a firm structure, which is ideal for a functional holder. Acrylic yarn also works well and provides a softer feel, depending on your preference.
Choose at least two colors: one for the mushroom cap and one for the stem. Traditional mushroom designs use red for the cap and white or beige for the stem, while spots can be made in white or contrasting shades. Feel free to explore fun colors for a unique or themed look. The tutorial encourages creativity without compromising structure.
You will also need an appropriately sized crochet hook. Depending on your yarn weight, hook sizes between 2.5 mm and 4.0 mm are commonly used. A smaller hook creates tighter stitches, which help keep the holder firm and upright. The Crocheted mushroom-shaped lipstick holder-Step by Step Tutorial suggests testing a small swatch to ensure the stitch tension is correct.
A yarn needle is required for sewing pieces together and weaving in loose ends. This tool is helpful when attaching spots to the cap or joining the cap and stem securely. Scissors are also essential for trimming yarn cleanly and maintaining a neat finish.
Some crafters like to insert a lightweight cardboard circle or plastic disc inside the base to give the holder extra stability. This is optional but can be helpful, especially if you plan to use the holder frequently or place it on smooth surfaces. The tutorial includes tips for reinforcing the base if desired.
With these materials gathered, you will be prepared to begin the project confidently. The Crocheted mushroom-shaped lipstick holder-Step by Step Tutorial ensures that even beginners can follow along easily, providing a smooth and enjoyable crafting experience from start to finish.
Step-by-Step Instructions for Making the Mushroom Cap
The mushroom cap is one of the most recognizable parts of this project, and the Crocheted mushroom-shaped lipstick holder-Step by Step Tutorial starts with creating a neat and rounded top. Begin by forming a magic ring or making a small chain circle. This will serve as the starting point for working in the round.
Once the center is established, continue by crocheting evenly spaced increases to expand the circle. These increases should be distributed carefully to maintain the dome shape without creating bumps or folds. The tutorial explains how to count stitches and place increases accurately.
As the cap grows wider, you may switch to straight rounds without increases to create height. This transition helps form the rounded sides of the mushroom cap. Pay attention to your stitch tension at this stage to keep the surface smooth and uniform.
If your design includes spots, you can create them separately using small rounds and sew them onto the cap later. Another option is to embroider spots directly onto the surface. The Crocheted mushroom-shaped lipstick holder-Step by Step Tutorial offers suggestions for both methods, depending on your skill level and preference.
When the cap reaches the desired size, you will work a few rounds of decreases to shape the underside slightly. This ensures the cap fits nicely onto the stem. You may leave a long yarn tail for sewing the pieces together during assembly.
Before moving on, you can lightly shape the cap with your hands to ensure it has an even curve. This step helps bring the project to life and prepares the piece for final assembly. With the cap complete, you are ready to construct the stem portion of the lipstick holder.
Creating the Stem and Assembling the Lipstick Holder
The stem serves as the main container section of the Crocheted mushroom-shaped lipstick holder-Step by Step Tutorial. Begin by crocheting a flat circular base using a series of increases similar to the beginning of the cap. This ensures the container sits evenly on any surface.
Once the base is ready, continue working upward in rounds without increases. This will form the cylindrical structure where the lipstick or balm will be placed. Use tight and consistent stitches to ensure the container remains firm and stable.
You may add slight shaping to the stem by working a decrease or two as the cylinder rises. This creates a subtle taper that resembles a natural mushroom shape. However, this step is optional depending on your desired style.
When the stem reaches the appropriate height, finish off your stitches and leave a tail for assembly. If you want to reinforce the base, this is the time to insert a small disc or extra layer before attaching the cap. The tutorial provides guidance for reinforcing without adding extra bulk.
Position the mushroom cap on top of the stem and sew the two parts together neatly using the yarn needle. Make sure the cap is centered and securely attached. A strong connection ensures your lipstick holder will last and maintain its shape.
Finally, weave in all loose ends and adjust the shaping of the mushroom if needed. Once finished, your crocheted lipstick holder will be ready to use, display, or gift. The completed project is charming, functional, and a perfect example of how crochet brings creativity to everyday items.
Frequently Asked Questions
1. Is the Crocheted mushroom-shaped lipstick holder suitable for beginners?
Yes, the project is great for beginners because it uses simple stitches and easy shaping techniques.
2. What yarn is best for this project?
Cotton yarn is recommended for structure, but acrylic also works well for a softer feel.
3. Can I modify the size of the lipstick holder?
Absolutely. You can add or remove rounds to adjust height and width.
4. How long does the project take to complete?
Most crafters finish it in one to two hours, depending on experience.
5. Are the spots on the mushroom cap necessary?
No, they are optional decorative elements you can include or skip.
6. Can I use this holder for other items?
Yes, it can hold lip balms, small crochet tools, or even office supplies like pens.
7. Will the holder stand upright on its own?
Yes, especially if you create a firm base or use reinforcement.
8. Can children use this lipstick holder?
Yes, but always supervise young children with small handmade items.
Conclusion
The Crocheted mushroom-shaped lipstick holder-Step by Step Tutorial offers a delightful and practical project that combines creativity, charm, and usability.
By following this tutorial, you learned how to create a beautifully shaped mushroom cap, a sturdy stem, and a stable base, resulting in a functional accessory perfect for storing lipsticks or small items.
Whether you are a beginner or an experienced crocheter, this project is enjoyable, customizable, and highly rewarding. If you enjoyed this tutorial, please leave your honest opinion and share your suggestions—I would love to hear your thoughts!