
Creating a Crocheted Hair Tie with Ears-Step by Step Tutorial is a fun and creative way to add a touch of personality to any hairstyle. This project is perfect for beginners and experienced crocheters who want to make something quick, cute, and practical. Hair ties with crochet ears have become widely popular because they blend fashion with functionality, making them ideal for gifts, craft sales, or personal use. With just a few simple materials and basic crochet stitches, you can create a charming accessory that adds a playful flair to your look.
This Crocheted Hair Tie with Ears-Step by Step Tutorial is ideal for using up leftover yarn, experimenting with colors, and crafting matching sets for different outfits. Many people love these handmade accessories because they are soft, comfortable, and do not damage hair the way some traditional elastics do. By making them yourself, you can control the size, color, and shape, ensuring the perfect fit for adults, teens, or children. The versatility of this project allows you to create themed designs such as bunny ears, cat ears, bear ears, or even fantasy-inspired shapes.
When you follow this Crocheted Hair Tie with Ears-Step by Step Tutorial, you learn how to crochet the base band, create the ears, and attach everything neatly to an elastic hair tie. The process is simple enough for beginners yet enjoyable and rewarding for experienced crafters. The finished product is lightweight, durable, and stylish, making it an excellent addition to your collection of handmade accessories. In this article, you will find detailed instructions, helpful tips, and creative ideas to ensure your crocheted hair tie turns out beautifully.
Choosing the Right Materials for Your Hair Tie
When starting this Crocheted Hair Tie with Ears-Step by Step Tutorial, selecting the right materials is essential to achieving the best results. Soft but sturdy yarn works best, especially cotton blends, because they hold their shape while remaining gentle on hair. Cotton yarn also creates clean stitch definition, allowing the ears to look crisp and symmetrical. You can also use acrylic yarn for a fluffier, more flexible look.
The next important detail is choosing a high-quality elastic hair tie. It should be strong, durable, and free from metal parts that could damage hair. Plain elastic bands work well because the crochet layer provides additional softness. Select an elastic color that matches or complements your yarn to keep the final design visually appealing.
A suitable crochet hook will help ensure the neatness and consistency of your stitches. Most crocheters prefer hook sizes between 2.5 mm and 4 mm for small accessories like this. Using a smaller hook creates tighter stitches, giving your ears a more structured, professional finish. Always match your hook size to your yarn to maintain the correct tension.
You will also need basic tools such as scissors and a yarn needle. The yarn needle is essential for weaving in ends and sewing the ears onto the elastic band. Choosing sharp scissors makes it much easier to trim yarn cleanly and avoid fraying, which can make the finished accessory look messy.
Another helpful addition is stitch markers, especially if you are new to crocheting in the round. They help keep track of increases and decreases while shaping the ears. Keeping your work organized contributes to a more polished final result, particularly when making multiple hair ties for sale or gifts.
Before starting the project, take a moment to prepare your workspace. Lay out your materials neatly and choose a well-lit area to work in. This will make it easier to see your stitches clearly and follow this Crocheted Hair Tie with Ears-Step by Step Tutorial with confidence.
Crocheting the Base Hair Tie
The foundation of this Crocheted Hair Tie with Ears-Step by Step Tutorial is the crocheted band that wraps around the elastic. This is usually done by working single crochet stitches around the hair tie to cover it completely. This simple step creates a soft, decorative base that complements the ears you will add later.
Start by attaching your yarn to the elastic hair tie using a slip knot. Hold the elastic firmly as you work your first few stitches to ensure they sit tightly and evenly around the band. The beginning may feel a bit awkward, but after a few stitches, the grip becomes more stable and smoother to handle.
Continue working single crochet stitches evenly around the entire elastic band. Make sure the stitches are close together so that the elastic is completely covered. Gaps between stitches may cause the elastic to show, which can detract from the final appearance. Consistency is key for creating a clean and attractive base.
Once you have crocheted all the way around, join with a slip stitch to close the round. Depending on the thickness of your yarn, you may add a second round to achieve fuller coverage. A thicker band adds durability and gives the ears a stronger foundation when they are sewn on later.
After finishing the band, fasten off your yarn and weave in all loose ends using a yarn needle. This step is important for preventing unraveling and maintaining a tidy look. A polished base ensures that the rest of your Crocheted Hair Tie with Ears-Step by Step Tutorial builds on a clean and secure foundation.
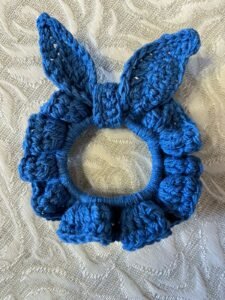
Now that the hair tie band is complete, you can move on to creating the ears. Whether you choose cat, bear, bunny, or fantasy ears, the process is enjoyable and customizable. This flexibility is what makes crocheted hair ties such a fun and expressive project.
Shaping and Crocheting the Ears
In this Crocheted Hair Tie with Ears-Step by Step Tutorial, the ears are the highlight of the project. The shape and size of the ears can vary depending on the style you want to achieve. Basic ear shapes are typically formed by crocheting small triangles, ovals, or rounded shapes. Each can be customized with color changes or added details.
Start each ear by creating a small base chain or magic ring. The magic ring works well for rounded or oval ears, while foundation chains are ideal for triangular shapes. Work your stitches tightly so the ears maintain structure and stand upright when attached to the band. Tighter tension ensures the accessory looks sharp and professional.
For round or oval ears, you will work several rounds of single crochet, increasing gradually to reach the desired width. For triangular ears, work in rows, increasing at the edges to shape the point. These basic techniques allow you to create a wide variety of ear styles without complicated stitches.
Once the main shape is complete, you may choose to add a border around the ear for a more defined look. This border can be made with slip stitches or single crochet stitches. Edging helps the ears maintain their shape and prevents curling, which is especially important for larger or more detailed designs.
Make two matching ears, checking that they are symmetrical in size and shape. Place them side by side to compare alignment and adjust if necessary. The consistency between both ears contributes greatly to the polished look of your finished hair tie.
After completing both ears, leave a long tail on each one for sewing. This tail will be used to attach the ears to the crocheted band. Preparing the ears correctly ensures an easier and more secure assembly process later on.
Attaching the Ears and Finishing the Project
This part of the Crocheted Hair Tie with Ears-Step by Step Tutorial focuses on assembly. Position the ears on the crocheted band where you want them. Most people place the ears centered at the top of the hair tie, but you can also angle them for a playful or whimsical look.
Use the long yarn tails to sew the ears firmly onto the band. Insert the yarn needle through both the ear and the stitches of the band, pulling tightly to secure each piece. Work evenly across the base of each ear to ensure stability. This is important because hair ties get stretched frequently during use.
Once both ears are securely attached, weave in any remaining yarn ends. Tidy finishing ensures your accessory looks neat and professional. A clean underside also prevents hair from snagging or catching on loose threads.
At this stage, you can add optional decorative details. Some crafters embroider inner ears, add tiny bows, or attach lightweight appliqués. These details make your hair tie even more unique and can be customized to match clothes, seasons, or special events.
Finally, test your hair tie by stretching it gently to make sure all stitches hold well. A durable construction guarantees long-lasting use and helps the ears maintain their shape. This step ensures your finished accessory is practical as well as cute.
Your personalized Crocheted Hair Tie with Ears-Step by Step Tutorial project is now complete. You can make multiple versions in different colors, styles, and ear shapes. They make wonderful gifts, craft-fair items, or useful accessories for daily wear.
Crocheted Hair Tie with Ears
1. Is this project suitable for beginners?
Yes, the stitches used in this Crocheted Hair Tie with Ears-Step by Step Tutorial are simple and ideal for beginners.
2. What yarn works best for crocheted hair ties?
Cotton or cotton-blend yarn is recommended because it is soft, durable, and provides good stitch definition.
3. How long does it take to make one hair tie?
Most crafters can complete a hair tie in 20 to 40 minutes, depending on the complexity of the ears.
4. Can I use any type of elastic band?
Choose a smooth, metal-free elastic hair tie to avoid damaging hair and to ensure comfortable use.
5. How do I make the ears stand upright?
Use tight stitches, add an edging for firmness, and sew the ears securely to the band.
6. Can these hair ties be washed?
Yes, they can be hand-washed gently and air-dried to maintain their shape.
Conclusion
This Crocheted Hair Tie with Ears-Step by Step Tutorial has guided you through the entire process of selecting materials, crocheting the band, shaping the ears, and assembling your final accessory.
With simple techniques and endless customization options, this project is perfect for crafters of all skill levels.
You now have the knowledge to create adorable, practical, and stylish hair ties for yourself or as thoughtful gifts. I hope you enjoyed this tutorial, and I invite you to leave your honest opinion and suggestions so I can continue bringing helpful and creative content for your crafting journey.