
Starting this guide with the phrase Make a crocheted coaster in the shape of a water lily–Step by Step Tutorial, this article is designed to help you create a beautiful, functional, and decorative handmade piece while learning new techniques in crochet. The project is simple enough for beginners yet detailed enough to satisfy experienced crafters who love creating unique home décor. By following this Step by Step Tutorial, you’ll master the structure, shape, and style of a charming water-lily-inspired coaster that adds color and personality to any table setting. Throughout the text, the main keyword Make a crocheted coaster in the shape of a water lily–Step by Step Tutorial will guide the learning process and support SEO optimization while keeping the article friendly and engaging.
The idea of creating a coaster shaped like a water lily brings together creativity and practicality. Handmade coasters have become increasingly popular because they add a touch of warmth and individuality to a room, and crocheting one in the form of a flower gives even more visual appeal. This Make a crocheted coaster in the shape of a water lily–Step by Step Tutorial focuses on using simple stitches, basic techniques, and easy patterns that build upon each other. By dedicating just a little time, you can craft a stunning floral coaster that works as a table protector, a décor piece, or even a thoughtful gift for friends and family.
Before beginning this Make a crocheted coaster in the shape of a water lily–Step by Step Tutorial, it’s important to gather your materials and understand the basic construction. You’ll typically need cotton yarn, a hook size appropriate for your yarn weight, a tapestry needle, and scissors. Cotton yarn is preferred because it is durable, heat-resistant, and easy to wash, making your coaster functional as well as beautiful. As you move through this tutorial, focus on taking your time with each stitch, keeping tension consistent, and enjoying the process. Crocheting a water lily coaster is not only about making a decorative item but also about embracing creativity, relaxation, and joy.
Understanding the Base Structure of the Water Lily Coaster
The first part of the Make a crocheted coaster in the shape of a water lily–Step by Step Tutorial is to understand the circular base that forms the foundation of the flower. Most crochet coasters begin with a magic ring or a chain loop, which allows the stitches to build evenly and form a symmetrical round shape. This base is essential because it determines the final size and stability of your water lily.
When constructing the base, use tight, even stitches to prevent the coaster from becoming floppy or uneven. The circle grows gradually by adding increases in each round, and the number of increases affects the flatness of your coaster. A common technique involves crocheting two stitches into one stitch evenly around the circle in each round, creating a perfect disk shape.
The key to building a sturdy foundation is maintaining consistency. If the circle puckers, there may be too many stitches; if it curls into a bowl shape, there may not be enough. Adjusting your tension or stitch count solves this easily, helping you master this foundational skill for this Step by Step Tutorial.
Once you complete the circular base, you’ll notice the flat and smooth surface that makes it ideal for a functional coaster. This flatness prevents cups or mugs from wobbling and ensures that the water lily shape will stand out beautifully. A well-made base also enhances the durability of your finished piece.
The base is not only practical but also serves as the canvas for the decorative petals. The better the base is made, the more symmetrical and attractive your flower coaster will appear when complete. With this firm foundation, you can confidently move on to the next part of this Make a crocheted coaster in the shape of a water lily–Step by Step Tutorial.
Creating the Water Lily Petals
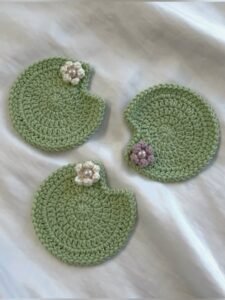
The second major step in the Make a crocheted coaster in the shape of a water lily–Step by Step Tutorial focuses on forming the petals that give the water lily its iconic shape. Water lilies typically have multiple layers of petals, and crocheting them adds dimension and beauty to the coaster. You’ll begin by attaching yarn in a new color, usually white, pink, yellow, or purple, depending on your artistic preference.
The petals are created by working clusters of stitches—often double crochets or treble crochets—that give each petal height, width, and shape. These clusters are formed in evenly spaced sections around the circular base, creating balance and symmetry. The more petals you add, the fuller and more realistic your water lily will look.
After forming the first round of petals, you can add another layer behind them to create depth. This second layer is usually placed between the gaps of the first layer, giving a natural staggered effect. This method is easy to follow and adds an impressive three-dimensional finish to the flower.
Each petal should have a gentle curve, which can be shaped as you crochet or adjusted afterward by lightly pulling the stitches. The softness of the petals creates the delicate look that water lilies are known for. This part of the Step by Step Tutorial invites crafters to experiment with petal size, texture, and style.
By the time both layers of petals are complete, your coaster will already resemble a beautiful handcrafted flower. The petals transform the flat circle into a charming decorative piece that stands out in any setting. With the petals finished, you’re ready to add details that bring the water lily to life.
Adding Details to Enhance the Water Lily Design
This portion of the Make a crocheted coaster in the shape of a water lily–Step by Step Tutorial focuses on refining and enhancing the beauty of your coaster. Small details can make a big difference in bringing realism and personality to your handmade water lily.
One common detail is adding a center accent, often made with a contrasting color like yellow. The center may be created with a small circle of single crochets or a simple cluster that resembles the stamen of a real water lily. This touch instantly adds charm and makes the flower more visually appealing.
You can also shape or refine the petals by slightly blocking them. Blocking helps the petals sit neatly, prevents curling, and gives the flower a more defined silhouette. Light steaming or manual shaping works perfectly for cotton yarn.
Detailing also includes securing all loose ends neatly. Using a tapestry needle, weave each end through the stitches on the backside to maintain a clean, polished appearance. This ensures your coaster looks professional and lasts longer with repeated use.
Color personalization is another way to enhance your project. Soft pastels create a delicate look, while bold colors deliver a modern and vibrant style. The flexibility to customize colors makes this project fun and adaptable to your décor.
These finishing touches elevate your handmade piece and complete this phase of the Make a crocheted coaster in the shape of a water lily–Step by Step Tutorial, preparing you for the final assembly and care tips.
Final Assembly and Care Tips
The last part of this Make a crocheted coaster in the shape of a water lily–Step by Step Tutorial teaches you how to assemble all parts smoothly and keep your coaster looking beautiful over time. Assembly is simple yet crucial for ensuring your coaster lies flat and holds its shape.
Begin by placing all layers neatly together, making sure the petals are evenly positioned. If you added multiple layers, check that each one aligns correctly and complements the others. Adjust spacing manually if needed.
Once satisfied with the arrangement, gently press the flower with your hands to help the stitches settle. Some crafters prefer lightly blocking the entire piece to help it stay perfectly flat, especially if using natural fibers.
Taking care of your coaster is equally important. Since cotton is durable, your water lily coaster can be washed by hand with mild soap and reshaped while drying. This keeps it looking fresh and new even after repeated use.
Storing your coasters flat will prevent unwanted bending or distortion. If gifting them, consider wrapping them in tissue paper to maintain their shape. This simple maintenance routine keeps the beauty and structure of your handmade design intact.
By completing this final step, you have successfully followed a complete Make a crocheted coaster in the shape of a water lily–Step by Step Tutorial, mastering the process from start to finish.
Make a Crocheted Coaster in the Shape of a Water Lily
1. Is this project beginner-friendly?
Yes, this project is suitable for beginners who are comfortable with basic stitches. The step-by-step structure makes learning easy.
2. What is the best yarn for this coaster?
Cotton yarn is recommended because it is absorbent, heat-resistant, and durable.
3. How long does it take to complete one coaster?
Most crafters can complete one in about one to two hours, depending on skill level.
4. Can I use different colors for the petals?
Absolutely. This project allows full color customization to match your personal style.
5. Will the coaster lie flat after adding petals?
Yes, as long as the base is constructed properly and the petals are spaced evenly.
6. Can I sell the finished coasters?
Yes, handmade water lily coasters make wonderful items for selling or gifting.
Conclusion
This complete Make a crocheted coaster in the shape of a water lily–Step by Step Tutorial has guided you through each stage of creating a beautiful, functional, and decorative handmade piece.
You learned how to form the base, create layered petals, add details, assemble the coaster, and care for it over time.
I hope this tutorial inspires your creativity and brings joy to your crafting journey. Please leave your honest opinion and suggestions so I can continue improving future tutorials.