
Starting this article with the main keyword Here’s a gift idea: this crocheted Christmas elf.-Step by Step Tutorial, this guide is perfect for anyone looking to create a charming handmade Christmas gift. Crocheting a festive elf not only brings joy to the holiday season but also gives you the chance to craft something meaningful and personalized. Throughout the text, the term Here’s a gift idea: this crocheted Christmas elf.-Step by Step Tutorial will be used strategically to help readers follow along and to keep the article optimized for SEO while maintaining a natural and engaging tone. Whether you’re a beginner or an experienced crocheter, this project is enjoyable, satisfying, and ideal for the holiday spirit.
Handmade gifts hold special meaning, and this Here’s a gift idea: this crocheted Christmas elf.-Step by Step Tutorial focuses on creating a small, adorable elf that can be gifted to adults and children alike. A crocheted Christmas elf can be used as an ornament, a decorative doll, a stocking stuffer, or even a keychain. This versatility makes it a thoughtful and creative gift option for the festive season. By following these steps carefully, you will learn how to shape the elf, assemble the parts, choose the right colors, and add details that make the piece truly unique.
Before diving into this Here’s a gift idea: this crocheted Christmas elf.-Step by Step Tutorial, take a moment to prepare your materials and understand the structure of the project. You will typically need yarn in festive colors, a crochet hook of the appropriate size, stuffing material, a tapestry needle, and optionally safety eyes or embroidery thread for the facial features. Working with soft yarn and simple shapes, this project is accessible, relaxing, and rewarding. Each step builds upon the previous one, gradually forming an adorable Christmas elf that is perfect for holiday celebrations and gift-giving.
Preparing the Materials and Understanding the Structure
The first part of the Here’s a gift idea: this crocheted Christmas elf.-Step by Step Tutorial focuses on selecting and preparing the materials. Choosing yarn in classic Christmas shades such as red, green, and white helps bring the festive spirit into your project. Cotton or acrylic yarns work beautifully, offering durability and a clean stitch definition that enhances the final look of your crocheted elf.
Once you gather your materials, take time to understand the general structure of the elf. Most crocheted dolls are worked in separate parts: head, body, arms, legs, hat, and accessories. Each part is crocheted individually and later joined together. This modular structure makes the project easy to follow and ideal for beginners.
Before you begin stitching, check your tension. Consistent tension is essential for creating pieces that fit together neatly. If your stitches are too loose, the stuffing may show; if they are too tight, the fabric may become rigid. Adjusting tension ensures your Christmas elf looks smooth and well-shaped.
It’s helpful to review the basic stitches used throughout this Step by Step Tutorial. Single crochet, increases, and decreases form the foundation of most amigurumi-style dolls. These simple techniques allow you to mold round shapes, define curves, and give structure to your elf.
Using a stitch marker helps keep track of rounds as you work in continuous spirals. This prevents uneven transitions and ensures the elf’s head and body maintain a smooth, symmetrical appearance. Good preparation helps the project flow easily from one step to the next.
By organizing materials and understanding the structure beforehand, you set the stage for a successful and enjoyable crafting process. With the basics covered, you can confidently start shaping the core parts of your crocheted Christmas elf.
Shaping the Elf’s Head and Body
This section of the Here’s a gift idea: this crocheted Christmas elf.-Step by Step Tutorial explains how to crochet the head and body, the central components of your holiday elf. The head is typically worked first, beginning with a magic ring that forms the foundation for a round, smooth shape. Gradually increasing stitches allows the head to expand evenly.
Once you reach the desired circumference, you will work several rounds without increases to give the head its height. Using soft stuffing, fill the head gently but firmly to help it maintain its round shape. The firmness of the stuffing plays a big role in how polished and professional the final doll looks.
Next, the body is worked in a similar manner but usually shaped more narrowly toward the top and slightly wider toward the bottom. This subtle shaping gives the elf a childlike, charming appearance. Using festive colors helps bring out the Christmas theme in the body design.
Stuffing the body evenly ensures it connects smoothly with the head. Leaving the top slightly firm helps the two parts align neatly when stitched together. Using a tapestry needle, join the head and body securely.
This section of the Step by Step Tutorial emphasizes taking your time to shape and stuff properly. Rushing can lead to uneven sections or lumps. A carefully shaped head and body set the tone for the rest of the elf.
Once the main structure is complete, your elf will begin to resemble a small doll. You are now ready to move on to creating the arms, legs, and other small components that bring the elf to life.
Adding Limbs, Hat, and Facial Features
The next part of this Here’s a gift idea: this crocheted Christmas elf.-Step by Step Tutorial focuses on making the limbs, hat, and face. The arms and legs are usually worked in tubes of single crochet stitches, slightly stuffed to keep them soft and flexible. This gives your elf a cuddly and approachable look.
The legs often use alternating colors to mimic striped elf stockings. This fun detail adds charm and helps your Christmas elf stand out. Once completed, sew the legs neatly to the lower part of the body.
The arms require less stuffing to keep them thin and proportional. Attaching them slightly below the neck area helps create a natural shape. Make sure both arms are aligned evenly to maintain symmetry.
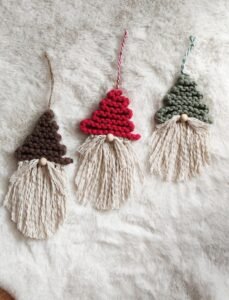
Creating the hat is one of the most enjoyable parts of this Step by Step Tutorial. Elf hats are often cone-shaped with a small brim or decorative trim. Using bright colors and adding a small pom-pom can enhance the festive spirit.
The facial features complete the character. Safety eyes are easy to install, but you can also embroider eyes using black thread for a softer look. A small embroidered smile brings personality, while a tiny nose—sometimes made with a single stitch—adds charm.
Once all parts are assembled, your elf begins to look lively and joyful. These details help make the project unique and give the crocheted Christmas elf a warm expression that captures the holiday spirit.
Final Assembly and Gift Presentation
This part of the Here’s a gift idea: this crocheted Christmas elf.-Step by Step Tutorial focuses on assembling the final details and preparing your elf for gifting. Carefully sewing each part ensures durability, especially if the elf is intended for a child. Use tight, secure stitches for every joint.
Once all components are attached, check the elf from every angle to ensure symmetry. Adjust small details by shaping the stuffing or smoothing stitches with your fingers. These small improvements elevate the overall quality of your handmade gift.
Consider adding small accessories to personalize your elf. A miniature scarf, a tiny belt, or a crocheted gift bag can make the doll even more special. These extras are optional but add charm and creativity to the project.
Before gifting, make sure your crocheted elf is clean and free from loose fibers. Lightly brushing the surface with your hands can remove lint and help the stitches settle neatly.
Presentation plays a key role in gift-giving. Wrapping your crocheted elf in soft tissue paper or placing it inside a small gift box makes the experience more special. Handmade items deserve beautiful presentation to match the love put into creating them.
By completing this part of the Step by Step Tutorial, your Christmas elf is ready to be enjoyed, admired, and treasured as a heartfelt gift.
Here’s a Gift Idea: This Crocheted Christmas Elf
1. Is this crocheted elf suitable for beginners?
Yes, beginners familiar with basic stitches can complete this project by following the tutorial carefully.
2. What type of yarn works best for the elf?
Acrylic or cotton yarn works beautifully because it holds shape well and is easy to handle.
3. How long does it take to complete the elf?
Most crafters finish it within a few hours to one day, depending on skill level.
4. Can I customize the colors of the elf?
Absolutely. Feel free to choose any festive or personalized colors to match your holiday theme.
5. Is stuffing required?
Yes, soft stuffing helps the elf maintain its shape and gives it a polished appearance.
6. Can children play with this crocheted elf?
Yes, but if gifting to a young child, avoid small detachable parts like safety eyes.
Conclusion
This complete Here’s a gift idea: this crocheted Christmas elf.-Step by Step Tutorial has shown you how to create a festive, meaningful, and adorable handmade Christmas gift.
You learned how to prepare materials, shape the head and body, add limbs and details, assemble the elf, and present it beautifully.
I hope this tutorial inspires your creativity and adds joy to your holiday crafting. Please leave your honest opinion and suggestions so I can continue improving future tutorials.