
Starting this article with the main keyword DIY Fabric Clip for Threads-Step by Step Tutorial, this guide will teach you how to create a simple, practical, and beautiful tool for organizing loose threads. Many crafters struggle with leftover pieces of thread that end up tangled in sewing boxes, bags, or drawers. With this DIY Fabric Clip for Threads-Step by Step Tutorial, you will learn an accessible way to keep everything neat and easy to find. Whether you enjoy sewing, quilting, embroidery, or any type of textile craft, this fabric clip will become an essential part of your workspace. Throughout this article, the keyword will be used naturally to ensure great readability and strong SEO performance.
When working on sewing or embroidery projects, staying organized can make the entire creative process smoother and more enjoyable. This DIY Fabric Clip for Threads-Step by Step Tutorial was designed to help crafters at all levels maintain a clean and efficient workspace. The fabric clip is easy to make, requires very little material, and can be customized with colors, patterns, and shapes. This tutorial also promotes sustainability, since you can use leftover fabric scraps, making it an environmentally friendly solution for thread storage.
Before moving to the hands-on part of this DIY Fabric Clip for Threads-Step by Step Tutorial, it’s important to understand how useful this accessory can be in your daily crafting routine. Fabric clips keep threads separated, prevent tangling, and make it easier to store small pieces of yarn or floss. This not only helps reduce waste but also saves time, especially when you need to find the right color quickly. Creating your own fabric clip also lets you explore creativity and add personality to your sewing tools. With these ideas in mind, let’s begin breaking down the steps needed to craft your own clip for threads.
Choosing Materials and Preparing Your Workspace
The first part of this DIY Fabric Clip for Threads-Step by Step Tutorial begins with selecting the right materials. You will need small pieces of fabric, interfacing or felt for structure, scissors, thread, and a sewing machine or hand-sewing needle. Many people prefer cotton fabric because it is easy to sew and durable. Using scraps is a great option because it keeps this project both economical and eco-friendly.
Once you choose the materials, take time to prepare your workspace. Having everything organized makes the process easier and more enjoyable. A clean surface, good lighting, and accessible tools are essential for achieving neat results. This preparation also ensures that the clip pieces will be cut and assembled correctly.
Cutting the fabric is one of the most important early steps. Carefully measure and cut identical pieces to ensure your fabric clip has consistent structure. Using a rotary cutter can help achieve sharp, clean edges, but regular scissors also work well with careful cutting.
Before sewing, attach interfacing or felt to the wrong side of your fabric if you prefer a firmer clip. This step gives the final piece structure and helps it hold threads securely. It also prevents the clip from losing its shape over time.
Pinning the pieces together is an essential part of preparation. Proper pinning keeps the fabric layers from shifting while you sew. This leads to a precise, professional finish. Take your time aligning all edges correctly.
Reviewing your materials and workspace one last time before beginning the construction phase helps prevent mistakes. With everything ready, you can confidently move into the sewing steps of this Step by Step Tutorial.
Sewing the Fabric Clip Base
This phase of the DIY Fabric Clip for Threads-Step by Step Tutorial focuses on assembling the clip’s base. Begin by placing your fabric pieces right sides together. Sew around the edges, leaving a small opening for turning the piece inside out. This method helps hide the seam and gives the clip a polished finish.
After sewing the main outline, trim any excess fabric from the corners to reduce bulk. This ensures that once the piece is turned right side out, the corners remain sharp and neat. Small details like this make a noticeable difference in the final appearance.
Next, turn the sewn fabric inside out using a turning tool, knitting needle, or the tip of scissors. Gently push the corners outward to achieve the correct shape. At this stage, the base of your clip should already look smooth and well-formed.
To reinforce the structure, topstitch around the entire piece once it has been turned. This adds durability and creates a clean, decorative border. It also closes the opening previously left for turning. Many crafters enjoy using contrasting thread colors for this step to add personality.
Once the base is complete, test its flexibility. It should be firm enough to hold thread but soft enough to fold or press slightly. If the texture feels too flimsy, you can add another layer of interfacing for reinforcement.
This completes the foundational structure in the Step by Step Tutorial, preparing you for the next step: forming the clip shape and attaching closure elements.
Forming the Clip and Adding Closure Details
This part of the DIY Fabric Clip for Threads-Step by Step Tutorial covers shaping the clip into a functional organizer. Start by folding the finished fabric base in half, forming a clamshell-like shape. This creates the pocket where threads will be held securely.
Once folded, sew a straight line along the lower section of the clip to create a hinge-like effect. This allows the top section to lift and close smoothly. Even stitching in this step ensures durability and long-term use.
Adding the closure is the next step. You can choose between velcro, snaps, or small buttons. Velcro is the easiest option and offers fast opening and closing. Snaps provide a neater look and hold strong, especially for thicker thread bundles.
Sew your chosen closure securely, reinforcing the edges so the clip can withstand frequent use. Place the closure so that when the clip closes, both sides align perfectly. Misaligned closure pieces can cause the clip to bend or sit unevenly.
Now test how the clip opens and closes. It should feel firm and smooth. Adjust the closure if necessary before moving forward. A functional closure is essential for keeping threads contained.
Once this shaping and closure section is complete, your fabric clip is fully functional. The following step in the Step by Step Tutorial focuses on decoration and personalization.
Decorating and Personalizing Your Clip
This area of the DIY Fabric Clip for Threads-Step by Step Tutorial invites you to add creativity and personal touches. Decoration is optional but highly recommended, as it transforms the clip from a basic tool into something charming and enjoyable to use.
One simple way to personalize the clip is to use printed fabrics. Floral, geometric, or holiday patterns can add personality. Using scraps from past sewing projects can also create sentimental value.
Another option is to add embroidery to the surface of the clip. Small flowers, initials, or decorative lines can make the piece more visually appealing. Embroidery also strengthens certain areas of the clip.
You can also sew small appliqués or buttons onto the clip. These embellishments should be lightweight so they do not interfere with the clip’s functionality. They add a touch of whimsy and allow you to match the clip with your other sewing accessories.
If you prefer a functional decorative approach, attach a small fabric loop so the clip can hang from hooks or organizers. This adds practicality and keeps your workspace even more organized.
Take your time decorating your clip. Personal touches make crafting more enjoyable and turn a simple tool into a beautiful extension of your artistic style. This completes the creative phase of this Step by Step Tutorial.
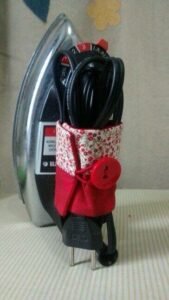
DIY Fabric Clip for Threads
1. What materials do I need to make a fabric thread clip?
You only need fabric scraps, interfacing or felt, scissors, thread, and a sewing machine or needle.
2. Can I make this project as a beginner?
Yes, this tutorial is beginner-friendly and uses basic sewing techniques.
3. What is the best fabric type for the clip?
Cotton fabric is recommended because it is durable and easy to sew.
4. How big should the clip be?
The size may vary, but most clips measure between 6 to 10 cm when finished.
5. Can I hand-sew the entire clip?
Yes, hand-sewing works perfectly fine, although it may take longer.
6. What closure type is strongest?
Snaps offer strong closure, but velcro is the easiest to apply and use.
Conclusion
This complete DIY Fabric Clip for Threads-Step by Step Tutorial has shown you how to choose materials, assemble the base, shape and close the clip, and personalize your final piece.
With this guide, you can create a practical and beautiful tool for keeping your sewing threads organized. I hope this tutorial inspires creativity and helps you maintain a tidy crafting environment.
Please leave your honest opinion and suggestions so I can continue offering helpful and enjoyable tutorials.