
Starting this crocheted Christmas ball tutorial for hanging-Step by Step Tutorial, you will discover how simple, creative, and relaxing it can be to crochet your own festive decorations. Using the crocheted Christmas ball tutorial for hanging-Step by Step Tutorial creates not only a beautiful ornament but also a meaningful handmade piece that adds warmth to any holiday display. Whether you are a beginner or an experienced crafter, this guide will help you confidently make your own Christmas ball with clear explanations and practical tips.
Creating a crocheted Christmas ball is a charming way to personalize your holiday décor. Handmade ornaments bring a unique touch to Christmas trees, garlands, mantels, or gift packaging. By following this Step by Step Tutorial, you will learn the essential techniques for making a sturdy, well-shaped ornament that will last for many seasons. This project is also an excellent choice for using leftover yarn, making it accessible, affordable, and environmentally friendly.
In this article, the crocheted Christmas ball tutorial for hanging-Step by Step Tutorial will guide you through each stage of the process, from selecting the right materials to assembling the final ornament. Before the first subtitle, you’ll find essential information to prepare your project, and as you move forward, the structured sections will help you understand every detail. The text is written in a humanized, warm tone while still optimized for SEO, with clear keyword placement and attention to readability. Let’s begin creating a festive treasure you can proudly display or gift.
Choosing Materials for Your Crocheted Christmas Ball
Selecting the right materials is essential for a successful crocheted Christmas ball tutorial for hanging-Step by Step Tutorial. The type of yarn you use will determine the texture, shine, and overall appearance of your ornament. Cotton yarn is often the best choice because it provides a defined stitch and a clean finish. Acrylic yarn can also be used if you prefer something soft or available in more festive color options.
Another essential material for this project is the crochet hook. A smaller hook typically works better because it creates tighter stitches that help the ball maintain its shape. Always choose a hook size that matches your yarn label recommendations, but feel free to use a slightly smaller hook if you want a firmer structure.
You will also need stuffing material. Polyester fiberfill is a great option because it is lightweight, easy to work with, and keeps your ball fluffy without deforming over time. Make sure to stuff the ornament gradually so the shape forms evenly. A small ribbon or yarn loop will also be necessary for hanging your finished decoration.
A stitch marker can help you keep track of your rounds, especially if you are working in continuous spirals. This simple tool ensures your increases and decreases stay aligned, giving your ornament a professional and polished appearance. Although optional, it is highly recommended for beginners.
Finally, you may want to add decorative elements such as beads, sequins, or embroidery. While optional, these embellishments can enhance the charm of your Christmas ball. Make sure any decorative pieces are securely attached so the ornament remains safe and durable during use.
Step-by-Step Instructions for Crocheting the Ball
To begin the crocheted Christmas ball tutorial for hanging-Step by Step Tutorial, you will start by forming a magic ring. This foundation technique allows the first round of stitches to close tightly, which is important for preventing stuffing from escaping through gaps. Insert six single crochets into the ring and pull it closed to form the base of the ball.
In the next rounds, you will increase stitches to give the ornament its round shape. Typically, you will increase evenly in each round, creating a dome-like structure. This phase is crucial because it determines the overall size and symmetry of your ball. Keep your tension consistent to avoid an uneven surface.
Once you reach the widest section, continue crocheting without increasing. This creates the perfect round middle body of the ornament. Maintaining even stitches during this phase ensures your Christmas ball looks smooth and professional. It also allows enough space to add stuffing later.
When the ball is halfway closed, begin filling it with fiberfill. Add small amounts at a time to prevent lumps or uneven shapes. The stuffing should be firm enough to support the structure but not overly tight, as too much tension can cause stitches to stretch.
After adding the stuffing, continue decreasing stitches to close the ornament. These decreases must be evenly spaced to maintain the ball’s roundness. Once only a few stitches remain, finish off the work by cutting the yarn and weaving in the ends carefully so they stay hidden.
Before moving to the next section, attach a loop for hanging. A simple chain made from yarn or a small ribbon works perfectly. Secure it firmly at the top of the ornament so it can withstand repeated use and movement every holiday season.
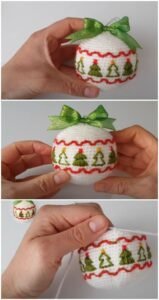
Adding Decorative Details to Your Ornament
After completing the basic shape in the crocheted Christmas ball tutorial for hanging-Step by Step Tutorial, decorating your ornament becomes the most exciting part. You can choose colors that match your holiday theme, making the ornament a standout feature on your tree or wreath. Consider using traditional shades like red, green, gold, or silver, or opt for pastel tones for a softer, modern look.
If you enjoy embroidery, you can add small stitched details such as stars, snowflakes, or initials. Embroidery adds a personal touch and elevates the handmade quality of your ornament. Always use a needle that fits easily through the stitches without stretching them.
Another fun option is adding beads or sequins. These sparkling elements catch the light beautifully and make your ornament feel magical. Be sure to secure each bead tightly to ensure safety and durability. These embellishments can be applied in patterns or randomly, depending on your preferred style.
Striped designs can be created by changing yarn colors between rounds. This is a simple yet effective method to add visual interest. When switching colors, make sure to carry the yarn neatly or weave in ends thoroughly to keep the inside of the ball tidy.
You can also create textured designs using different crochet stitches. Bobble stitches, for example, add dimension and charm to your ornament. Use these techniques sparingly to maintain balance and avoid overloading the surface with too many effects.
Lastly, consider adding a tiny bow or miniature holiday decoration near the hanging loop. This small detail completes the ornament and gives it a festive, polished look. Simple yet adorable touches can transform a basic crocheted ball into a unique keepsake.
Tips for Maintaining and Storing Your Christmas Ball
To keep your handmade ornament looking beautiful, the crocheted Christmas ball tutorial for hanging-Step by Step Tutorial also includes maintenance tips. Proper care ensures your decoration can be used year after year without losing its shape or color. The first step is storing your ornament in a cool, dry place after the holiday season.
Avoid placing crocheted ornaments in areas where they might be crushed. Soft decorations can easily become misshapen if pressed under heavy objects. Store them in boxes with dividers or wrap them gently in tissue paper. This small effort keeps your ornaments looking new.
Cleaning your ornament is simple if it collects dust. Use a soft brush or lint roller to remove surface particles. Avoid soaking the ornament unless absolutely necessary, as too much moisture can distort the stuffing. Spot clean gently with a damp cloth only when needed.
Make sure your ornament remains protected from pests. Natural fibers like cotton or wool can attract insects if stored improperly. A small sachet of lavender or cedar inside the storage box can help keep pests away.
If your ornament becomes misshapen over time, you can lightly reshape it by adjusting the stuffing with your fingers. This works well for small deformations and keeps the ball looking round and fresh. Always handle it gently to protect the stitches.
Lastly, inspect your ornament each year before hanging it. Look for loose threads, weakened stitches, or decorations that may need re-securing. A quick annual check ensures your handmade ornament stays in excellent condition.
FAQ
How long does it take to make a crocheted Christmas ball?
Most crafters can complete one ornament in about one to two hours, depending on skill level and design details.
Can beginners follow this tutorial?
Yes, the crocheted Christmas ball tutorial for hanging-Step by Step Tutorial is beginner-friendly and uses basic stitches.
What type of yarn works best for crocheted Christmas balls?
Cotton yarn is recommended for a clean, firm finish, but acrylic can also be used.
Do I need to use a stuffing material?
Yes, stuffing gives the ornament its round shape and helps it maintain structure.
Can I wash my crocheted Christmas ball?
Spot cleaning is best; avoid soaking to prevent distortion.
How do I attach the hanging loop?
You can crochet a small chain or tie a ribbon securely at the top of the ornament.
Conclusion
This crocheted Christmas ball tutorial for hanging-Step by Step Tutorial has guided you through every stage of making a beautiful handmade ornament for the holiday season.
You learned how to choose materials, crochet the ball, decorate it, and care for it properly. Handmade Christmas decorations bring warmth, creativity, and personal meaning to your celebrations.
If you enjoyed this tutorial, please leave your sincere opinion and share any suggestions for future guides. Your feedback helps create even better content for everyone who loves crafting.