
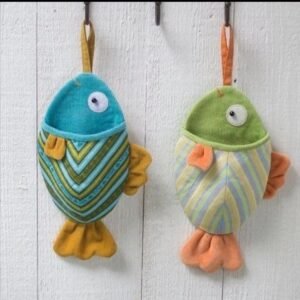
Creating a Fish-shaped fabric organizer for hanging.-Step by Step Tutorial is a fun, practical, and creative way to add personality and organization to any space in your home. This tutorial is designed especially for people who enjoy sewing and want an easy project that delivers functional and beautiful results. By learning how to make this organizer, you can store small items while also decorating walls, craft rooms, or children’s areas with something handmade and unique. The combination of functionality and charm makes this project suitable for beginners and experienced crafters alike.
Working through this Fish-shaped fabric organizer for hanging.-Step by Step Tutorial not only helps you improve your sewing skills but also gives you the opportunity to create an organizer that can be customized in color, size, and style. Whether you want bright, colorful fabric for a playful look or soft, neutral tones for a minimalist style, this organizer can adapt to almost any home décor. Its adorable fish shape attracts attention, making it a delightful gift idea as well. When you follow the tutorial closely, you will learn simple steps that transform basic materials into a decorative yet functional accessory.
One of the best things about this Fish-shaped fabric organizer for hanging.-Step by Step Tutorial is that it uses basic sewing supplies that most crafters already have at home. The instructions are easy to follow and repeatable, allowing you to make several organizers for different rooms. This handmade organizer can hold small toys, craft materials, accessories, and other household items. With its cute fish shape and multiple pockets, it adds both convenience and creativity to your everyday life. Now, let’s dive into the step-by-step instructions and begin this sewing journey.
Materials and Preparation
Gathering the right materials is essential for starting your fish-shaped fabric organizer project successfully. Choose fabrics that are durable yet easy to sew, such as cotton or canvas. These fabrics hold their shape well and offer excellent support for the pockets. The colors and patterns you select will determine the final visual effect of your organizer, so opt for fabrics that complement your interior space.
Before cutting the fabric, always iron it to remove wrinkles. This will ensure more precise cuts and cleaner seams throughout the project. When working with multiple fabric pieces, ironing helps the layers sit properly on top of each other, making sewing much easier and more accurate.
Prepare your sewing machine by threading it with a matching or contrasting color, depending on the design you want. A contrasting thread can provide a decorative touch, emphasizing the shape of the fish and the stitching details. If you prefer a simple look, select a thread that blends into the fabric.
Cut a main fish-shaped body from your chosen fabric. You can either draw the shape by hand or use a printed template. The body should be large enough to include several pockets while still fitting well on the wall or door where it will hang.
Next, cut the pockets that will be placed on the fish’s body. These pockets can be rectangular, curved, or shaped like scales to enhance the fish theme. Be sure to leave extra fabric for seam allowances on all sides so that the pockets are sturdy once sewn in place.
Finally, prepare additional elements such as the fish tail, fins, and a loop for hanging. These details create personality and character, transforming a simple organizer into an adorable decorative item for any room.
Sewing the Fish Body
The first step in assembling the organizer is sewing the fish-shaped body. Place two layers of fabric right sides together, trace the fish body shape, and secure it with pins. This ensures that the shape does not shift while sewing. Then, sew around the edges, leaving a small opening to turn the piece inside out.
Once you turn the fish body right-side out, gently push out the edges using a blunt tool to achieve a smooth outline. A clean shape makes the organizer look more professional and well-crafted. After shaping it properly, stitch the small opening closed with a ladder stitch or topstitching.
If you want extra support, you may add interfacing or padding inside the fish body. This will help the organizer maintain its structure, especially when filled with items. The added thickness also enhances the final appearance, giving the fish a fuller and more defined shape.
Topstitch around the entire fish body to secure the layers and add decorative detail. This gives a polished finish and reinforces the structure. Choose a simple straight stitch or a decorative stitch depending on your preferences and sewing machine capabilities.
Prepare the fish’s decorative elements, such as the tail and fins. These pieces can be sewn separately and then attached to the body with strong, even stitches. These features bring life to the design and contribute to the theme of the organizer.
Attach a fabric loop at the top of the fish’s head. This loop will support the organizer when hung on a wall or hook. Make sure it is securely stitched, as it will bear the weight of the organizer and everything stored inside.
Adding the Pockets
Arrange the pockets on the fish body to determine the best layout. The pockets can be aligned horizontally, vertically, or in a scale pattern. Take your time placing them to achieve both functionality and visual appeal. Once satisfied, pin the pockets in place before sewing.
Start sewing each pocket carefully, beginning with the bottom pockets and working upward. This technique helps keep the design neat and prevents overlapping issues. Use a straight stitch for strong pocket seams that can handle frequent use.
Leave the top side of each pocket open while sewing the remaining three sides. This ensures that items can be placed inside without difficulty. Reinforce the top edges with double stitching for added durability.
You can add dividers within larger pockets by sewing vertical lines from top to bottom. These dividers turn a single pocket into multiple compartments, making the organizer even more versatile. Consider the type of items you plan to store before deciding on the dividers.
If desired, add elastic bands at the top of some pockets. This provides flexibility and helps keep items secure, especially smaller objects that tend to slip out easily. Elastic is particularly useful for children’s items, craft materials, or accessories.
Continue adding pockets until the entire fish body is covered according to your design. Remember to keep the pockets balanced, both visually and structurally, so the organizer hangs evenly without sagging.
Final Details and Finishing Touches
Once all the pockets are attached, take a moment to inspect the organizer. Make sure all stitches are secure and that the pockets sit flat or slightly open as intended. Smooth any uneven parts and reinforce areas that may require extra strength.
Add decorative stitching along the fish’s body, tail, and fins. This enhances the handmade appearance and creates a charming texture that highlights the fish shape. A combination of decorative stitches can bring even more detail to your project.
Consider embellishing the organizer with fabric paint, buttons, or small appliqués. These decorative elements personalize your project and give it a unique look. Just ensure that any additions are securely attached and safe for handling.
Check the hanging loop again to confirm it is strong enough to support the organizer. Reinforce it with extra stitching if necessary. A strong loop ensures your organizer remains safe and functional for daily use.
Give the entire organizer a final press with an iron to remove any wrinkles and help the pockets lie neatly. A well-pressed organizer has a cleaner, more professional look that enhances your sewing work.
Your Fish-shaped fabric organizer for hanging is now ready to use. Hang it in the desired location and enjoy the convenience and charm it adds to your space.
Fish-shaped Fabric Organizer
How long does it take to complete this organizer?
Most people can complete the organizer within a few hours, depending on sewing experience and decorative details.
Can I use recycled fabric?
Yes, recycled fabric works great and adds sustainability to the project. Just ensure the fabric is clean and strong enough for pockets.
Is this project beginner-friendly?
Absolutely. The steps are simple, making it ideal for beginners who want to practice sewing skills.
How do I clean the organizer?
Hand washing is recommended to maintain the shape, especially if you added decorative items like buttons.
Can I make the organizer larger or smaller?
Yes, simply adjust the template size. The process remains the same regardless of the dimensions.
What items can I store in the fish-shaped organizer?
You can store small toys, sewing tools, craft supplies, accessories, or lightweight household items.
Conclusion
This Fish-shaped fabric organizer for hanging.-Step by Step Tutorial taught you how to create a beautiful and functional organizer using simple materials and easy sewing techniques.
From preparing the fabric to adding decorative details, each step contributes to a unique handmade piece that is both practical and decorative.
If you enjoyed this tutorial, leave your honest opinion below and share suggestions for future projects. Your feedback helps improve and inspire new ideas!