
Creating a Christmas Napkin Holder-Step by Step Tutorial is a wonderful way to bring festive charm to your holiday table while enjoying a relaxing and creative crafting experience. Many people love decorating their homes during the Christmas season, and a handmade napkin holder adds that special touch of warmth and personality. Whether you are preparing for a family gathering, hosting a holiday dinner, or simply looking for a fun project, this Christmas Napkin Holder-Step by Step Tutorial gives you everything you need to create a beautiful and functional piece. Using simple materials and accessible techniques, you can craft a holiday accessory that enhances your home décor and brings joy to everyone who sees it.
This article is designed to make the Christmas Napkin Holder-Step by Step Tutorial easy to follow, even for beginners. By using clear instructions and a friendly, humanized tone, you will feel supported through every stage of the project. You will learn how to gather the right materials, cut and assemble the parts, decorate your napkin holder, and even customize it to match different holiday themes. The tutorial makes use of gentle crafting techniques like folding, gluing, assembling, and embellishing, which ensures that anyone can participate—no advanced crafting skills required. With the right guidance and creativity, you will finish with a handmade décor piece that looks charming and festive.
The beauty of this Christmas Napkin Holder-Step by Step Tutorial is the freedom it gives you to personalize your design. Whether you prefer traditional Christmas themes like holly leaves, bells, stars, or Santa motifs, or you enjoy modern and minimalistic styles, this guide helps you achieve a result that reflects your taste. This project is perfect for crafters of all ages, making it suitable for holiday activities with children, friends, or even for personal relaxation. By the end of the tutorial, you will not only have a beautiful napkin holder, but also a deeper appreciation for the joy that handmade holiday crafts bring to the season.
Materials Needed for the Christmas Napkin Holder
To begin the Christmas Napkin Holder-Step by Step Tutorial, you will need a few essential materials that are easy to find at any craft store or even at home. Start with a sturdy base material such as cardboard, EVA foam, felt, or thick paperboard. This will serve as the foundation of your napkin holder and give it enough stability to stand upright on the table. Choosing the right base material ensures durability and long-term use throughout many holiday seasons.
Another important part of the Christmas Napkin Holder-Step by Step Tutorial is selecting decorative paper or fabric. You can choose festive prints such as snowflakes, Christmas trees, reindeer, candy canes, or abstract holiday patterns. Decorative paper is ideal for clean, smooth finishes, while fabric gives a cozy, soft-textured look. Whichever option you choose, make sure it complements your table décor.
You will also need glue, scissors, and possibly hot glue if you prefer a stronger bond. These tools are essential for cutting and assembling the pieces of your napkin holder. Using high-quality scissors will help you achieve clean cuts, which improves the final look of your project. Hot glue is great for attaching thicker decorations and ensuring they stay in place.
Optional decorations are a great way to personalize your Christmas Napkin Holder-Step by Step Tutorial. You can add buttons, ribbons, mini ornaments, glitter, foam shapes, felt appliqués, or small bows. These embellishments bring charm and holiday spirit to your project, making it unique and eye-catching.
If you want a more natural or rustic style, consider using jute string, wooden pieces, or cinnamon sticks as decorations. These elements can give your napkin holder a warm, handcrafted feel that perfectly suits traditional Christmas aesthetics. Crafting with natural textures brings a cozy and timeless look to your table setting.
Finally, prepare a clean workspace where you can craft comfortably. Having all your materials organized and within reach will make the Christmas Napkin Holder-Step by Step Tutorial easier and more enjoyable. A calm and well-lit crafting environment always leads to better results.
Step-by-Step Instructions to Create Your Napkin Holder
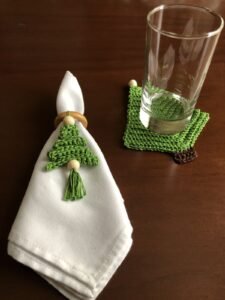
The first step in this Christmas Napkin Holder-Step by Step Tutorial is to trace and cut the shape of your napkin holder. Most designs feature two identical side panels shaped like Christmas trees, stars, reindeer, or bells. You can choose whichever silhouette matches your holiday décor best. Carefully trace your chosen shape onto the base material and cut it out with precision.
Next, cut a rectangular strip that will connect the two side panels. This strip forms the base of the napkin holder and determines how many napkins it can hold. In this Christmas Napkin Holder-Step by Step Tutorial, a wide base allows you to store multiple napkins, making it ideal for larger holiday gatherings.
Once your pieces are cut, begin assembling the napkin holder. Glue the rectangular strip to the bottom edges of both side panels, making sure everything is aligned. Hold the pieces in place for a few moments to ensure the glue bonds well. A strong and stable structure is essential for your napkin holder to stand upright without wobbling.
After assembling the base, start decorating the side panels. This is one of the most enjoyable parts of the Christmas Napkin Holder-Step by Step Tutorial. You can cover the panels with decorative paper or fabric using glue, smoothing out any wrinkles to create a clean finish. After covering them, begin adding embellishments that bring the festive spirit to life.
Attach small decorations such as felt stars, mini bows, glitter accents, or foam shapes to the surface of your napkin holder. Tiny ornaments or snowflake appliqués also look beautiful and add depth to your design. Be creative and let your personal taste guide you.
Finally, let the napkin holder dry completely before using it. Once dry, test it by placing a stack of napkins inside. Admire your handmade work and enjoy the fact that you followed the Christmas Napkin Holder-Step by Step Tutorial to create something festive and functional.
Creative Variations for Your Christmas Napkin Holder
One of the best things about this Christmas Napkin Holder-Step by Step Tutorial is how customizable it is. You can easily adapt the design to fit your holiday theme, dining room style, or personal preferences. If you love traditional Christmas imagery, try cutting the panels in the shape of a Christmas tree and decorating them with small ornaments or glittery garlands.
For a more elegant look, choose shapes like stars or snowflakes. Cover them with metallic paper or gold ribbon for a luxurious finish. This version works beautifully for formal holiday dinners and gives your table an upscale seasonal charm. It’s simple to make yet visually striking.
If you enjoy rustic Christmas décor, use natural materials such as kraft paper, jute string, or wood-textured paper. Attach small wooden beads or cinnamon sticks to enhance the cozy, handmade feel. This style fits perfectly with farmhouse or country Christmas themes.
For a fun and playful approach, especially if crafting with children, try bright colors and cartoon-themed shapes like Santa hats, gingerbread men, or reindeer faces. The Christmas Napkin Holder-Step by Step Tutorial becomes an exciting family activity, encouraging creativity and quality bonding time.
You can also create a coordinated set by making different napkin holders for various parts of your table. For example, create one with a Santa theme for the head of the table, a snowflake design for the center, and a reindeer theme for the opposite end. This adds delightful variety to your table setting.
Finally, don’t hesitate to personalize each napkin holder with names or initials. This turns your Christmas Napkin Holder-Step by Step Tutorial into a meaningful gift idea or a charming detail for individual place settings during a Christmas dinner.
Troubleshooting and Helpful Tips
Sometimes, during the Christmas Napkin Holder-Step by Step Tutorial, you may face small crafting challenges. One common issue is uneven cutting, which can make the napkin holder look unbalanced. Using a template or stencil helps ensure your shapes are symmetrical and clean.
Another common issue is glue residue showing through the decorative paper or fabric. To avoid this, apply a thin, even layer of glue and smooth the surface gently while attaching the material. Patience is key to achieving a flawless finish.
If your napkin holder doesn’t stand upright, the base may be too narrow or weak. Reinforce the bottom with an additional strip of cardboard or add a second layer for more stability. A strong base ensures that the holder stands firm even when filled with napkins.
Curling edges can occur if paper or fabric absorbs moisture from glue. To fix this, let the material dry before attaching decorations and avoid using excess glue. Pressing the pieces under a heavy book for a short time can also help flatten them.
If decorations detach easily, try switching to hot glue for heavier embellishments. This adhesive creates a much stronger bond and keeps your decorative elements secure. It is especially useful for ornaments, bows, and foam shapes.
Lastly, always give the project time to dry fully. Rushing the drying process can cause the structure to shift or decorations to fall off. Allowing everything to dry completely ensures that your Christmas Napkin Holder-Step by Step Tutorial results in a durable and beautiful final product.
Christmas Napkin Holder
1. What materials are best for making a Christmas napkin holder?
Cardboard, EVA foam, or felt are ideal because they provide stability and are easy to cut and decorate.
2. Is this project suitable for beginners?
Yes, the Christmas Napkin Holder-Step by Step Tutorial is beginner-friendly and uses simple techniques like cutting, gluing, and decorating.
3. Can I use fabric instead of decorative paper?
Absolutely. Fabric adds texture and a cozy look, making it a great option for holiday décor.
4. How can I make the napkin holder more durable?
Reinforce the base with extra layers or use thicker materials such as EVA foam for added strength.
5. Can children participate in this craft?
Yes, this tutorial is perfect for kids, especially when using safe glue and simple decorations.
6. How do I customize the napkin holder for different themes?
Change the shape, colors, and embellishments to match traditional, elegant, rustic, or playful Christmas styles.
Conclusion
By following this Christmas Napkin Holder-Step by Step Tutorial, you learned how to gather materials, assemble the structure, decorate it beautifully, and customize it to match your holiday style.
This project adds a personal and festive touch to your Christmas table, making celebrations even more special.
I hope you enjoyed this tutorial and feel inspired to create your own holiday piece. Please leave your honest opinion and share suggestions for future tutorials—I would love to hear your feedback!