
Creating a small fabric bag in the shape of a fish.-Step by Step Tutorial is a delightful way to explore fabric crafts while producing something truly unique and functional. Right from the start, this project allows crafters of all skill levels to express their creativity through colors, textures, and playful shapes. Because the concept itself is so charming, many people enjoy making these little bags as gifts, accessories, or even decorative pieces for special occasions. Using the key phrase throughout the article helps build strong SEO, making it easier for readers to discover this project while also ensuring clarity and consistency.
This small fabric bag in the shape of a fish.-Step by Step Tutorial stands out due to its versatility and simple construction. Even beginner sewists can follow along without difficulty, and more advanced crafters can add detailed embellishments such as appliqués, embroidery, or contrasting fabrics. The fish shape gives the design a fun, whimsical personality, which makes it appealing for children and adults alike. With the right choice of materials, you can transform this fish-shaped bag into a functional pouch, a coin purse, a travel accessory, or even a small gift bag for handmade treats.
In addition to the creative freedom, this small fabric bag in the shape of a fish.-Step by Step Tutorial also provides an excellent opportunity to practice basic sewing skills such as cutting fabric, installing a zipper, and adding lining. These techniques are essential for anyone wanting to expand their sewing abilities. By the time you finish this project, you’ll not only have a beautiful handmade bag but also more confidence in your crafting skills. Now that you have a clear idea of what this tutorial covers, let’s dive into the step-by-step process to bring your fabric fish bag to life.
Choosing Materials for Your Fish-Shaped Bag
Selecting the right materials is crucial when following a small fabric bag in the shape of a fish.-Step by Step Tutorial, as the fabric choice affects both appearance and durability. Cotton fabric is a popular choice because it is easy to handle, available in countless patterns, and ideal for beginners. For a more structured finish, you can also use quilting cotton or light canvas. The key is choosing a fabric that holds its shape while still being easy to sew.
The lining fabric is equally important. Many crafters prefer using a lightweight cotton or polyester lining to ensure a clean, professional interior. When choosing lining, pick a color that complements or contrasts with your outer fabric. This small detail elevates the final look and enhances the visibility inside the small fabric bag, making it easier to find items.
Additionally, you’ll need a zipper that fits the length of your fish-shaped design. A nylon zipper is often the best option because it is flexible and easy to sew onto curved fabric edges, which are common in the fish tail and mouth areas. Choosing a zipper that matches or accents your fabric adds a charming finishing touch.
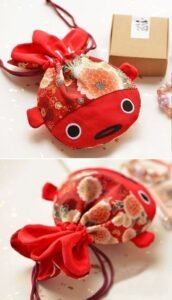
To bring your fish shape to life, consider using felt or fabric scraps for the eyes and fins. These embellishments give the project personality and allow you to customize your small fabric bag however you like. Some crafters even add embroidered details or decorative stitching to make each bag unique.
Don’t forget the interfacing. Adding a layer of lightweight interfacing gives the fish-shaped bag structure without making it too stiff. This step is especially helpful if you’re using softer fabrics. Interfacing ensures the bag maintains its shape and holds up well with frequent use.
Before moving to the next steps, gather your sewing tools: scissors, pins, a sewing machine, coordinating thread, and a fabric marker. Having all materials ready will make the crafting process smoother and more enjoyable.
Cutting and Preparing the Fish Pattern
The first step in constructing the small fabric bag in the shape of a fish.-Step by Step Tutorial is preparing the fish pattern. You can draw a simple fish outline on paper, making sure to include a wide enough body to serve as the bag’s storage area. Your pattern should also include separate shapes for the fins and tail if you want them to have a layered, dimensional appearance.
Once your pattern is ready, fold the fabric and place the fish body shape on top. Pin it securely, then cut through both layers so you have two identical pieces. These will form the front and back of your small fabric bag. Repeat this process for the lining fabric. Cutting the lining in the same shape ensures that the inside of your fish bag fits perfectly without bunching.
Next, cut interfacing using the same pattern. Applying interfacing to one or both body pieces helps give your bag stability. Use an iron to fuse the interfacing to the wrong side of the fabric, following manufacturer instructions. Make sure the fabric is smooth and wrinkle-free before pressing.
Now it’s time to prepare the embellishment pieces. Cut the fins and tail shapes from your chosen fabric or felt. If you’re using delicate materials, consider adding a small amount of interfacing to keep the pieces firm and easy to sew. For the fish eyes, you can cut circles from felt or simply embroider them directly onto the body fabric.
Before sewing, take a moment to arrange all pieces on one fish body panel. This helps you visualize the final design and make adjustments if needed. It’s always easier to correct placement before stitching rather than after the bag is assembled.
Finally, mark the zipper placement using a fabric pen. This step ensures accurate sewing and prevents uneven edges. Once all pieces are prepared, you’re ready to begin assembling your fish-shaped bag.
Sewing the Fish-Shaped Bag
In this stage of the small fabric bag in the shape of a fish.-Step by Step Tutorial, you will start stitching the fish together. Begin by attaching the zipper to the top edge of the fish body. Place the zipper face down against the right side of the fabric, aligning the edges. Pin in place and sew slowly to maintain a smooth, even line across the curved shape.
Once one side of the zipper is sewn, repeat the process with the lining fabric. This creates a sandwich with the zipper in the middle. Sew carefully, then flip the layers so both fabrics face outward. Press the seam gently to keep the zipper area neat and flat. Repeat the same steps for the other side of the fish body.
After installing the zipper, topstitch along the edges. This step not only improves durability but also provides a polished, professional finish. Topstitching prevents the lining from catching in the zipper and ensures smooth opening and closing.
Next, position the fins, tail, and eyes onto the front panel. If you’re sewing the pieces on before closing the bag, make sure they are securely attached. Use a zigzag or straight stitch depending on your preferred style. The embellishment stage is where your creativity can shine, making each bag unique and expressive.
Once all decorations are in place, align the front and back pieces of the bag with right sides together. Pin around the edges, leaving the zipper partially open to allow turning later. Sew around the fish shape, carefully following the curves to maintain a smooth outline.
After stitching, trim excess fabric around the curves to reduce bulk. Be careful not to cut the seams. Turn the bag right side out through the zipper, shape it gently, and press if needed. At this point, your fish-shaped bag should look complete and adorable.
Adding Finishing Touches
Adding finishing touches is a rewarding part of the small fabric bag in the shape of a fish.-Step by Step Tutorial. These final details bring your project to life and enhance the overall charm. Start by checking all seams to ensure they are secure and neatly stitched. Reinforcing the tails, fins, and zipper ends can add extra durability.
Some crafters like adding a small loop strap to the top of the fish, making it easier to carry or attach to a keychain. If you want to include one, cut a small strip of fabric, fold it lengthwise, sew along the edge, and attach it securely near the zipper area.
You can also personalize your bag with embroidery. Adding swirls, scales, or cute patterns on the fish body gives it a more textured look. Embroidery is a fun way to express creativity and turn your project into something uniquely yours.
Another option is adding small beads or buttons as accents. For example, a button eye adds a playful touch, while beads can create decorative details. Just ensure that any added embellishments are securely attached, especially if the bag will be used by children.
If your fish bag seems slightly uneven or doesn’t hold its shape as expected, press the seams gently using an iron. This helps the fabric lay flat and enhances the structured look. Make sure to avoid ironing over plastic zippers or delicate decorations.
Once you’re satisfied with your finishing touches, your fish-shaped fabric bag is ready to use, gift, or sell. Each handmade piece has its own charm, making it a delightful accessory for anyone who appreciates creative crafts.
FAQ
1. What materials do I need to make a fish-shaped fabric bag?
You will need cotton fabric, lining fabric, interfacing, a zipper, scissors, pins, thread, felt or fabric scraps for embellishments, and a sewing machine.
2. Is this project suitable for beginners?
Yes, this tutorial is designed to be beginner-friendly while still being enjoyable for advanced sewists.
3. Can I sew the fish bag by hand instead of using a sewing machine?
Yes, but it will take more time. Use small, tight stitches for durability.
4. What type of zipper works best for this project?
A nylon zipper is ideal because it is flexible and easy to sew along curved edges.
5. Can I wash the finished fish-shaped bag?
Yes, but hand washing is recommended to preserve the shape and embellishments.
6. How can I customize the fish design?
You can add embroidery, fabric paint, appliqués, buttons, or beads to personalize your bag.
7. What size should the bag be?
You can adjust the pattern to any size depending on whether you want a coin purse, small pouch, or larger accessory.
8. Do I need interfacing?
Interfacing is optional but recommended for better structure and durability.
9. Can children help with this craft?
Yes, children can assist with decorating or placing pieces, but an adult should handle the sewing.
10. What can the fish bag be used for?
It can serve as a coin purse, mini makeup bag, gift pouch, travel organizer, or decorative accessory.
Conclusion
This small fabric bag in the shape of a fish.-Step by Step Tutorial provides a fun and creative sewing experience that results in a charming, functional accessory.
Throughout the tutorial, you learned how to choose materials, prepare the pattern, assemble the bag, and add finishing touches to create a unique handmade piece.
Whether you’re making it for yourself or as a thoughtful gift, this project allows you to practice essential sewing techniques while enjoying a playful design. If you enjoyed this tutorial, feel free to leave a sincere opinion and share suggestions for future projects.