
Creating a Crocheted Santa Claus Napkin Holder-Step by Step Tutorial is a delightful way to add a festive touch to your holiday table décor. This charming crochet project is both decorative and functional, offering a handmade piece that enhances Christmas gatherings with personality and joy. By starting this craft early in the season, you allow yourself plenty of time to experiment, perfect stitches, and customize colors. Because this tutorial is beginner-friendly, even those new to crochet can follow along and enjoy making their own Santa-inspired napkin holder.
The beauty of this Crocheted Santa Claus Napkin Holder-Step by Step Tutorial lies not only in the final product but also in the creative process itself. Crocheting holiday items can be relaxing, fun, and deeply rewarding—especially when they become part of your annual Christmas traditions. This project is also an excellent opportunity to use leftover yarn, making it an eco-friendly craft option. Whether you prefer classic Christmas colors or want to experiment with creative shades, your Santa napkin holder can reflect your holiday style.
This Crocheted Santa Claus Napkin Holder-Step by Step Tutorial is perfect for anyone who enjoys decorating with handmade items. A crocheted napkin holder adds warmth to your table arrangement, making your celebrations feel even more special. You can create several matching holders to place on each plate or even gift them to friends and family. As you explore the following steps, you will learn how to craft the main structure, add facial features, assemble the Santa figure, and complete the festive details that bring this project to life.
Materials Needed for the Crocheted Santa Claus Napkin Holder
To begin this Crocheted Santa Claus Napkin Holder-Step by Step Tutorial, gather the essential materials required to complete the project efficiently. The ideal yarn for this craft is medium-weight acrylic yarn, which is durable, affordable, and available in a wide range of colors. For Santa’s classic look, prepare red, white, black, pink, and beige yarn. Having all the materials ready before starting helps keep the process smooth and enjoyable.
You will also need an appropriate crochet hook that matches your yarn weight. Most medium-weight yarns work well with a 4.0 mm or 4.5 mm hook, creating sturdy stitches suitable for a napkin holder. Using the correct hook ensures your stitches are tight enough to hold the shape but flexible enough to work comfortably. Keeping a few extra hooks nearby is helpful if you prefer switching sizes for different parts of the project.
A yarn needle is essential for sewing pieces together and weaving in loose ends. Since this project involves assembling facial features and attaching decorative elements, a needle with a large eye will make threading yarn easier. Scissors are also necessary for trimming excess yarn after sewing. Keeping these small tools organized ensures your workspace stays tidy and efficient.
Stitch markers can be helpful for beginners, especially when counting rows or working in rounds. They prevent mistakes that may require unraveling stitches later. Although optional, stitch markers contribute to better accuracy and consistency in each step of your crochet work. Using them can give your finished napkin holder a cleaner, more polished appearance.
For Santa’s eyes, you may use small black safety eyes or crochet tiny black circles if you prefer a fully yarn-based design. Safety eyes give a more defined look, while crocheted eyes provide a soft and seamless finish. Both options work well depending on your style preference and whether children will use the napkin holders.
Finally, prepare a small amount of fiberfill stuffing, optional but useful for adding a slight 3D effect to Santa’s hat or beard. A touch of stuffing helps create volume and dimension, making your crocheted Santa look more lively and festive on your holiday table. With all materials collected, you are ready to move on to the crochet process.
Creating the Base of the Santa Napkin Holder
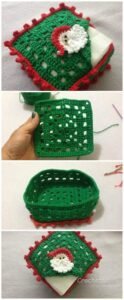
The first step in this Crocheted Santa Claus Napkin Holder-Step by Step Tutorial is crocheting the base or ring that will hold the napkin. Begin by creating a simple ring using chain stitches, large enough to fit a rolled napkin comfortably. A common approach is to chain around 25 to 30 stitches, depending on your desired size. Join the ends with a slip stitch to form a circle, making sure the chain is not twisted.
Once the ring is formed, work several rounds of single crochet stitches to strengthen the base. These rounds will create a sturdy structure that keeps the napkin holder upright. The number of rounds may vary depending on your stitch tightness, but three to five rounds are usually ideal. Keeping the stitches even contributes to a professional finish and a stable foundation.
Switching colors is necessary to follow Santa’s traditional design. The bottom part of the ring is usually red to resemble Santa’s suit. As you progress, you may switch to black for Santa’s belt and then return to red. Color changes should be seamless, and weaving in ends as you go prevents the holder from looking messy. Smooth transitions between colors enhance the visual appeal.
Once you complete the ring, fasten off and weave in all loose ends. This step ensures the structure is secure and prevents unraveling. The finished ring should be flexible enough to slip around a napkin but firm enough to hold its shape. At this point, you can test the fit using a rolled cloth or paper napkin.
With the base complete, the next step involves adding Santa’s decorative elements. The ring serves as the foundation, and all facial features, hat, and beard will be attached to it. A well-made base makes the rest of the project easier, ensuring all parts assemble neatly and securely.
Before moving on, reshape the ring if needed by gently stretching it into a symmetrical circle. A balanced base helps Santa’s face sit correctly, giving your napkin holder the charming appearance that makes this Christmas craft so special.
Crocheting Santa’s Face, Beard, and Hat
This part of the Crocheted Santa Claus Napkin Holder-Step by Step Tutorial focuses on creating Santa’s facial elements. Begin with the face by crocheting a small beige or light-pink oval or circle. This serves as Santa’s head and should be sized proportionally to the ring. Working in continuous rounds creates a smooth shape without visible seam lines.
Next, crochet Santa’s beard using white yarn. The beard can be made using loops or puff stitches to add texture. A fluffy, textured beard brings the final piece to life, making Santa instantly recognizable. Make sure the beard is wide enough to frame the face but not too large that it overpowers the napkin holder.
For the hat, use red yarn to create a small triangular shape. Add a white border using single crochet stitches to imitate Santa’s hat trim. A tiny white pom-pom completes the hat, giving it the festive charm associated with Santa Claus. You may choose to lightly stuff the hat to give it a 3D look before attaching it to the head.
Crochet Santa’s eyes using small black circles or attach safety eyes for a more defined expression. The eyes should be placed evenly on the face, providing a friendly, welcoming look. If desired, you can add a small embroidered nose using pink yarn to give Santa more character.
Next, assemble all facial elements by sewing the beard, hat, eyes, and nose onto the face securely. Using small, tight stitches ensures the parts remain firmly attached even with repeated use. The assembled face will later be added to the ring, completing the front decoration.
Once the face is ready, hold it in front of the napkin ring and position it at the center. Sew or glue it securely, ensuring the edges lay flat and the facial details are clearly visible. This central piece is the highlight of your napkin holder, so take your time to position it perfectly.
Final Assembly and Decorative Touches
This final stage of the Crocheted Santa Claus Napkin Holder-Step by Step Tutorial brings all elements together to create a polished holiday accessory. Begin by verifying the strength of all seams on the ring. Reinforcing the stitches ensures that the napkin holder can withstand repeated handling.
Next, carefully attach Santa’s face to the front of the ring, making sure it is centered and secure. The face should cover a portion of the ring but leave enough room for the napkin to slide in smoothly. This balance ensures both functionality and decorative appeal.
Add Santa’s belt buckle using a small piece of yellow or gold yarn. Crochet a tiny square or embroider one directly onto the black belt section. This small detail adds realism and enhances Santa’s recognizable appearance.
You may also add blush to Santa’s cheeks by lightly brushing a small amount of pink yarn fibers or using a crocheted circle. This brings warmth and friendliness to the character. Additional touches, such as small snowflakes, stars, or Christmas embellishments, can be sewn onto the hat or beard.
If you wish to personalize the napkin holder, you can embroider initials or short festive phrases like “Joy” or “Ho Ho Ho.” These additions make the holder even more special, especially if gifted to family members or friends during the holiday season.
Once all embellishments are complete, test the napkin holder by inserting a folded or rolled napkin. Ensure the ring fits snugly and the decorations remain securely in place. Your Crocheted Santa Claus Napkin Holder is now ready to brighten your Christmas table.
FAQ
1. What type of yarn works best for this project?
Medium-weight acrylic yarn is ideal because it is durable, affordable, and easy to work with.
2. Can beginners make a crocheted Santa napkin holder?
Yes, the tutorial is beginner-friendly and uses simple stitches suitable for all skill levels.
3. Is the project time-consuming?
No, most crafters can complete one napkin holder in one to two hours depending on skill level.
4. Do I need safety eyes for Santa’s face?
No, you can crochet the eyes or embroider them if you prefer a softer look.
5. Can I customize the colors?
Yes, you can use traditional colors or create unique combinations to match your holiday theme.
6. How many napkin holders should I make for a full table setup?
This depends on the number of guests, but making one per place setting creates a coordinated look.
7. Can the napkin holder be washed?
Spot cleaning is recommended to preserve shape and prevent yarn damage.
8. Does the ring need stuffing?
No, the ring structure is firm enough without stuffing.
9. Can I sell crocheted Santa napkin holders?
Yes, they make great handmade holiday items, as long as you follow your local craft sale guidelines.
10. Is this project safe for children?
Yes, but avoid using small detachable parts like safety eyes if the holder will be handled by small children.
Conclusion
This Crocheted Santa Claus Napkin Holder-Step by Step Tutorial teaches you how to create a festive, charming, and functional piece of holiday décor.
You learned how to prepare materials, crochet the ring, assemble Santa’s face, and add personalized details.
This handmade project brings warmth to any Christmas table setting and makes a thoughtful holiday gift. If you enjoyed this tutorial, please leave your sincere opinion and share suggestions for future crochet projects.