
Starting this Crochet Beach Bag – Step by Step Tutorial is a wonderful way to combine creativity, practicality, and summer style into a single project. A handmade beach bag is not only a functional accessory but also a beautiful expression of your personality and craftsmanship. With this tutorial, you can create a stylish and durable crochet beach bag even if you are still learning the basics of crochet. The goal is to offer a clear, easy-to-follow guide so you can enjoy a relaxing and productive crafting experience.
Before diving into the techniques, it is important to understand the advantages of making your own crochet beach bag. Store-bought bags often lack the charm and personalization that a handmade item carries. By learning through this step by step tutorial, you gain the freedom to choose colors, patterns, textures, and the perfect size to suit your summer needs. A handcrafted beach bag also makes a thoughtful gift for friends or family, and the joy of creating something with your own hands is truly special.
In this tutorial, you will learn all the essential stages—from choosing materials to shaping, assembling, and finishing your crochet beach bag. The instructions are friendly, practical, and designed to help beginners and experienced crafters alike. Throughout the guide, you will find tips that enhance quality, improve durability, and help you achieve a professional look. With patience and attention to detail, this Crochet Beach Bag – Step by Step Tutorial will help you create a summer essential you will love using for many seasons.
Choosing the Right Materials for Your Crochet Beach Bag
Selecting the right materials is the foundation for a strong and beautiful crochet beach bag. The type of yarn you choose will affect the durability, flexibility, and overall appearance of your project. Cotton yarn is often the best option because it is sturdy, breathable, and maintains its shape even when exposed to sun and moisture. You can also use recycled cotton or t-shirt yarn for an eco-friendly and extra-strong finish.
A good crochet hook is another essential component. The hook size depends on the yarn thickness, but for beach bags, larger hooks are typically preferred to give the bag a flexible yet stable texture. Aluminum hooks glide smoothly, while ergonomic handles help reduce hand fatigue during long crocheting sessions. Always check the yarn label for hook recommendations before beginning.
Colors play an important role in making your beach bag visually appealing. Bright and vibrant colors give a fresh, summery feel, while neutral tones create a more elegant and timeless look. You may combine different shades to produce stripes, ombre effects, or creative patterns. Choosing colors that match your swimwear or beach accessories can make your handmade bag stand out beautifully.
Additional materials such as stitch markers, scissors, and a tapestry needle will help you complete your project more efficiently. Handles or straps can be crocheted or purchased ready-made depending on your preference. For extra structure, some crafters add a washable fabric lining to the interior of the bag, especially if they plan to carry heavier items.
Quality materials not only enhance the appearance but also extend the life of your crochet beach bag. Investing in good supplies ensures your finished project is reliable and resistant, especially since beach bags often hold towels, sunscreen, snacks, and other essentials. Preparing everything in advance makes the crocheting process smoother.
Once all your materials are ready, you can begin the tutorial with confidence, knowing that your choices will support a high-quality result. The next steps will walk you through creating the foundation, shaping the bag, and adding the final decorative touches that make your Crochet Beach Bag – Step by Step Tutorial complete.
Creating the Base: The First Step of the Crochet Beach Bag
The base of your crochet beach bag is the most important structural element. It determines the size, shape, and stability of your final piece. Depending on your design preference, the base can be round, oval, or rectangular. A solid base ensures your belongings remain stable, preventing sagging or distortion when the bag is full.
To begin the base, you will typically start with a chain stitch foundation. The number of chains depends on the desired width of your bag. Once the initial chain is complete, you will crochet around it to form an oval, adding increases at both ends. This technique allows the base to expand smoothly without creating harsh corners.
As you continue working in rounds, it is important to keep the stitches even. Using stitch markers helps you identify where each round begins and ends, ensuring symmetry. Count your stitches regularly to maintain accurate shaping. Uneven stitch counts can lead to an irregular base, which may affect the final appearance of the bag.
Cotton yarn provides excellent stability for the base, and you may choose to use a slightly smaller hook size for the initial rounds. This technique tightens the stitches and creates a firm foundation capable of holding heavier items. A strong base also improves the overall durability of the crochet beach bag.
Once your base reaches the size you want, it is time to stop increasing and begin building upward. The base should be wide enough to hold your beach essentials, such as towels, snacks, and personal items. Making a spacious base adds practicality to your handmade bag and ensures it remains functional for everyday use.
With the base complete, you can proceed to the next steps in this Crochet Beach Bag – Step by Step Tutorial, where you will shape the body, add height, and create the distinctive look of your summer accessory.
Building the Body: Shaping Your Crochet Beach Bag
The body of your crochet beach bag adds height and volume, allowing you to customize the design according to your style. Once the base is completed, you will begin crocheting upward in rounds without increasing. This helps the sides rise evenly and creates a smooth, cylindrical shape.
Many crafters choose to incorporate texture stitches during this phase. Stitches such as half-double crochet, double crochet, or alternating patterns can produce visually appealing textures perfect for beach fashion. Switching colors between rounds can also give the bag a vibrant, striped look that enhances its summer charm.
It is important to maintain consistent tension throughout this stage. Uneven tension may cause the sides of the bag to flare outward or collapse inward. If this happens, simply adjust your grip or switch hook sizes to regain uniformity. Patience and steady practice make this step easier with each project.
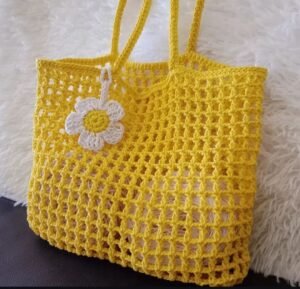
As the body grows taller, you must decide whether to keep the bag open or add decorative design features. Some people prefer a solid pattern throughout, while others like to incorporate mesh stitches for a lighter and more breathable bag. Mesh patterns are also ideal for sandy environments because they allow particles to fall through easily.
The height of the bag is completely customizable. Shorter bags work well for quick trips, while tall bags are better for carrying towels and extra items. Creating a practical height ensures your crochet beach bag fits your lifestyle and needs. Remember to measure frequently to stay within your desired dimensions.
Once you have reached the ideal height, you can prepare to add handles, edging, or any special finishing touches. These final steps truly complete the design and give your bag its unique personality, bringing the Crochet Beach Bag – Step by Step Tutorial close to its final stage.
Adding Handles and Finishing Touches
The handles are one of the most important functional parts of your crochet beach bag. They must be strong enough to carry weight while still being comfortable on your shoulders or hands. You can crochet the handles using tight stitches, such as slip stitch or single crochet, to ensure durability.
Another option is to use pre-made handles made from rope, bamboo, or leather. These add a stylish finish to your beach bag but still allow you to maintain a handmade look. Attaching them securely is essential. Always reinforce the joining points using strong stitches to prevent stretching or tearing.
Edging is another finishing touch that elevates the overall appearance of your beach bag. A simple row of single crochet around the rim can help tidy the edges, while a decorative stitch such as picot or shell stitch creates a more elegant and decorative border.
Adding embellishments can make your beach bag even more personal. You might choose to attach tassels, buttons, or crochet flowers to match your summer aesthetic. Be creative but also practical—avoid overly heavy decorations that could distort the shape of your bag.
If desired, you can line the interior with fabric for additional support. This step helps the bag maintain its shape and keeps smaller items from slipping through textured stitches. Choose a lightweight, washable fabric to ensure easy maintenance throughout the season.
When all finishing touches are complete, your crochet beach bag is ready for use. With the help of this Crochet Beach Bag – Step by Step Tutorial, you have created a beautiful, durable, and functional summer accessory completely by hand.
Frequently Asked Questions
1. Is a crochet beach bag durable enough for heavy items?
Yes. When made with sturdy cotton yarn and tight stitches, a crochet beach bag can handle beach essentials such as towels, sunscreen, and snacks without stretching excessively.
2. What is the best yarn for a crochet beach bag?
Cotton yarn is the best choice because it is strong, washable, and maintains its shape well in warm weather.
3. Can beginners follow this step by step tutorial?
Absolutely. This Crochet Beach Bag – Step by Step Tutorial is designed to be easy for beginners while still offering valuable tips for advanced crafters.
4. How long does it take to complete a crochet beach bag?
Depending on your skill level and the size of the bag, it may take several hours to a few days to complete.
5. Can I customize the size and colors?
Yes. One of the greatest benefits of crocheting your own bag is the freedom to choose any size, color, or pattern you prefer.
Conclusion
This Crochet Beach Bag – Step by Step Tutorial has guided you through choosing materials, creating the base, shaping the body, and adding beautiful finishing touches.
With patience and creativity, you can craft a stunning beach bag that is both stylish and useful.
I hope you enjoyed this tutorial and feel inspired to start your next crochet project. Please leave your honest opinion and suggestions—I would love to hear how your beach bag turned out!