
Starting your Crocheted Santa Claus boot for beginners-Step by Step Tutorial journey is an exciting way to embrace the holiday season through creativity, warmth, and handmade charm. This project is perfect for crafters of all skill levels, especially beginners who want to try something festive and practical. Throughout this article, you will find each step described in a clear, intuitive, and beginner-friendly way, ensuring that you feel supported from start to finish. By using the main term Crocheted Santa Claus boot for beginners-Step by Step Tutorial across the text, this guide remains optimized for SEO and easy to follow.
Learning how to create your own Christmas boot opens the door to endless holiday possibilities. Whether you want to decorate your home, create personalized gifts, or prepare handmade items for craft fairs, this tutorial provides everything you need. The Crocheted Santa Claus boot for beginners-Step by Step Tutorial offers a structured approach, making it simple to understand even if you have only basic crochet knowledge. With a focus on accessible techniques, you will quickly build confidence as you progress.
One of the charming aspects of this craft is how customizable each boot can be. You can adjust colors, sizes, and embellishments to suit your personal style or holiday theme. This Crocheted Santa Claus boot for beginners-Step by Step Tutorial will walk you through every phase, ensuring that even newcomers can achieve a clean, polished result. By following the instructions carefully, you will have a festive crochet decoration ready to brighten your home for Christmas.
Preparing Materials and Understanding the Basic Stitches
For this project, a few simple materials are all you need to get started. Gathering the right supplies before beginning your Crocheted Santa Claus boot for beginners-Step by Step Tutorial will make the entire process smoother and more enjoyable. A soft red yarn, a small amount of white yarn, a crochet hook suited to the yarn weight, scissors, and a yarn needle are essential. These basics ensure that even beginners have everything necessary to start stitching with confidence and ease.
Crochet beginners will appreciate that this project only requires a handful of basic techniques. Before starting the main boot, take a moment to practice stitches such as chain stitch, single crochet, and slip stitch. In this Crocheted Santa Claus boot for beginners-Step by Step Tutorial, each of these stitches will play an important role in shaping the boot. Understanding them will help you follow the instructions without difficulty.
As you prepare your workspace, make sure you are working in a comfortable, well-lit area. Proper lighting helps you see your stitches clearly, while a calm environment enhances your overall crafting experience. Starting your Crocheted Santa Claus boot for beginners-Step by Step Tutorial this way will prevent mistakes and allow your creativity to flow naturally.
Having your tools organized is also helpful. Place your scissors, needle, and extra yarn within easy reach so you do not interrupt your progress. This allows you to stay focused and maintain a steady rhythm as you work through your Crocheted Santa Claus boot for beginners-Step by Step Tutorial.
Once you have all your materials ready, take a moment to read through the steps before you begin. Understanding the flow of the tutorial makes the process more intuitive. As this is a Crocheted Santa Claus boot for beginners-Step by Step Tutorial, the steps have been organized in a supportive pace so beginners feel encouraged at each stage.
Finally, remember that practice is part of the learning process. If your stitches feel uneven at first, do not worry—your hands will naturally adjust as you progress. The beauty of this Crocheted Santa Claus boot for beginners-Step by Step Tutorial is that it embraces beginner imperfections while guiding you toward a festive, beautiful result.
Shaping the Base of the Santa Claus Boot
The base of the boot is where your project begins to take form. In the Crocheted Santa Claus boot for beginners-Step by Step Tutorial, the foundation starts with a simple oval shape. Crochet a series of chain stitches, then work around them using single crochet. As you build the first rounds, the stitch count increases gradually, forming a comfortable base that will support the rest of the boot.
Maintaining even tension is important at this stage. This helps your stitches look uniform and keeps your boot sturdy. While following the Crocheted Santa Claus boot for beginners-Step by Step Tutorial, keep your yarn relaxed but steady as you work through the rounds. If your base starts to curl, gently flatten it with your hands to guide the shape.
As the oval grows, you will see how each round builds upon the previous one. This layering effect creates a smooth bottom that keeps the boot stable when placed on a surface. The structure of this part of the Crocheted Santa Claus boot for beginners-Step by Step Tutorial helps even beginners achieve a strong and polished foundation.
Once the base has reached the recommended size, it is time to begin shaping the sides. The shift from the base to the sides is smooth, requiring only a consistent pattern of single crochet stitches. These easy steps make the Crocheted Santa Claus boot for beginners-Step by Step Tutorial accessible and beginner-friendly.
Do not rush this step—shaping the boot slowly ensures greater accuracy later on. Each stitch contributes to the overall final result. This section of the Crocheted Santa Claus boot for beginners-Step by Step Tutorial focuses on building confidence through repetition and clarity.
By the end of this phase, you will have a sturdy base and the beginning structure of the boot body. This marks a major milestone in your crafting journey and sets the stage for the next exciting steps.
Creating the Boot Body and Adding the White Trim
The boot body is where your holiday project starts to look truly festive. In the Crocheted Santa Claus boot for beginners-Step by Step Tutorial, this section focuses on building height by crocheting continuously in the round. As you complete each row, the shape becomes more recognizable.
Using red yarn, work upward using consistent single crochet stitches. This part of the Crocheted Santa Claus boot for beginners-Step by Step Tutorial builds the main structure. Beginners appreciate this section because it uses repetition, making it easier to stay on track without complicated stitch changes.
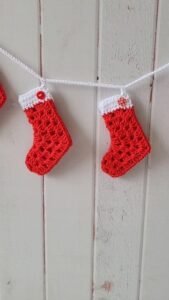
The white trim is one of the most charming details of the project. Switching from red yarn to white helps create that iconic Santa look. In this portion of the Crocheted Santa Claus boot for beginners-Step by Step Tutorial, you will simply join the white yarn and continue crocheting in the round. The soft contrast between colors is visually appealing and festive.
Adding texture is another creative feature in this phase. You can use simple techniques to give the trim a fluffy appearance. Even as a beginner, this Crocheted Santa Claus boot for beginners-Step by Step Tutorial allows you to explore small decorative variations without complexity.
Once the trim is complete, check your stitch tension to ensure the boot maintains its shape. Adjust gently with your hands if needed. This step in the Crocheted Santa Claus boot for beginners-Step by Step Tutorial is where your project begins looking polished and close to finished.
After shaping the boot body and adding the trim, take a moment to appreciate your progress. You have built something from scratch, and it reflects your effort and creativity. This milestone keeps you motivated as you move toward the final assembly.
Final Assembly, Finishing Touches, and Display Ideas
In the final stage of the Crocheted Santa Claus boot for beginners-Step by Step Tutorial, you will focus on assembling your piece and adding optional decorative touches. Begin by weaving in all yarn ends using a yarn needle. This helps secure the stitches and maintain a clean appearance.
You can add embellishments such as tiny bells, mini pompoms, ribbons, or buttons. These accessories bring personality and charm to your creation. This part of the Crocheted Santa Claus boot for beginners-Step by Step Tutorial encourages creativity and customization.
If you plan to hang your boot, consider crocheting a small loop using matching yarn. Sew it securely inside the top trim. This easy step turns your project into a holiday decoration suitable for walls, doors, or Christmas trees. Beginners love this feature because it requires minimal effort and delivers a beautiful result.
Another fun idea is using your crocheted boot as a small treat holder. You can place candies, small gifts, or handwritten notes inside. This idea within the Crocheted Santa Claus boot for beginners-Step by Step Tutorial adds practical value to your craft.
Take a moment to shape your boot by hand, ensuring it stands or hangs neatly. The yarn naturally adapts to gentle adjustments. This final detail ensures that your completed Crocheted Santa Claus boot for beginners-Step by Step Tutorial project looks its best.
Finally, admire your finished boot and consider making more. They make thoughtful handmade gifts and can be crafted in sets for decoration or gifting.
Crocheted Santa Claus Boot
1. Is this project suitable for absolute beginners?
Yes! The Crocheted Santa Claus boot for beginners-Step by Step Tutorial was created specifically with beginners in mind. It uses simple stitches and provides clear instructions from start to finish.
2. What yarn works best for this project?
Soft acrylic or cotton yarns work well. Choose red and white colors for a traditional Santa Claus theme.
3. Can I make the boot larger or smaller?
Absolutely. Simply adjust the number of starting chains and rounds. The technique remains the same.
4. How long does it take to complete the boot?
Beginners usually finish it within a few hours, depending on experience and pace.
5. Can I wash the crocheted Santa boot?
Yes, but hand washing is recommended to preserve the shape and texture.
6. Can children help with this project?
They can assist with decorations, but the crochet work itself is better suited for teens or adults.
Conclusion
This Crocheted Santa Claus boot for beginners-Step by Step Tutorial has guided you through a festive and rewarding project.
You learned how to prepare materials, shape the base, build the boot body, add decorative trim, and finalize the piece with personal touches.
Now that you have completed your creation, I would love to know your thoughts. Please share your honest opinion and any suggestions you may have for future tutorials.