
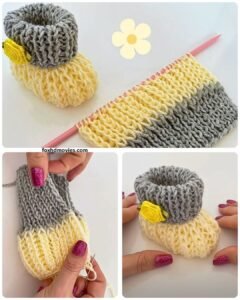
The Easy crochet booties-Step by Step Tutorial is the perfect guide for anyone who wants to create adorable, handmade baby booties with confidence and ease. Whether you are new to crocheting or already have some experience, this tutorial simplifies each step so you can follow along comfortably. By using the Easy crochet booties-Step by Step Tutorial, you can learn how to make cozy, soft, and beautiful booties that are perfect for gifting, selling, or making for your own little one. The charm of crochet is that every stitch brings a personal touch, and this project is wonderfully accessible to crocheters of all levels.
These baby booties are not only practical but also full of charm and tenderness. With just a few materials, you can create a pair of crochet booties that look like they came straight from a boutique. The Easy crochet booties-Step by Step Tutorial helps you understand the pattern, organize your work, and add small decorative touches that make the final result even more special. This tutorial focuses on simplicity and clarity while maintaining a warm and encouraging tone so you feel motivated during every stage of crafting.
Creating something by hand is deeply rewarding, and crocheting baby booties is no exception. In this guide, the Easy crochet booties-Step by Step Tutorial takes you from the foundation stitches to the last embellishments with clear explanations suitable for beginners. Each section builds on the previous one, making the process smooth and enjoyable. With the right tools and a bit of patience, you can transform yarn into something meaningful, practical, and adorable. Now, let’s explore the materials, techniques, and steps required to create your own beautiful pair of crochet booties.
Materials and Preparation for Crochet Booties
To begin this Easy crochet booties-Step by Step Tutorial, gather all necessary materials before starting to crochet. You will need soft baby-friendly yarn, such as acrylic or cotton, which is gentle on the skin and comfortable for babies to wear. Choosing the right yarn thickness is important, as it affects the size and shape of the booties, so lightweight or medium yarns usually work best for beginners.
You will also need a crochet hook that matches your yarn’s thickness. Most yarn labels suggest the correct hook size, which makes choosing easy. In this Easy crochet booties-Step by Step Tutorial, using the correct hook ensures your stitches remain consistent and the booties maintain their shape. A hook that is too large may create loose, unstable stitches, while a hook that is too small may create stiff booties.
Scissors and a tapestry needle are also essential tools for finishing the booties. The needle helps weave in loose ends and attach any embellishments you choose to add. When following this Easy crochet booties-Step by Step Tutorial, keeping your tools organized will make the whole process smoother and more enjoyable.
Before starting the crochet work, take a moment to review common crochet stitches such as chain stitch, single crochet, half double crochet, and slip stitch. These basic stitches form the foundation of many projects, including the baby booties explained in this tutorial. Even if you are a beginner, the Easy crochet booties-Step by Step Tutorial ensures you understand each stitch before using it in your project.
If you want to customize your booties, prepare ribbons, buttons, or small appliqués. These can be added later to give your booties a personalized touch. Decorative elements enhance the charm of handmade pieces, and the Easy crochet booties-Step by Step Tutorial encourages creativity throughout the process.
Finally, choose a comfortable and well-lit workspace. Good lighting helps you see your stitches clearly, especially when working with light-colored or very soft yarns. Having a peaceful space enhances your concentration and enjoyment while following the Easy crochet booties-Step by Step Tutorial.
Crocheting the Sole of the Booties
The first step in the Easy crochet booties-Step by Step Tutorial is creating the sole, which forms the base of the booties. Start by making a foundation chain long enough to match the desired bootie size. The length of this chain determines how long the bootie will be, so adjust it based on the size you want to create.
Work single crochet stitches along the foundation chain to form the first row. This row serves as the foundation for shaping the bootie sole. As the Easy crochet booties-Step by Step Tutorial explains, keeping your stitches even and consistent ensures a neat and smooth base.
Continue crocheting rows while slightly increasing the stitches at the beginning and end of each row. This technique helps you create an oval-shaped sole, which is essential for the proper structure of the bootie. The Easy crochet booties-Step by Step Tutorial highlights the importance of following the increases carefully to maintain the correct shape.
Once the sole reaches the desired length and width, finish it with a final round of single crochet stitches around the edges. This creates a smooth border and strengthens the foundation of your bootie. In this Easy crochet booties-Step by Step Tutorial, clean edges contribute to a professional-looking result.
Make sure the sole lies flat on your workspace. If it curls or folds, gently stretch it and adjust your tension in the next bootie. Beginners may need a little practice, but the Easy crochet booties-Step by Step Tutorial ensures that you can correct small imperfections easily.
Repeat the entire process to create the second bootie sole. Ensuring both soles match in size and shape is important for a balanced and attractive finished pair.
Building the Bootie Shape
Once the soles are complete, it’s time to build the sides and upper portion of the booties. In this Easy crochet booties-Step by Step Tutorial, this step transforms the flat soles into a 3D shape. Begin by crocheting around the outer edge of the sole to form the base of the bootie walls.
Work several rounds of single crochet or half double crochet, depending on the thickness you prefer. These rounds gradually lift the sides of the booties. The Easy crochet booties-Step by Step Tutorial recommends maintaining even tension throughout to create smooth and sturdy walls.
After forming the sides, you will shape the toe area. This is done by decreasing stitches at the front of the bootie. Carefully follow the pattern’s decrease instructions so that the bootie takes on a rounded shape at the front. The Easy crochet booties-Step by Step Tutorial ensures this step is simple and beginner-friendly.
Continue working rows back and forth to cover the top of the foot. This creates the upper flap of the bootie. Depending on the style you want, you can make the flap longer, shorter, or even add ribbing for texture. The Easy crochet booties-Step by Step Tutorial provides flexibility for customizing your design.
Once the top portion is complete, join the stitches neatly at the back. Use a slip stitch or tapestry needle to close any remaining openings. A clean finish is essential, and this Easy crochet booties-Step by Step Tutorial guides you toward a polished final look.
Test the fit and shape of the bootie by gently stretching it into place. It should look rounded, comfortable, and symmetrical. Repeat all steps to construct the second bootie.
Decorating and Finishing the Booties
With the booties fully shaped, it’s time to add decorations and finish the project. The Easy crochet booties-Step by Step Tutorial encourages you to express your creativity with different embellishments. You can add small bows, buttons, or flowers to give the booties a unique and adorable style.
Start by weaving in all loose yarn ends using a tapestry needle. This step is essential for a neat and professional finish. The Easy crochet booties-Step by Step Tutorial recommends securing ends tightly so the booties remain durable during use.
If you want to add buttons, choose lightweight ones that won’t bother the baby’s feet. Attach them securely with strong thread. Remember that safety is important, and the Easy crochet booties-Step by Step Tutorial reminds you to avoid small loose pieces when crafting items for babies.
Ribbon ties can be added around the ankle area to help the booties stay in place. These add charm and functionality. When following the Easy crochet booties-Step by Step Tutorial, consider using soft ribbon to prevent discomfort.
You can also create crocheted appliqués, such as hearts, stars, or animals, to sew onto the booties. These tiny additions make the booties even more unique. The Easy crochet booties-Step by Step Tutorial encourages experimenting with colors and shapes.
Before finishing, softly shape the booties with your hands to ensure they look even and well-structured. Take a moment to admire your work, as the Easy crochet booties-Step by Step Tutorial guides you through creating a truly heartfelt handmade gift.
FAQ
How long does it take to make baby booties?
Most beginners can complete a pair within 2 to 3 hours, depending on their speed and the level of decoration.
Can I use any type of yarn for crochet booties?
Soft baby-friendly yarns like acrylic or cotton are recommended for comfort and safety.
Are crochet booties suitable for newborns?
Yes, as long as they are made with soft materials and secure embellishments.
Can I make larger sizes using this tutorial?
Absolutely. You can increase the initial chain and additional rows to create bigger booties.
Do the booties stretch with use?
Yes, crochet naturally stretches, especially with soft yarns, making the booties comfortable for babies.
Is this project beginner-friendly?
Yes, the Easy crochet booties-Step by Step Tutorial is designed specifically for beginners.
Conclusion
The Easy crochet booties-Step by Step Tutorial has guided you through each stage of creating beautiful, comfortable, and handmade baby booties.
From preparing materials to shaping and decorating the booties, this tutorial provides a complete and easy-to-follow guide for beginners and experienced crocheters alike.
Handmade booties are meaningful gifts and adorable accessories that carry the warmth of craftsmanship. I hope you enjoyed this detailed tutorial and feel inspired to create your own pairs. Please leave your sincere opinion and share suggestions so we can continue improving future guides.