
The How to Make a Crocheted Heart Keychain-Step by Step Tutorial is a fun and beginner-friendly guide that teaches you how to create a charming heart-shaped accessory using simple crochet techniques. Whether you’re a new crafter or someone with experience looking for a quick handmade project, this tutorial provides all the information you need to make a beautiful keychain. By using the How to Make a Crocheted Heart Keychain-Step by Step Tutorial, you’ll be able to make a small, thoughtful item perfect for gifting, decorating, or adding a touch of personality to your keys or bags.
One of the best things about learning How to Make a Crocheted Heart Keychain-Step by Step Tutorial is that it requires only minimal materials and a small amount of time. This makes it an ideal project for crafters who enjoy relaxing, creative activities without needing complex patterns or advanced skills. A crocheted heart keychain is not only adorable but also a wonderful way to practice basic stitches, tension control, and simple shaping. Even if you have never crocheted before, this tutorial walks you through every step clearly and calmly.
Handmade items like crocheted keychains bring a personal touch that store-bought accessories often lack. Following this How to Make a Crocheted Heart Keychain-Step by Step Tutorial allows you to create something that expresses love, creativity, and care. It’s a great option for birthdays, Valentine’s Day, friendship gifts, or simple everyday use. With a few stitches and a bit of yarn, you transform a small piece of handmade art into a practical, cute accessory. Now, let’s begin exploring everything you need to create your crocheted heart keychain from start to finish.
Materials Needed for the Crocheted Heart Keychain
To begin the How to Make a Crocheted Heart Keychain-Step by Step Tutorial, gather all the materials necessary for the project. You will need a small amount of yarn, preferably cotton or acrylic, in your chosen color. Cotton is ideal because it gives structure to the heart, while acrylic offers softness and flexibility. Choose a color that expresses the meaning you want—red for love, pink for sweetness, blue for calmness, or any shade that makes your keychain unique.
Next, select a crochet hook that matches the yarn weight. Most small projects like the crocheted heart keychain work well with hooks between 2.5 mm and 4.0 mm. The How to Make a Crocheted Heart Keychain-Step by Step Tutorial emphasizes using the proper hook size so your stitches remain tight enough to hold the shape of the heart. Loose stitches may cause the heart to look floppy, while overly tight stitches can make it difficult to work.
You will also need scissors and a tapestry needle. Scissors help cut the yarn neatly, while the tapestry needle assists in weaving in loose ends and sewing the two halves of the heart together. The How to Make a Crocheted Heart Keychain-Step by Step Tutorial ensures every step is manageable, including the finishing touches with these tools.
Another important item is the keychain hardware—a metal ring or clasp that attaches your crocheted heart to your keys, purse, or backpack. These are inexpensive and easy to find, and they give your finished heart a polished and functional look. In the How to Make a Crocheted Heart Keychain-Step by Step Tutorial, adding hardware is simple and beginner-friendly.
If you want your heart keychain to be slightly puffy, you may also prepare a small amount of fiberfill stuffing. This helps give the heart a soft, rounded shape. The How to Make a Crocheted Heart Keychain-Step by Step Tutorial includes instructions for stuffing the heart safely and evenly.
Finally, choose a comfortable, well-lit workspace. Good lighting helps you see your stitches clearly, especially when working with small projects. A clean and organized area helps you enjoy the crafting experience and follow the How to Make a Crocheted Heart Keychain-Step by Step Tutorial with ease.
Making the First Half of the Crocheted Heart
To start the How to Make a Crocheted Heart Keychain-Step by Step Tutorial, begin by creating a magic ring or a small loop of chains, which forms the center of the heart. This allows you to build the shape outward. The magic ring gives a tighter center, while a chain loop is easier for beginners.
Work a series of stitches into the ring to form the foundation for the heart. This usually includes a combination of single crochet, half double crochet, and double crochet stitches. The How to Make a Crocheted Heart Keychain-Step by Step Tutorial explains each section clearly so beginners can follow along without confusion.
After building the first row of stitches, you’ll begin shaping the heart’s curves. This is done through specific stitch placement and increases. Adding double crochet stitches in certain areas helps form the rounded top of the heart. The How to Make a Crocheted Heart Keychain-Step by Step Tutorial shows how easy it is to give crochet projects their characteristic shape.
To create the point of the heart, work decreases toward the bottom. Proper decreases make the tip sharp and defined. In the How to Make a Crocheted Heart Keychain-Step by Step Tutorial, each decrease is explained simply, making the shaping process smooth and intuitive.
Complete the first half by slip-stitching around the edges to smooth out the shape and create a clean outline. This step improves the finished appearance and prepares the piece for assembly. The How to Make a Crocheted Heart Keychain-Step by Step Tutorial highlights the importance of neat edges.
Set the first heart piece aside and prepare to repeat the same steps to make the second half. Both halves must match in size and shape to create a balanced keychain.
Making the Second Heart Half and Assembly
Once the first heart shape is done, follow the same steps to make a matching second half. The How to Make a Crocheted Heart Keychain-Step by Step Tutorial ensures that each half is identical by guiding you through the same stitch sequence and shaping. Make sure your tension remains consistent so both pieces look uniform.
After finishing the second heart half, place both pieces together with the right sides facing outward. Using a tapestry needle or crochet hook, begin sewing or slip stitching around the edges. The How to Make a Crocheted Heart Keychain-Step by Step Tutorial walks you through this joining method carefully.
As you sew around the edges, leave a small opening at the top or side. This opening is where you will insert the fiberfill stuffing. Add small amounts at a time to avoid overfilling. The How to Make a Crocheted Heart Keychain-Step by Step Tutorial recommends evenly distributing the stuffing to maintain a smooth shape.
After stuffing the heart to your desired firmness, close the remaining opening with neat stitches. Make sure the seam is tight and secure. The How to Make a Crocheted Heart Keychain-Step by Step Tutorial encourages careful finishing to ensure the keychain lasts a long time.
Attach the keychain ring or clasp by threading it through a stitch at the top of the heart. Some crafters prefer using a small loop of yarn to secure the hardware, while others attach it directly to the heart. The How to Make a Crocheted Heart Keychain-Step by Step Tutorial supports either method depending on personal style.
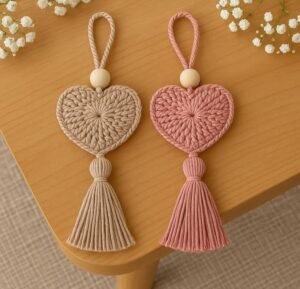
Admire your finished crocheted heart keychain. The project is simple but meaningful, and following the How to Make a Crocheted Heart Keychain-Step by Step Tutorial helps you create a piece that looks polished and professional.
Decorating and Customizing the Heart Keychain
Now that your keychain is assembled, you can personalize it further. The How to Make a Crocheted Heart Keychain-Step by Step Tutorial encourages creativity and customization to make each heart truly unique. You can add small appliqués, embroidery, or beads to decorate your heart.
If you enjoy embroidery, you can stitch initials or small symbols onto the heart using a tapestry needle. This adds sentimental value and makes the keychain a perfect personalized gift. The How to Make a Crocheted Heart Keychain-Step by Step Tutorial explains that even simple stitches create beautiful results.
Adding beads or sequins is another option. Be sure to attach them securely to avoid any accidental detachment. The How to Make a Crocheted Heart Keychain-Step by Step Tutorial recommends this for adult keychains, avoiding small pieces when crafting for children.
Color changes can also add charm. You might crochet each heart half in a different color or add stripes. The How to Make a Crocheted Heart Keychain-Step by Step Tutorial supports experimenting with colors to achieve the look you want.
If you’re making multiple keychains as gifts or for sale, consider a theme—such as pastel hearts, bold hearts, or glitter yarn hearts. Themes make your creations more cohesive. The How to Make a Crocheted Heart Keychain-Step by Step Tutorial notes that themed sets look beautiful when displayed together.
Finally, shape and smooth the heart gently with your fingers, ensuring it looks symmetrical and full. Admiring your work is part of the fun, and the How to Make a Crocheted Heart Keychain-Step by Step Tutorial encourages celebrating your handmade success.
FAQ
Is this heart keychain beginner-friendly?
Yes, the How to Make a Crocheted Heart Keychain-Step by Step Tutorial is perfect for beginners.
How long does it take to make one heart keychain?
Most people finish in 20 to 40 minutes.
Do I need stuffing?
Stuffing is optional but helps the heart keep its shape.
What is the best yarn for this project?
Cotton yarn offers good structure, but acrylic also works well.
Can I wash the keychain?
Yes, gently hand-wash it if needed.
Can kids make this project?
With supervision, older children can follow the How to Make a Crocheted Heart Keychain-Step by Step Tutorial easily.
Conclusion
In this complete How to Make a Crocheted Heart Keychain-Step by Step Tutorial, you learned how to gather materials, crochet both halves of the heart, assemble the keychain, add stuffing, and decorate it creatively.
This small project is perfect for beginners and offers endless customization possibilities. I hope you enjoyed learning this tutorial and feel inspired to make your own heart keychains.
Please leave your sincere opinion and share suggestions so we can continue improving future tutorials.