
Creating a fun handmade accessory is always exciting, and this Crocheted smiling emoji keychain-Step by Step Tutorial will guide you through making a charming and cheerful keychain from start to finish. Whether you are a beginner or an experienced crocheter, this project is quick, enjoyable, and filled with opportunities to personalize your work. Using the keyword Crocheted smiling emoji keychain-Step by Step Tutorial throughout the article ensures search engine optimization while keeping the content natural and informative.
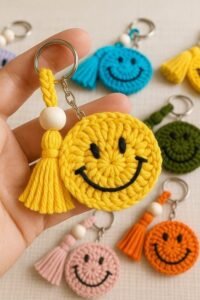
Emoji designs are universally loved, making them perfect for accessories such as keychains, bag charms, and cute handmade gifts. In this Crocheted smiling emoji keychain-Step by Step Tutorial, we will explore easy stitches, color changes, and stuffing techniques to achieve a round and expressive emoji face. Creating such a piece brings joy, not only because of its bright color and happy expression but also because it represents a simple project with satisfying results.
Before we begin the tutorial, it is important to understand the structure and materials needed to ensure a smooth crafting process. This Crocheted smiling emoji keychain-Step by Step Tutorial focuses on clarity and accessibility, making it ideal for all skill levels. With a hook, some yarn, and a bit of stuffing, you’ll create a handmade keychain that is delightful, durable, and perfect for personal use or gifting. Now let’s dive into the steps of making your adorable emoji keychain.
Materials Needed to Begin the Emoji Keychain
The first step in this Crocheted smiling emoji keychain-Step by Step Tutorial is gathering all necessary materials to ensure a comfortable and uninterrupted crafting experience. Yellow yarn is the primary color, as it forms the smiling emoji’s iconic round face. Cotton or acrylic yarn in medium weight is perfect for this project because it creates a firm structure for the keychain. You will also need small amounts of black and white yarn for facial features.
A crochet hook suitable for your chosen yarn is essential. Most crafters prefer a 3.0 to 4.0 mm hook for keychains because smaller hooks create tighter stitches that help maintain the round shape. In this Crocheted smiling emoji keychain-Step by Step Tutorial, using the right hook size is crucial for the finished look, as it helps avoid gaps between stitches where stuffing might show.
You will also need fiberfill stuffing to give the emoji face its dimensional shape. A small amount is enough, but it’s important to use a soft stuffing material that can be easily molded. The stuffing helps maintain the perfectly round emoji shape and gives your keychain a plush, professional finish.
A yarn needle is another essential tool for sewing facial details and closing the keychain shape. This tool will also help you weave in loose ends and attach the keychain ring securely. A simple metal keychain ring or lobster clasp will transform your crocheted piece into a functional accessory.
Preparing your workspace is also important. Choose a clean, well-lit area, and arrange your materials so they are within easy reach. This simple preparation helps you follow each step of the Crocheted smiling emoji keychain-Step by Step Tutorial effortlessly, keeping your crafting experience enjoyable and organized.
Lastly, it is helpful to have a pair of sharp scissors for trimming yarn ends. Clean cuts help make the finished piece look tidy and polished. With all materials gathered, you’re now ready to begin crocheting the emoji.
Creating the Emoji Face Base
To begin forming the smiling emoji, you will create two identical flat circles that will later be joined together. This Crocheted smiling emoji keychain-Step by Step Tutorial starts with a magic ring, a popular technique used to form a tight and clean center. After creating the magic ring, crochet six single crochets into the ring to begin the round shape and pull it tight.
For the next rounds, you will continue increasing in a circular pattern. Typically, crocheters follow the pattern of doubling stitches in each round to expand the circle evenly. This ensures that the shape stays flat while growing in size. The goal is to create a circle that is sturdy and large enough to display the smiling emoji face clearly. In this Crocheted smiling emoji keychain-Step by Step Tutorial, paying attention to even increases helps prevent a wavy or uneven shape.
Continue increasing until your circle reaches the desired size, usually between 2.5 and 3 inches in diameter. This size is perfect for a keychain—small enough to carry easily but large enough to show detailed facial features. After completing the first circle, repeat the process to create a second identical circle. These two pieces will form the front and back of your emoji.
Before assembling the two circles together, check that they match in size and stitch count. This step is important because it affects how smoothly they can be joined. If one circle is slightly larger, you can adjust by adding or skipping a stitch in the final round. This small detail ensures a symmetrical and neat finished piece.
Now, place your circles aside and begin preparing the facial details. The bright yellow base you’ve created will soon transform into a smiling emoji, giving your project its charming personality. The next part of the Crocheted smiling emoji keychain-Step by Step Tutorial will focus on adding those expressive features.
Adding the Smiling Emoji Facial Features
Creating the face is one of the most enjoyable parts of the Crocheted smiling emoji keychain-Step by Step Tutorial, as it brings your emoji to life. Start with the eyes by crocheting or embroidering two small black ovals. You can also use small felt pieces if you prefer a different texture. Whichever method you choose, make sure the eyes are symmetrical and placed evenly on the yellow circle.
Next, create the smile using black yarn. Many crafters choose to embroider the smile directly onto the circle using a yarn needle. A simple curved line works perfectly for a classic smiling emoji expression. Take your time shaping the smile so it looks smooth and cheerful, as this detail greatly affects the overall cuteness of your project.
To add dimension, some crocheters like to add small white highlights to the eyes. This can be done with embroidery thread or tiny crocheted stitches. These small white spots give the emoji an expressive, lively appearance. This step in the Crocheted smiling emoji keychain-Step by Step Tutorial is optional, but it’s a delightful detail that enhances the final look.
Once the facial features are complete, secure all yarn ends by weaving them into the back of the circle. This prevents loose threads from coming undone and ensures a clean finish. Be careful not to pull too tightly so the facial features retain their shape.
Before moving on to assembly, check that the facial features are centered and consistently spaced. Adjusting now is much easier than after the keychain is stuffed and sewn closed. The face should appear balanced, friendly, and instantly recognizable.
With the facial details perfected, you are ready to move forward with joining the two circles together and completing the next steps of the Crocheted smiling emoji keychain-Step by Step Tutorial.
Joining the Keychain and Finishing the Emoji
Begin assembling your emoji by placing the front and back circles together with the wrong sides facing inward. Use single crochet stitches to join the edges, working through both layers. This joining method, recommended in the Crocheted smiling emoji keychain-Step by Step Tutorial, creates a neat and sturdy seam around the entire emoji.
As you crochet around the circle, stop when about one-third of the seam remains open. This gap allows you to insert the stuffing. Use a small amount of fiberfill and press it into the shape until it becomes firm and round. Too much stuffing can distort the shape, so add it little by little until you achieve the perfect balance.
Once stuffed, continue crocheting the seam closed. Make sure the closure is tight and even to ensure the stuffing stays secure inside. This step is crucial for durability, especially since keychains are often handled roughly or carried inside bags.
After closing the seam, attach the keychain ring. To do this, create a small crocheted loop or use a piece of strong yarn to tie the key ring securely to the top of the emoji. Ensure the loop is reinforced so it can withstand daily use. This final attachment transforms your project from a decorative piece into a functional accessory.
Inspect your finished emoji for any loose threads or uneven areas. Trim unnecessary yarn ends and shape the emoji gently with your hands. At this stage, your project should look vibrant, cute, and perfectly round. Your work in this Crocheted smiling emoji keychain-Step by Step Tutorial is nearly complete.
Once everything is finished, you will have a handmade keychain that reflects creativity, joy, and dedication. It makes a fabulous personal accessory or a thoughtful handmade gift.
Crocheted smiling emoji keychain-Step by Step Tutorial
1. Is this project beginner-friendly?
Yes! This Crocheted smiling emoji keychain-Step by Step Tutorial is ideal for beginners who want a simple, fun project to practice basic stitches.
2. What type of yarn works best?
Medium-weight cotton or acrylic yarn works perfectly because it keeps the shape firm and durable.
3. Can I add different facial expressions?
Absolutely! You can create winking, laughing, or heart-eyes emoji variations by modifying the facial details.
4. Do I have to use a magic ring?
While the magic ring creates a cleaner center, you can also begin with a chain of two and crochet into the first chain.
5. How do I prevent stuffing from showing?
Use a smaller hook size to create tight stitches or add a thin felt layer inside for extra coverage.
6. Can children make this project?
Older children with basic crochet experience can definitely make it, but supervision is recommended when using scissors or needles.
Conclusion
This Crocheted smiling emoji keychain-Step by Step Tutorial has shown you how to create a delightful and expressive accessory using simple crochet techniques.
From forming the base circles to adding the charming smile and assembling the final keychain, each step helps you build confidence and skill.
I hope this tutorial inspires you to create more cute emoji designs and explore your creativity. Please leave a sincere opinion and any suggestions you may have for future tutorials. Your feedback helps make each guide even better.