
Learn how to crochet snowflakes.-Step by Step Tutorial is a wonderful way to bring the beauty of winter into your handmade décor. Creating delicate snowflakes with yarn can be both relaxing and rewarding, especially if you enjoy projects that combine elegance with simplicity. In this article, you will not only Learn how to crochet snowflakes.-Step by Step Tutorial, but also understand the techniques behind each stitch and how to achieve professional-looking results. Whether you want to decorate your tree, embellish gifts, or create winter garlands, this guide will help you bring your ideas to life.
Crocheting snowflakes is one of the most satisfying seasonal crafts because it transforms small amounts of yarn into beautiful shapes reminiscent of nature’s perfection. When following this Learn how to crochet snowflakes.-Step by Step Tutorial, you will notice how each round slowly blossoms into a stunning winter motif. This tutorial was designed to be simple, beginner-friendly, and completely safe for all audiences. Each step focuses on clarity while also offering helpful insights that allow you to improve your overall crochet skills.
In addition to being a creative craft, crocheting snowflakes offers an opportunity to practice essential stitches, perfect your tension, and experiment with thread types. By using this Learn how to crochet snowflakes.-Step by Step Tutorial, you will gain confidence and learn how small changes in yarn weight, hook size, or blocking techniques can enhance the final appearance of your snowflakes. With patience and consistency, anyone can create delicate pieces that look handmade and artistic, perfect for holiday décor and winter-inspired gifts.
Understanding the Materials Needed
Choosing the right materials is an important part of this Learn how to crochet snowflakes.-Step by Step Tutorial, because the final look of your snowflake depends heavily on your yarn and hook. A thin cotton thread works beautifully for crisp and delicate snowflakes, but regular lightweight yarn can also be used for a soft and cozy look. Take time to experiment with different textures so you can find what suits your style and purpose.
Your crochet hook size will depend on the thread you choose. A smaller hook creates tighter stitches, giving your snowflakes a more defined shape. This tutorial encourages you to try different hook sizes until you feel comfortable with the tension and appearance. Beginners may prefer a slightly larger hook, while advanced crocheters can experiment with very fine hooks for lace-like results.
Scissors and a yarn needle are essential tools for trimming ends and weaving them securely. Snowflakes often require precise finishing, so clean edges make a big difference. Working patiently during this stage ensures your snowflakes remain neat and durable.
Starch or fabric stiffener is often used to shape snowflakes permanently. While optional, many crafters enjoy the crisp, polished look it creates. You can apply it lightly for a natural feel or more generously for firm, decorative snowflakes. This step is simple and greatly enhances the final results.
A blocking surface such as foam or a board helps you shape your snowflakes symmetrically. By pinning each point in place, you allow the snowflake to dry in a perfect shape. This extra step makes your finished work look refined and professional, even with a beginner-friendly pattern.
Finally, gather your materials before beginning the Learn how to crochet snowflakes.-Step by Step Tutorial so you can follow the instructions smoothly. Preparing ahead of time allows the entire process to feel more enjoyable and organized.
Step-by-Step Instructions for Crafting Your Snowflake
Begin by creating a slip knot and chaining a small number of stitches to form the center ring. This ring is the foundation of your snowflake and serves as the base for all subsequent rounds. Once you join the chain, you will work stitches into the center to create the inner circle.
The first round generally includes simple stitches such as single crochets, double crochets, or chain spaces. These basic shapes determine your snowflake’s symmetry and provide the structure for the decorative points. As you work through this Learn how to crochet snowflakes.-Step by Step Tutorial, always keep your tension even so your snowflake lays flat.
Next, begin forming the points or “arms” of the snowflake. These sections often combine chains, picots, and taller stitches. They give the snowflake its iconic shape and delicate appearance. Take your time and follow the repetition, making sure each point matches the others.
Blocking becomes very important once your snowflake is complete. Pinning each point evenly ensures that your snowflake maintains a balanced and symmetrical shape. This process also highlights the beauty of the stitches and gives the finished piece a crisp and professional look.
If you choose to stiffen your snowflake, apply a small amount of fabric stiffener or starch after blocking. Allow it to dry completely before removing the pins. This ensures your snowflakes remain firm and preserve their shape for long-term use.
When all steps are complete, admire your finished snowflake and appreciate the transformation of simple stitches into a delicate winter design. The Learn how to crochet snowflakes.-Step by Step Tutorial allows you to recreate this beauty again and again.
Customizing Your Crocheted Snowflakes
Once you master the basic structure, you can personalize your snowflakes in many ways. Adjusting stitch counts, chain lengths, or picot designs can give each snowflake a unique and artistic appearance. Experimenting with different variations makes crocheting snowflakes even more enjoyable.
Color choice is another way to customize your snowflakes. Classic white is always stunning, but soft blues, silvers, and pastels can create interesting visual effects. This helps your snowflakes stand out when displayed during the winter season.
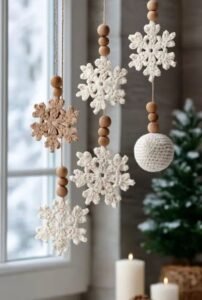
Adding beads or small embellishments can give your snowflakes a sparkling touch. These additions create a festive and elegant look, especially when used for holiday decorations. Always attach beads securely so they remain in place.
Different yarn types also create different textures. Using metallic thread can give your snowflakes a shimmering appearance, while cotton thread offers a clean and crisp finish. Each type brings a different charm to the design.
If you enjoy making larger projects, consider combining many crocheted snowflakes into garlands, ornaments, or wall décor. The versatility of snowflakes makes them perfect for a wide range of handmade crafts.
This customization section enhances your experience with the Learn how to crochet snowflakes.-Step by Step Tutorial, helping you create designs that reflect your personal style.
Tips for Perfecting Your Snowflakes
Consistent tension is essential when crocheting snowflakes. If your stitches are too loose or tight, the snowflake may warp. Always take your time and adjust your tension for the smoothest results.
Reading through the entire pattern before starting helps avoid confusion during the process. Understanding the structure makes it easier to follow each step with confidence. This is particularly helpful for beginners.
Use stitch markers when necessary. They help you keep track of stitch repeats and ensure accuracy when forming symmetrical points. This small tool can greatly improve your results.
Practice blocking often, as it is one of the most important finishing steps. Proper blocking enhances the beauty of your snowflakes and ensures they keep their shape for years.
Try making snowflakes in batches. Once you get comfortable, repeating the pattern becomes faster and easier, allowing you to create multiple pieces in one sitting.
Following these tips will help you get the most out of the Learn how to crochet snowflakes.-Step by Step Tutorial and create flawless designs every time.
FAQ
What type of yarn is best for crocheting snowflakes?
Lightweight cotton thread is typically recommended, but you can use any thin yarn depending on the look you prefer.
Do I need to stiffen my crocheted snowflakes?
Stiffening is optional, but it helps maintain the snowflake’s shape, especially for decorative uses.
Can beginners follow this tutorial?
Yes, this Learn how to crochet snowflakes.-Step by Step Tutorial is beginner-friendly and easy to follow.
How long does it take to make one snowflake?
Most snowflakes can be completed in 15 to 45 minutes depending on the pattern complexity.
Can I use these snowflakes for gift decorations?
Absolutely. Crocheted snowflakes make beautiful gift toppers and holiday ornaments.
Do snowflakes require special blocking tools?
No special tools are required. A foam board and pins work perfectly for blocking.
Conclusion
This article guided you through the complete Learn how to crochet snowflakes.-Step by Step Tutorial, from choosing materials to finishing your beautiful creations.
You learned how to craft delicate snowflakes, customize them, and perfect your technique through simple tips.
I hope you enjoyed this tutorial and feel inspired to create your own collection of handmade winter décor. Please leave a sincere opinion and suggestions so I can continue bringing helpful and creative content for you!