
Creating a Carrot-shaped crochet bag pattern-Step by Step Tutorial is a fun and creative project that blends style, utility, and personality. Right from the first stitch, this design stands out for its unique shape and vibrant appearance, making it perfect for gifting, decorating, or accessorizing your everyday outfits. This article will guide you through every stage of the process while using essential techniques that are easy to follow even if you are new to crochet. Throughout the text, the term Carrot-shaped crochet bag pattern-Step by Step Tutorial will appear naturally to help reinforce the theme and improve overall SEO performance.
This delightful project is suitable for anyone who enjoys making handmade items that bring charm and character to their accessories. The Carrot-shaped crochet bag pattern-Step by Step Tutorial provides a playful style that captures attention and sparks creativity. With the right yarn, hook size, and pattern instructions, you can craft a bag that is both decorative and functional. Beginners love this idea because it doesn’t require advanced techniques, while experienced crafters appreciate the room for personalization and detail.
The goal of this Carrot-shaped crochet bag pattern-Step by Step Tutorial is to make the process simple, enjoyable, and rewarding. Whether you intend to sell your handmade bags, offer them as holiday gifts, or simply use them for personal enjoyment, this guide will help you achieve a beautiful final result. The project is also an excellent opportunity to practice your crochet tension, shaping, and finishing skills while creating something adorable and practical.
Understanding the Carrot-Shaped Bag Structure
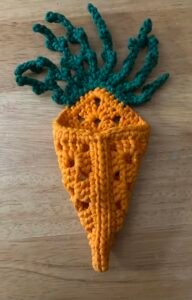
The first step in making a carrot-inspired bag is understanding its overall structure. The Carrot-shaped crochet bag pattern-Step by Step Tutorial typically features a tapered body that resembles the root of a carrot, gradually narrowing toward the bottom. This shape is easy to achieve with increases and decreases, making the bag form naturally as you work each round. The top part is usually slightly wider and may include a drawstring or flap closure.
Another essential characteristic of the bag is the leaf-shaped top, which adds charm and enhances the carrot theme. You can create these leaves using simple chain stitches and shaping techniques. In this Carrot-shaped crochet bag pattern-Step by Step Tutorial, you will find that individual leaf motifs can be attached to the top of the bag for a more realistic effect. This decorative detail completes the “carrot” look and makes the bag extra appealing.
Choosing the ideal materials is also part of understanding how the bag will turn out. Most creators prefer cotton yarn, which provides durability and a clean stitch definition. Others choose acrylic yarn for a softer, more flexible finish. Regardless of your choice, the Carrot-shaped crochet bag pattern-Step by Step Tutorial encourages you to select bright orange tones for the carrot body and green shades for the leaf accents.
For beginners, working in continuous rounds can feel challenging, but this is part of what gives the carrot bag its smooth, seamless appearance. Using stitch markers and counting your stitches carefully ensures that the shape forms correctly. The tutorial provides guidance on how to maintain even tension so the bag does not look stretched or uneven.
When planning the bag size, decide whether you want a mini version for decorations or a larger version suitable for storing accessories or small gifts. The Carrot-shaped crochet bag pattern-Step by Step Tutorial gives you freedom to adjust the number of rounds, making it fully customizable. With just a few pattern adjustments, you can create a whole set of carrot-shaped bags in various sizes.
Lastly, understanding how the bag will be assembled helps you prepare for the finishing touches. Once the body is crocheted, you will join the top leaves, attach the strap if desired, and add any optional decorative details. This tutorial ensures that every step is covered clearly and thoroughly.
Step-by-Step Instructions for the Carrot Body
To begin crafting the carrot-shaped body, start with a magic ring. This technique ensures a tight and seamless center at the bottom of the bag. The Carrot-shaped crochet bag pattern-Step by Step Tutorial recommends starting with six single crochets inside the ring, then gradually increasing each round to widen the shape. This creates the characteristic rounded bottom of the carrot shape.
As you continue upward, it is time to incorporate additional rounds of increases to reach the desired width. Count each stitch to maintain the correct shape. The round technique used in this Carrot-shaped crochet bag pattern-Step by Step Tutorial ensures that the bag grows evenly and looks polished. Using bright orange yarn enhances the natural carrot appearance and brings life to the design.
Once the base is complete, you will stop increasing and continue crocheting in even rounds to build the main body of the bag. This section typically consists of several rounds, depending on how tall you want the carrot bag to be. The tutorial advises using a stitch marker to keep track of each round, which is particularly helpful for beginners and ensures accuracy.
As the bag approaches the top, you will begin decreasing to create the tapered top edge before attaching the green leaf portion. The Carrot-shaped crochet bag pattern-Step by Step Tutorial explains how to execute these decreases smoothly without creating gaps. Maintaining the correct tension is crucial here to achieve a clean and even finish.
For a functional carrot bag, consider adding an inner lining made of lightweight fabric. While optional, this enhances durability and supports the structure of the crochet. The tutorial encourages crafters to choose a fabric that complements the orange yarn. Even without lining, the crochet structure is still sturdy enough for everyday use.
Once the carrot body is complete, fasten off the yarn and weave in the ends. This step ensures that the bag looks neat and professional. With the main section finished, you can now move on to the decorative leaves, which bring the carrot bag design together beautifully.
Creating the Leaf Accents
To form the carrot leaves, choose a green yarn that contrasts well with the orange body. The Carrot-shaped crochet bag pattern-Step by Step Tutorial typically includes several leaf motifs, each created with chain stitches and shaped using slip stitches and single crochets. This simple technique gives the leaves texture and a natural-looking form that resembles real carrot leaves.
Begin each leaf by chaining a length that matches the size of the bag. Longer chains create large, flowing leaves, while shorter chains produce a more compact look. In this tutorial, you will learn to adjust the leaf sizes to personalize the design. Crocheting back down the chain helps build structure and gives the leaves a slightly curled appearance.
Once you have created multiple leaves, attach them securely to the top of the carrot bag. The Carrot-shaped crochet bag pattern-Step by Step Tutorial shows where to position each leaf for the best visual effect. Spreading them evenly around the top creates a full and lush appearance, making the bag look more realistic and playful.
If you prefer adding a drawstring, you can weave it through the last few rounds of the carrot body before attaching the leaves. This makes the bag functional and easy to open and close. The drawstring can also be embellished with small beads, knots, or crochet accents. These small touches enhance the overall charm of the design.
Some crafters enjoy adding a strap to transform the carrot-shaped bag into a wearable accessory. In this Carrot-shaped crochet bag pattern-Step by Step Tutorial, you can choose between a long shoulder strap, short handheld strap, or even a detachable option. Reinforcing the strap area ensures that the bag remains sturdy even with frequent use.
Once all the leaves and optional additions are secured, the bag is ready for the final touches. You may gently shape the leaves or block them slightly to maintain their form. The completed carrot bag now has a unique, adorable appearance perfect for gifts, décor, or everyday use.
Finishing and Personalizing the Bag
The finishing stage is where your creativity can truly shine. After completing the basic structure, the Carrot-shaped crochet bag pattern-Step by Step Tutorial encourages adding personal touches to make the design truly unique. Many crafters like to embroider small details or attach decorative buttons that complement the carrot theme.
Adding a lining is another great way to enhance the bag. Choose a fabric that matches your personal style or the intended recipient’s taste. A fun polka-dot pattern or a green print can bring even more charm to the design. The tutorial explains how to stitch the fabric lining neatly inside the bag for a polished and professional finish.
Consider adding a closure system, such as a button, wooden bead, or snap. The Carrot-shaped crochet bag pattern-Step by Step Tutorial discusses several closure methods that are both functional and decorative. Selecting a closure that complements the carrot shape makes the bag practical while enhancing its aesthetic appeal.
For those who want to create multiple carrot bags, each one can be customized with different shades of orange or green. This gives each bag a distinct personality and makes them perfect for selling or gifting. The tutorial encourages experimenting with textures, yarn types, and decorative elements.
Some crafters choose to add small pockets inside the lining for extra organization. This optional detail may require basic sewing, but it greatly improves the bag’s functionality. The Carrot-shaped crochet bag pattern-Step by Step Tutorial recommends simple stitches that are easy to apply even if you are not experienced with sewing.
Once all elements are assembled, check the bag for any loose threads or uneven areas. Making these small adjustments ensures a clean final result. Your carrot-shaped crochet bag is now complete—fun, functional, and full of charm.
FAQ
What materials do I need to make a carrot-shaped crochet bag?
You will typically need orange and green yarn, a crochet hook that matches the yarn weight, scissors, a tapestry needle, and optional fabric for lining. Some crafters also use beads or buttons for decoration.
Is this project suitable for beginners?
Yes, the project is beginner-friendly. The Carrot-shaped crochet bag pattern-Step by Step Tutorial uses basic stitches such as single crochet, slip stitch, and simple increases and decreases.
How long does it take to complete the bag?
Most crafters finish the bag in a few hours to a full day, depending on experience level and desired size.
Can I sell the bags I make from this pattern?
Yes, handmade carrot-shaped bags are popular items to sell at craft fairs and online. Just be sure that your finished items are original and handcrafted.
Can the pattern be adjusted to make larger bags?
Absolutely. You can increase the number of rounds or adjust the stitch count to create different sizes.
Do I need to line the bag?
Lining is optional but recommended for added durability and structure. It also gives the bag a more professional appearance.
Conclusion
In this detailed Carrot-shaped crochet bag pattern-Step by Step Tutorial, you learned how to create a unique and charming bag from start to finish.
We explored materials, shaping techniques, leaf accents, personalization tips, and finishing methods to ensure your project turns out beautifully.
Whether you make it for yourself, as a gift, or for sale, this adorable carrot-shaped bag is sure to impress. If you found this tutorial helpful, please leave a sincere opinion and share your suggestions for future ideas.