
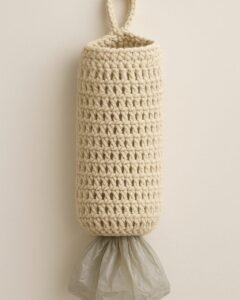
Starting with the theme Try making this easy crochet idea.-Step by Step Tutorial, this article will guide you through a beginner-friendly crochet project that is both fun and creatively fulfilling. From the very first line, you will notice how this key phrase helps shape the direction of the content, ensuring clarity, consistency, and SEO optimization. Whether you are a beginner or an experienced crafter, this tutorial will inspire you to explore new techniques and enjoy the relaxing process of crocheting something handmade. By emphasizing Try making this easy crochet idea.-Step by Step Tutorial, we set the tone for a humanized, structured, and helpful guide.
Crochet continues to grow in popularity, and many people are constantly searching for simple yet beautiful ideas they can try at home. If you’ve been wanting to improve your skills, challenge yourself creatively, or simply relax with a new hobby, this project will be a great fit. The use of the term Try making this easy crochet idea.-Step by Step Tutorial throughout the article is intentional, helping search engines better understand the topic while giving you a clear pathway to follow. This content is built to support your learning process and keep you engaged from start to finish.
Before diving into the structured sections of this guide, it’s important to highlight how beneficial this crochet exercise can be. Creating something handmade is not only fulfilling but also a wonderful way to build confidence in your crafting abilities. By following the steps carefully and taking your time, you will notice how even an easy crochet idea can turn into something impressive. Keep the phrase Try making this easy crochet idea.-Step by Step Tutorial in mind as a reminder that you’re learning through a supportive and accessible approach.
Understanding the Materials You Will Need
To begin this project successfully, it is essential to gather all the materials beforehand. Doing so will help you work more smoothly and enhance your overall crafting experience. You only need a few basic tools, making this ideal for beginners and anyone on a budget. Keeping things simple allows you to fully appreciate the process without feeling overwhelmed.
Start by selecting a yarn that is comfortable and easy to handle. Most people prefer medium-weight yarn for beginner projects because it provides excellent stitch visibility. You are free to choose any color you like, so pick something that inspires you and encourages you to keep working on your project.
Next, you will need a crochet hook that matches the thickness of your yarn. Hooks generally display the recommended size, so check the yarn label for guidance. Using the right hook size is important because it influences the tension and overall appearance of your work. This step also ensures your final piece looks neat and well-structured.
You may also want to have a yarn needle for weaving in loose ends, which is essential for finishing your piece with a professional touch. Although this is a small detail, it makes a big difference in the final appearance. Scissors are another necessary tool, and keeping them nearby will make the process more efficient.
Optional accessories such as stitch markers can be helpful, especially if you’re new to crocheting. These small items help you keep track of counting, making the project less confusing and more enjoyable. Having everything ready in advance contributes to a smoother and more organized crafting experience.
Finally, keep your workspace clean and comfortable, as this contributes to better focus and relaxation. A well-lit area helps you see your stitches clearly, preventing mistakes and reducing eye strain. Taking these steps may seem simple, but they are essential for ensuring your project starts off right.
Step-by-Step Instructions for Beginners
Following the Try making this easy crochet idea.-Step by Step Tutorial process, you will now learn how to begin your project with confidence. Each step is written clearly and intentionally, making it accessible even if this is your first attempt at crocheting. Remember that practice is key, so be patient and take your time with each stitch.
To begin, create a basic slip knot and place it on your hook. This is the starting point for most crochet projects, and once you master it, you’ll feel much more comfortable. Pull the yarn gently to secure the knot without tightening it too much.
Next, start forming your foundation chain. This step determines the length of your project, so make sure to keep your chain even and consistent. Try to avoid pulling too tightly, as this may affect the flexibility of your first row.
Once your chain is complete, you will begin your first row of stitches. Depending on the pattern you decide to follow, this might involve single crochet, half-double crochet, or double crochet. Beginners often find it easier to start with single crochet, as it is simple and creates a solid base.
Continue working row by row, maintaining even tension throughout the fabric. This is where many beginners notice their confidence start to grow, as the piece begins to take shape. Don’t worry if your stitches are not perfect at first—crochet improves naturally with practice.
If you make a mistake, simply pull the yarn gently to unravel the stitches and redo them. One advantage of crochet is that errors are easy to fix, allowing you to learn without frustration. Celebrate small improvements, as they show your progress with every stitch.
By the time you reach the end, you will see how satisfying it is to follow a complete Try making this easy crochet idea.-Step by Step Tutorial from beginning to end. Keep practicing and exploring new stitch combinations to develop your skills further.
Tips to Improve Your Crochet Technique
Improving your technique is an important part of any crafting journey, and even simple projects offer opportunities to grow. Every crafter starts as a beginner, so allow yourself room to learn and enjoy the process. With patience, consistency, and the right guidance, your work will naturally become more refined.
One helpful tip is to maintain consistent tension as you crochet. This creates a smoother final result and prevents uneven edges. It may take some time to find the perfect balance, but with regular practice, it becomes second nature.
Another valuable suggestion is to hold your hook in a way that feels comfortable for your hand. There is no single correct method—some prefer the pencil grip, while others like the knife grip. Experiment with both options and see which one works best for you.
Using high-quality yarn can also enhance your experience. Softer, smoother yarn tends to glide more easily on the hook, reducing friction and making your stitches neater. As you gain experience, you can try different textures and materials.
Taking breaks during longer sessions is important for avoiding hand strain. Crocheting is enjoyable and relaxing, but repetitive movements can cause fatigue. Stretch your fingers and wrists regularly to maintain comfort.
Watching your progress is one of the most rewarding parts of crocheting. Photograph your work or keep small samples to compare how your technique improves over time. Whether you’re following the Try making this easy crochet idea.-Step by Step Tutorial or experimenting on your own, every step takes you closer to mastery.
Finishing and Customizing Your Project
Once you complete your final row, it’s time to finish your project with care and attention to detail. Secure your last stitch by pulling the yarn through and tightening it gently. This prevents unraveling and ensures durability.
Next, use a yarn needle to weave in all loose ends. This step might seem small, but it greatly enhances the overall appearance of your work. It keeps your project tidy and gives it a polished, complete look.
After weaving in the ends, take a moment to inspect your piece for any areas that may need adjustments. If you notice uneven stitches or bumps, lightly reshape the fabric with your hands. This helps the project settle into its final form.
You also have the option to customize your piece. Adding decorative elements such as buttons, tassels, or embroidered details can elevate the design. These small touches make your creation more personal and unique.
Blocking is another technique used to shape crochet projects. While not always necessary for beginners, it can enhance the overall structure of your work. Simply dampen the piece lightly and lay it flat to dry in the desired shape.
By the end of this process, you will have created something beautiful using the Try making this easy crochet idea.-Step by Step Tutorial. This accomplishment not only encourages you to keep practicing but also demonstrates the power of creativity and handmade art.
FAQ
What is the easiest crochet idea for beginners?
Beginners often enjoy simple projects like coasters, squares, or small accessories. These pieces require basic stitches and allow you to practice comfortably.
How long does it take to complete an easy crochet project?
The time varies depending on the project size and your experience level. Many beginners finish small items within a few hours.
What materials do I need to start crocheting?
You will typically need yarn, a crochet hook, scissors, and a yarn needle. Optional items like stitch markers can also be helpful.
Is crochet difficult to learn?
Crochet can feel challenging at first, but with clear instructions and regular practice, most people learn quickly. Starting with easy ideas helps build confidence.
Can I customize my crochet project?
Yes, you can add decorations, switch colors, or adjust the size to make your project more personal. Customization is one of the most enjoyable parts of crocheting.
Conclusion
In this guide, you learned how to follow the Try making this easy crochet idea.-Step by Step Tutorial from start to finish.
We explored essential materials, beginner-friendly steps, helpful techniques, and customization ideas.
Completing a crochet project is rewarding and inspiring, especially when you take the time to enjoy the process. If this tutorial helped you, please leave your honest opinion and share suggestions for future topics. Your feedback is always welcome and helps improve future content.