
Creating beautiful holiday ornaments is one of the most enjoyable parts of the festive season, and this Crochet Christmas Baubles-Step by Step Tutorial is designed to help you craft meaningful handmade decorations with ease. Right from the first stitch, you will discover how satisfying and relaxing it is to crochet unique baubles that express your creativity. These baubles can be used to decorate your tree, brighten your home, or even serve as small gifts for friends and family. The combination of simple crochet techniques and colorful yarn choices allows you to create ornaments that stand out with charm and warmth. By following this guide, you will feel confident whether you are a beginner or an experienced crafter.
One of the reasons why the Crochet Christmas Baubles-Step by Step Tutorial is so popular is its versatility. Every ornament can be customized with your preferred colors, patterns, and textures, making each one a personal expression of your holiday spirit. Crochet baubles offer endless creative freedom, from traditional red and green combinations to soft pastel options or even metallic yarns that reflect light beautifully. When you create your own baubles, you also give yourself the chance to relax, unwind, and channel your imagination during one of the busiest times of the year. Handmade decorations carry a sentimental value that store-bought items simply cannot match.
Before diving into the detailed steps, this Crochet Christmas Baubles-Step by Step Tutorial introduces fundamental techniques that make each ornament both sturdy and aesthetically pleasing. This project encourages slow crafting, helping you enjoy every part of the process, from forming the initial magic ring to adding the final embellishments. You don’t need advanced crochet skills to succeed; all you need is basic knowledge of stitches, patience, and enthusiasm for handmade holiday decor. With that in mind, let’s explore the materials, techniques, and instructions needed to create your own charming crochet baubles.
Choosing Materials for the Crochet Christmas Baubles
Selecting the right materials is an essential part of this Crochet Christmas Baubles-Step by Step Tutorial, as it determines the durability and appearance of your finished ornaments. Yarn type is one of the key decisions you will make, and cotton yarn is commonly recommended due to its clean stitch definition and smooth texture. However, acrylic yarn also works well, especially if you prefer a softer finish or a more budget-friendly option. Try to choose yarn in festive colors that match your overall holiday theme, whether traditional or modern.
In addition to yarn, you will need the proper hook size to achieve the ideal tension. Most bauble patterns work best with smaller hooks that create tight stitches, ensuring the ornament maintains its shape. Depending on the yarn thickness, a hook between 2.5 mm and 4 mm is usually suitable. The tighter the stitches, the more solid your bauble will be, which is particularly important if you plan to fill it with stuffing or cover a plastic ball insert.
Stuffing material is another important consideration. Polyfiber stuffing is commonly used because it provides a lightweight, fluffy interior that keeps the bauble round. Some crafters prefer to use foam spheres or reusable plastic ornaments inside their crochet covers. This technique ensures perfect shape and makes the bauble stronger, especially if you have children or pets around the house. No matter your choice, consistency in stuffing is essential to avoid lumps or uneven surfaces.
Decorative elements also play a significant role in this project. While the Crochet Christmas Baubles-Step by Step Tutorial focuses on crochet techniques, you can enhance your baubles with ribbons, beads, sequins, or embroidery. These embellishments add personality and sparkle to your pieces. Just be sure to attach decorations securely to avoid any loose parts, especially if the baubles will be handled frequently.
Another useful material is a yarn needle for sewing parts together and weaving in ends. A small pair of scissors will also come in handy for trimming excess yarn. Having these tools prepared before you start helps maintain a smooth workflow and makes the entire crafting experience more enjoyable. Good materials do not have to be expensive, but choosing reliable ones will improve the final result.
Finally, remember that practicing with different materials is part of the learning process. Some yarns glide more easily through your fingers, while others provide more control. Try experimenting with a few options so you can determine which materials work best for your style and comfort level. This preparation will ensure excellent results as you continue through the Crochet Christmas Baubles-Step by Step Tutorial.
Crocheting the Base Shape of the Bauble
The first step in creating your ornament in this Crochet Christmas Baubles-Step by Step Tutorial is forming the base shape. The foundation usually begins with a magic ring, a technique that allows you to close the center tightly, leaving no gaps. This method is perfect for round projects because it ensures a neat and polished appearance. After forming the ring, you will work single crochet stitches in increasing rounds.
Increasing the stitch count gradually helps build a smooth, rounded structure. Each round typically adds evenly spaced stitches that expand the bauble’s diameter. Maintaining consistent tension while crocheting is essential, as it ensures the bauble remains symmetrical. If your tension varies too much, the ornament may appear uneven or lopsided. Taking your time with each round gives you the best outcome.
Once the bauble reaches its widest point, the next step involves crocheting rounds without increases. These rounds form the middle section of the bauble. This part of the Crochet Christmas Baubles-Step by Step Tutorial is usually simple and repetitive, making it a soothing and enjoyable section of the project. Crocheters often appreciate this step because it creates a rhythmic flow.
After completing the middle rounds, you will begin decreasing stitches to close the shape. These decreases should be done gradually and evenly, just like the increases earlier. Using the invisible decrease technique results in a cleaner finish, avoiding small holes between stitches. Taking care during this stage ensures your bauble forms a perfect sphere.
Before closing the final stitches, this is the moment to add stuffing or insert your foam or plastic ball. Make sure the stuffing is evenly distributed to maintain a smooth and round shape. Insert small amounts of filling at a time rather than pushing in large chunks. This technique prevents lumps and helps you achieve a polished bauble.
Finally, close the top by tightening the remaining stitches and weaving in the yarn tail securely. This completes the base shape of your ornament. With practice, this part of the Crochet Christmas Baubles-Step by Step Tutorial becomes second nature, allowing you to create multiple baubles quickly and efficiently.
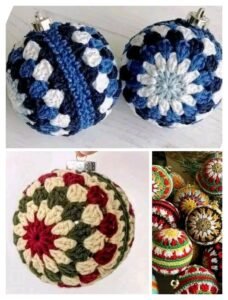
Adding Decorative Details to Your Crochet Christmas Baubles
Enhancing your baubles with decorations is one of the most creative steps in this Crochet Christmas Baubles-Step by Step Tutorial. Simple color changes during crocheting can create stripes, spirals, or geometric patterns. Switching yarn colors between rounds adds interest and contrast, making your bauble more visually appealing. Experiment with festive combinations, such as gold and white or red and green.
Another way to decorate your baubles is by applying surface embroidery after completing the crochet base. Using a yarn needle, you can stitch simple stars, snowflakes, or swirls onto the surface. This technique allows you to personalize each ornament, giving it a unique and handcrafted touch. Embroidery adds depth and texture without overwhelming the design.
Beads and sequins can also be incorporated into your baubles for extra sparkle. These embellishments reflect light beautifully and bring your ornaments to life on the Christmas tree. If you choose to use beads, select lightweight ones so they do not weigh down the bauble. Sew them on firmly to prevent them from loosening over time.
Ribbon loops are another common decorative addition. Instead of simply attaching a yarn loop for hanging, you can use a thin ribbon in a complementary color. This small detail elevates the final look of the bauble and makes it feel more polished. Ribbons can also be tied into small bows and sewn onto the top for an elegant finish.
For those who enjoy textured designs, consider experimenting with bobble stitches, puff stitches, or crochet cables. These techniques create raised patterns that add dimension to your bauble. The key is to choose textures that enhance the design without making the bauble too heavy or bulky. Light and airy textures often work best.
No matter which decorative details you choose, the goal is to create ornaments that reflect your style and creativity. The Crochet Christmas Baubles-Step by Step Tutorial encourages you to explore different methods, experiment with colors, and enjoy the process of transforming a simple crochet ball into a beautiful holiday decoration.
Finishing and Displaying Your Crochet Christmas Baubles
The final stage of the Crochet Christmas Baubles-Step by Step Tutorial focuses on assembling, finishing, and displaying your handmade ornaments. Proper finishing techniques ensure that your baubles look clean, neat, and professionally crafted. Start by trimming all loose ends and weaving them securely into the stitches. This prevents unraveling and keeps the ornament looking polished.
If your bauble requires any final shaping, gently roll it between your hands to smooth out the form. Some crafters lightly steam-block their baubles to help the stitches relax and take shape. However, be cautious with steam if you used acrylic yarn, as excessive heat can cause the fibers to melt. A gentle approach is always best.
Next, attach a loop to hang the bauble. You can create a simple chain loop from the same yarn or use decorative ribbon. Make sure the loop is strong enough to support the bauble and securely fastened to prevent slipping. This step completes the ornament structurally and prepares it for display.
Displaying your baubles is an exciting part of the project. These decorations look beautiful on Christmas trees, wreaths, mantels, or even attached to wrapped gifts. Their handmade charm brings a warm and festive atmosphere to your home. You can also create themed collections, such as vintage-inspired sets, minimalistic sets, or colorful assortments.
These baubles also make thoughtful and heartfelt gifts. Handmade ornaments are appreciated because they represent time, effort, and creativity. They can be personalized with names, dates, or color schemes that match someone’s home or holiday theme. This makes your work even more meaningful and memorable.
Finally, remember that the beauty of this Crochet Christmas Baubles-Step by Step Tutorial lies in the joy of crafting. Whether you make one bauble or an entire collection, the satisfaction of creating your own holiday decorations is unmatched. Enjoy the process, celebrate your progress, and continue developing your skills.
FAQ – Crochet Christmas Baubles
1. Are crochet Christmas baubles suitable for beginners?
Yes, many bauble patterns are beginner-friendly. This tutorial uses simple stitches and step-by-step instructions, making it ideal for those new to crocheting ornaments.
2. What type of yarn works best for crochet baubles?
Cotton yarn offers excellent stitch definition, while acrylic provides softness and flexibility. Both options work well depending on your preference.
3. Can I use foam or plastic inserts instead of stuffing?
Absolutely. Inserts help create a perfectly round bauble and add durability, making them a great choice for long-lasting ornaments.
4. How do I keep my baubles from looking lumpy?
Insert stuffing gradually and shape the bauble as you go. This prevents lumps and helps maintain a smooth surface.
5. Is it possible to add beads or sequins to crochet baubles?
Yes, beads, sequins, and embroidery can add beautiful decorative touches, as long as they are securely attached.
6. How do I make the baubles hang nicely on the tree?
Attach a sturdy yarn loop or ribbon at the top. Ensure it is tightly fastened and centered for proper balance.
Conclusion
This Crochet Christmas Baubles-Step by Step Tutorial has guided you through choosing materials, crocheting the base, adding decorative elements, and finishing your handmade ornaments.
With creativity and patience, you can create beautiful baubles that brighten your holiday décor and carry sentimental value.
I hope this tutorial inspires you to explore new styles, practice your skills, and enjoy the magic of crafting. Please feel free to leave your sincere opinion and share your suggestions so I can continue improving future tutorials.