
Crocheted Christmas Wreath with Bells-Step by Step Tutorial projects have become a favorite among crafters who enjoy creating festive handmade decorations for the holiday season. When you follow an Crocheted Christmas Wreath with Bells-Step by Step Tutorial, you can design a charming, warm, and personal ornament that enhances your Christmas decor with a unique touch. This type of project offers endless opportunities for customization and creativity, making it enjoyable for beginners and experienced crocheters alike. The detailed process of crafting a wreath with bells gives you the chance to combine traditional crochet stitches with beautiful holiday elements.
One of the main reasons people love working on a crocheted Christmas wreath with bells is the festive feeling it brings. The colors, textures, and design reflect the spirit of the season while allowing makers to express their artistic vision. When you make your own wreath, you can personalize it in any way you like—whether you prefer classic red and green, shimmering metallics, or more modern pastel tones. This Crocheted Christmas Wreath with Bells-Step by Step Tutorial provides all the essential information to help you craft a decorative piece that suits your style and complements your home for the holidays.
Before beginning the tutorial, it’s important to understand the basic materials and techniques needed for your project. A Crocheted Christmas Wreath with Bells-Step by Step Tutorial typically includes yarn, hooks, stuffing material, and decorative accessories like bells, ribbons, or faux greenery. These items help create the structure and festive look of the wreath. Whether you plan to hang it on your door, place it on a mantle, or give it as a handmade gift, the process remains simple and rewarding. The next sections will guide you through every stage, from gathering materials to assembling the final decorative details.
Materials Needed for Your Crocheted Christmas Wreath
To begin your Crocheted Christmas Wreath with Bells-Step by Step Tutorial, the first step is collecting all the materials required for the project. Most crocheters prefer using medium-weight acrylic or cotton yarn, as these fibers hold their shape well and come in a wide range of festive colors. You may select traditional holiday shades or mix and match hues to create a more personalized design.
Your crochet hook size will depend on the yarn you choose, but most crafters use hooks between 4 mm and 5.5 mm for wreath projects. The right hook will ensure your stitches are tight enough to form a neat and sturdy structure. This step is essential for creating a wreath that maintains its round shape and supports the decorations added later.
Stuffing is another important component for shaping the wreath. Polyfill is commonly used because it is lightweight, easy to manipulate, and helps achieve a smooth appearance. You can adjust the amount of stuffing depending on whether you prefer a slim wreath or a fuller, more plush design.
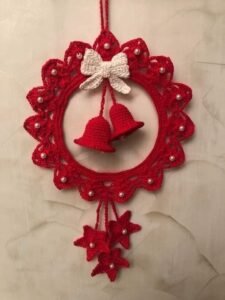
Decorative accessories are what transform your wreath from a simple crochet project into a festive holiday piece. The Crocheted Christmas Wreath with Bells-Step by Step Tutorial encourages the use of small bells, bows, miniature ornaments, or crocheted appliqués like holly leaves and berries. These add visual interest and enhance the holiday theme.
You may also want a wreath base for added stability. While some crocheters prefer to crochet entirely from scratch, others choose foam or wire bases that are wrapped with yarn and secured with stitches. Either approach works well and depends on your crafting preferences.
Finally, ensure you have essential tools such as scissors, stitch markers, and a yarn needle. These basic tools make the crafting process much more efficient and help you achieve a clean, polished result in your wreath project.
Step-by-Step Instructions to Make the Wreath
To start the Crocheted Christmas Wreath with Bells-Step by Step Tutorial, create the foundation for your wreath using a long crocheted tube. Begin by chaining enough stitches to form the width you desire. Most wreaths use between 25 and 35 chains, depending on size. This chain will determine the thickness of your wreath once it is stuffed and shaped.
Next, work rows of your chosen stitch—most crafters prefer single crochet or half-double crochet for a firm, dense texture. Continue crocheting rows until the piece is long enough to wrap around your wreath base or form a complete circle when joined. Maintaining consistent tension will make the wreath smooth and even.
Once your tube is complete, fold it lengthwise and seam the long edge together using slip stitches or a yarn needle. This will form a long, stuffed tube. Before closing the ends, carefully fill the tube with Polyfill or your chosen stuffing material. Ensure the stuffing is distributed evenly to avoid bumps or uneven stretches.
After stuffing, join the ends of the tube to create a circular shape. Use firm stitches to close the seam securely. This forms the main body of your wreath, which should now have a full and rounded appearance. The Crocheted Christmas Wreath with Bells-Step by Step Tutorial emphasizes tight stitching at this stage to maintain the wreath’s durability and shape.
With the base complete, you can begin adding decorative elements. Crocheted holly leaves, berries, stars, or small flowers are popular choices for Christmas wreaths. These can be sewn onto the wreath in clusters or arranged evenly around the surface. Add as many or as few decorations as you prefer.
Finally, attach the bells. You can sew them directly onto the wreath or tie them with ribbon for extra movement and charm. Bells add a lovely festive sound and complete the look described in the Crocheted Christmas Wreath with Bells-Step by Step Tutorial.
Decorating and Customizing Your Christmas Wreath
Decorations are what make your crocheted Christmas wreath with bells truly stand out. One of the most popular ways to customize your wreath is by adding crocheted appliqués. Holly leaves, berries, and poinsettias are classic holiday themes that complement the overall design beautifully.
Ribbons are also an excellent choice for adding elegance. You can tie a large bow at the top or bottom of the wreath or weave a thin ribbon around the crocheted surface. The Crocheted Christmas Wreath with Bells-Step by Step Tutorial encourages experimentation with ribbon textures, whether satin, burlap, or metallic.
For a more playful look, consider adding miniature ornaments. These lightweight decorations can easily be sewn onto the project. They add color, shine, and variety, making your wreath even more festive and eye-catching.
Another customization option is incorporating multiple colors of yarn. You can create stripes, color-block patterns, or alternating textures. This technique enhances visual interest and makes your handmade wreath truly unique.
If you enjoy adding personal touches, embroidery on crochet can add delicate details. You can stitch small snowflakes, initials, or tiny swirls onto the wreath surface. Embroidery adds charm and helps personalize the Crocheted Christmas Wreath with Bells-Step by Step Tutorial according to your taste.
Finally, consider adding a hanging loop. You can crochet a small chain or attach a ribbon loop to the top of the wreath. This allows you to easily hang your festive decoration on a door, wall, or fireplace mantle.
Tips for Finishing and Maintaining Your Wreath
Finishing touches are essential in bringing your crocheted Christmas wreath with bells to life. Start by checking all seams for tightness and making sure the stuffing is evenly distributed. This ensures your wreath looks professional and maintains its shape year after year.
Blocking your appliqués, such as holly leaves or flowers, can help them lie flat and look more polished. Lightly dampen the pieces, shape them with your fingers, and let them dry completely. Blocking adds structure and enhances the overall design.
To preserve your wreath, avoid storing it in damp or direct-sunlight environments. Store it in a cool, dry place to prevent yarn discoloration and maintain freshness for the following holiday season. Proper storage keeps your wreath vibrant and beautiful.
Cleaning your wreath should be done carefully. Instead of washing it, gently dust it or wipe with a soft cloth. If any part becomes dirty, spot-clean with mild detergent. This helps maintain the quality of the fibers and decorative elements.
If you plan to reuse your wreath for future holidays, check annually for loose stitches or decorations. Repairing small issues early ensures your Crocheted Christmas Wreath with Bells-Step by Step Tutorial results remain in good condition over time.
Finally, consider creating matching items such as garlands, table centerpieces, or mini wreaths. Coordinated decorations amplify the festive atmosphere and showcase your crochet skills beautifully.
About Crocheted Christmas Wreaths
1. Is a crocheted Christmas wreath suitable for beginners?
Yes. Many wreath designs are beginner-friendly and rely on simple stitches.
2. What type of yarn works best?
Medium-weight acrylic or cotton yarn is ideal for structure and durability.
3. Do I need a wreath base?
No. You can crochet the entire structure or use a foam or wire base for support.
4. How long does it take to complete a wreath?
Depending on your speed, it may take 3–6 hours.
5. Can I wash my crocheted wreath?
Avoid full washing; spot-cleaning is recommended.
6. Can I customize the decorations?
Absolutely. Add bells, appliqués, ribbons, ornaments, embroidery, and more.
Conclusion
This Crocheted Christmas Wreath with Bells-Step by Step Tutorial provides all the guidance needed to create a festive, charming, and fully customizable wreath for the holiday season.
From gathering materials to adding delightful decorative details, this project offers creativity, joy, and a beautiful handmade decoration you can reuse every Christmas.
If you enjoyed this tutorial, please leave your honest opinion and share your suggestions for future projects.