
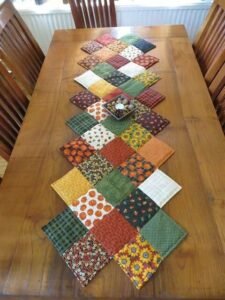
Patchwork Table Runner Tutorial is the perfect guide for anyone who wants to create a beautiful handmade decoration while improving their sewing and quilting skills. In this complete Patchwork Table Runner Tutorial, you will discover how to combine fabrics, patterns, and techniques to produce a stunning table runner that enhances any space. Whether you are just starting out or already have experience, this Patchwork Table Runner Tutorial will help you achieve a polished and professional result.
Creating a project through a Patchwork Table Runner Tutorial is not only practical but also highly rewarding. Patchwork allows you to transform simple fabric pieces into a cohesive and artistic design. This Patchwork Table Runner Tutorial focuses on clarity and simplicity, ensuring that every step is easy to follow while still delivering a high-quality final piece. With patience and creativity, you can turn this project into a centerpiece for your dining table.
Another advantage of following this Patchwork Table Runner Tutorial is the opportunity to personalize your work. You can experiment with colors, textures, and layouts to reflect your style. This Patchwork Table Runner Tutorial encourages creativity and flexibility, making it possible to adapt the design for different seasons, occasions, or home décor themes. By the end of this guide, you will feel confident in your ability to create unique patchwork designs.
Materials and Tools for Patchwork Table Runner Tutorial
To begin your Patchwork Table Runner Tutorial, it is essential to gather all the necessary materials. You will need cotton fabric, thread, a rotary cutter, a cutting mat, a quilting ruler, and a sewing machine. Having these tools ready ensures a smoother process throughout your Patchwork Table Runner Tutorial.
Choosing the right fabric is a crucial step in the Patchwork Table Runner Tutorial. Cotton fabric is highly recommended because it is easy to handle and provides a clean finish. Selecting coordinating colors will enhance the overall appearance of your project.
Pre-washing your fabric is an important preparation step in the Patchwork Table Runner Tutorial. This helps prevent shrinkage and ensures that your finished table runner maintains its shape after washing.
Accurate cutting is essential in the Patchwork Table Runner Tutorial. Using a rotary cutter and ruler allows you to create precise pieces that fit together perfectly.
Organizing your fabric pieces before sewing is another helpful tip in the Patchwork Table Runner Tutorial. This keeps your workspace tidy and improves efficiency.
Finally, ensure your sewing machine is properly set up. A well-maintained machine is key to success in your Patchwork Table Runner Tutorial.
Step-by-Step Instructions for Patchwork Table Runner Tutorial
The heart of the Patchwork Table Runner Tutorial lies in the step-by-step assembly process. Begin by cutting your fabric into equal-sized squares or rectangles, depending on your chosen design.
Next, arrange your pieces in a layout that you find visually appealing. This stage of the Patchwork Table Runner Tutorial allows you to experiment with color placement before sewing.
Start sewing the pieces together in rows. Maintaining a consistent seam allowance is crucial in the Patchwork Table Runner Tutorial to ensure proper alignment.
Press your seams after each step. This technique improves the overall look of your work in the Patchwork Table Runner Tutorial by keeping the fabric flat.
Once the rows are complete, sew them together to form the quilt top. This is a significant milestone in your Patchwork Table Runner Tutorial.
Finally, add batting and backing fabric, then quilt the layers together. This finishing step completes your Patchwork Table Runner Tutorial and gives your project structure and durability.
Creative Design Ideas for Patchwork Table Runner Tutorial
One of the most enjoyable aspects of the Patchwork Table Runner Tutorial is exploring creative design ideas. You can experiment with different color combinations to create unique visual effects.
Seasonal themes are a great way to personalize your Patchwork Table Runner Tutorial. For example, warm tones can be used for autumn, while bright colors are perfect for spring.
Using patterned fabrics can add depth to your design. This approach in the Patchwork Table Runner Tutorial creates a more dynamic and interesting look.
You can also vary the size of your fabric pieces. This variation in the Patchwork Table Runner Tutorial adds a modern touch to your project.
Adding borders is another creative option. Borders can frame your design beautifully in the Patchwork Table Runner Tutorial.
Finally, consider different quilting patterns. Straight lines or decorative stitching can enhance the final appearance of your Patchwork Table Runner Tutorial.
Tips for Perfect Results in Patchwork Table Runner Tutorial
Consistency is essential when working through the Patchwork Table Runner Tutorial. Keeping your seam allowance even ensures that all pieces fit together properly.
Take your time with each step. Rushing the process in the Patchwork Table Runner Tutorial can lead to mistakes that are difficult to correct.
Use sharp tools for cutting fabric. Clean cuts are important in the Patchwork Table Runner Tutorial for achieving a professional finish.
Press seams carefully and regularly. This step improves the overall quality of your work in the Patchwork Table Runner Tutorial.
Practice your stitching if needed. This helps build confidence and improves your results in the Patchwork Table Runner Tutorial.
Most importantly, enjoy the process. The Patchwork Table Runner Tutorial is about creativity and relaxation as much as it is about the final product.
Patchwork Table Runner Tutorial
What is the best fabric for this project?
The best choice for a Patchwork Table Runner Tutorial is cotton fabric because it is durable and easy to work with.
Is this tutorial suitable for beginners?
Yes, this Patchwork Table Runner Tutorial is beginner-friendly and provides clear instructions for each step.
How long does it take to complete?
The time required for a Patchwork Table Runner Tutorial depends on your experience and the complexity of your design.
Can I customize the size of the table runner?
Yes, you can adjust the dimensions in your Patchwork Table Runner Tutorial to fit your table perfectly.
Do I need a sewing machine?
While it is possible to sew by hand, a machine makes the Patchwork Table Runner Tutorial faster and more efficient.
How do I care for my finished table runner?
After completing your Patchwork Table Runner Tutorial, gentle washing and proper storage will help maintain its quality.
Conclusion
This complete Patchwork Table Runner Tutorial has guided you through every essential step, from selecting materials and preparing your workspace to assembling your design and adding creative touches.
By following this Patchwork Table Runner Tutorial, you have learned how to create a beautiful and functional piece that enhances your home décor.
With practice and creativity, you can continue to develop your skills and explore new designs. If you found this article helpful, please share your honest opinion and leave your suggestions. Your feedback is valuable and helps inspire future tutorials.