
Friendship Star Quilt Block is a timeless and meaningful quilting pattern that has been cherished by generations of crafters. In this complete Friendship Star Quilt Block guide, you will learn how to create this classic design step by step while also understanding its significance and versatility. Whether you are new to quilting or an experienced maker, this Friendship Star Quilt Block tutorial will help you achieve a beautiful and precise result.
The charm of the Friendship Star Quilt Block lies in its simplicity and symbolism. Traditionally, this pattern represents friendship and connection, making it a perfect choice for gifts or collaborative quilts. By following this Friendship Star Quilt Block tutorial, you will not only learn a valuable technique but also create something that carries emotional meaning and artistic beauty.
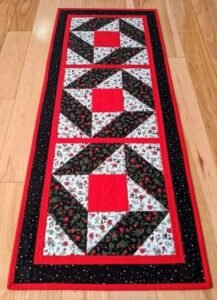
Another reason to explore the Friendship Star Quilt Block is its adaptability. This pattern works well with a wide variety of fabrics, colors, and layouts. In this Friendship Star Quilt Block tutorial, you will discover how to customize your design while maintaining the integrity of the traditional pattern. This flexibility allows you to create unique quilts that reflect your personal style.
Materials and Preparation for Friendship Star Quilt Block
To begin your Friendship Star Quilt Block, it is important to gather all the necessary materials. You will need cotton fabric, quilting thread, a rotary cutter, a cutting mat, and a ruler. These tools are essential for achieving accuracy and consistency throughout your project.
Choosing the right fabric is a crucial step in the Friendship Star Quilt Block process. Selecting contrasting colors will help highlight the star design and make it stand out clearly.
Pre-washing your fabric is recommended before starting the Friendship Star Quilt Block. This helps prevent shrinking and ensures that your quilt maintains its shape after washing.
Accurate cutting is key when working on a Friendship Star Quilt Block. Using a rotary cutter and ruler allows you to create precise pieces that fit together perfectly.
Organizing your fabric pieces before sewing is another helpful step in the Friendship Star Quilt Block tutorial. This makes the assembly process smoother and more efficient.
Finally, prepare your workspace to ensure comfort and focus while creating your Friendship Star Quilt Block.
Step-by-Step Instructions for Friendship Star Quilt Block
The construction of the Friendship Star Quilt Block begins with cutting your fabric into squares and triangles. These shapes form the foundation of the star pattern.
Next, create half-square triangles. This step in the Friendship Star Quilt Block is essential for forming the star points.
Arrange your pieces into the star layout. This stage of the Friendship Star Quilt Block allows you to visualize the final design before sewing.
Sew the pieces together in rows. Maintaining a consistent seam allowance is crucial in the Friendship Star Quilt Block for proper alignment.
Press your seams carefully after each step. This technique improves the overall appearance of your Friendship Star Quilt Block.
Finally, assemble the rows to complete the block. This completes your Friendship Star Quilt Block and prepares it for inclusion in a larger quilt.
Creative Ideas for Friendship Star Quilt Block
One of the most exciting aspects of the Friendship Star Quilt Block is its versatility. You can experiment with different color combinations to create unique effects.
Using bold contrasts can make your Friendship Star Quilt Block stand out dramatically. Alternatively, soft tones create a more subtle and elegant look.
You can also vary the size of your blocks. This flexibility in the Friendship Star Quilt Block allows for creative quilt layouts.
Incorporating patterned fabrics adds depth to your Friendship Star Quilt Block design. Mixing prints can create a dynamic visual effect.
Another idea is to arrange multiple blocks into a larger pattern. This expands the possibilities of the Friendship Star Quilt Block.
Finally, consider adding borders or sashing. These elements enhance the overall presentation of your Friendship Star Quilt Block project.
Tips for Perfect Results in Friendship Star Quilt Block
Maintaining consistent seam allowances is essential in the Friendship Star Quilt Block. This ensures that all pieces align correctly.
Take your time with each step. Rushing the Friendship Star Quilt Block process can lead to inaccuracies.
Use sharp cutting tools. Clean cuts are important for achieving precision in the Friendship Star Quilt Block.
Press seams regularly. This helps keep your Friendship Star Quilt Block flat and well-structured.
Practice your techniques if needed. This builds confidence when working on the Friendship Star Quilt Block.
Most importantly, enjoy the process. The Friendship Star Quilt Block is both creative and rewarding.
FAQ About Friendship Star Quilt Block
Is the Friendship Star Quilt Block suitable for beginners?
Yes, the Friendship Star Quilt Block is beginner-friendly with basic sewing knowledge.
What type of fabric should I use?
Cotton fabric is ideal for the Friendship Star Quilt Block due to its ease of use.
How long does it take to make one block?
The time required for a Friendship Star Quilt Block depends on your experience level.
Can I customize the design?
Yes, customization is a key feature of the Friendship Star Quilt Block.
Do I need special tools?
No, basic quilting tools are sufficient for the Friendship Star Quilt Block.
How do I maintain my quilt?
After completing your Friendship Star Quilt Block, proper care will keep it in good condition.
Conclusion
This complete Friendship Star Quilt Block tutorial has guided you through every step of creating a classic and meaningful quilt block.
From selecting materials and preparing your workspace to assembling the design and exploring creative ideas, you now have the knowledge needed to succeed.
The Friendship Star Quilt Block is a beautiful way to express creativity while honoring a traditional quilting pattern. If you found this article helpful, please leave your honest opinion and share your suggestions. Your feedback is valuable and helps inspire future creative projects.