
Chicken hat with crochet tutorial is a fun and creative project that combines playful design with practical crochet skills, making it perfect for crafters who enjoy unique handmade accessories. In this complete Chicken hat with crochet tutorial, you will learn how to create an adorable hat inspired by a chicken, featuring charming details like a beak, comb, and wings. This Chicken hat with crochet tutorial is designed to guide both beginners and experienced crocheters through every step with clarity and confidence.
Creating a Chicken hat with crochet tutorial project is a great way to improve your crochet techniques while making something truly eye-catching. Handmade hats are always popular because they are functional, customizable, and perfect for gifts or themed events. By following this Chicken hat with crochet tutorial, you will gain valuable experience in shaping, stitching, and assembling different elements into one cohesive design.
Another reason to explore the Chicken hat with crochet tutorial is the opportunity for personalization. You can choose different yarn colors, adjust the size, and add creative details to make your hat unique. This Chicken hat with crochet tutorial encourages you to experiment and express your style while creating a fun and wearable piece that stands out.
Materials and Preparation for Chicken hat with crochet tutorial
To begin your Chicken hat with crochet tutorial, it is important to gather all the necessary materials. You will need yarn in various colors, a crochet hook, scissors, a yarn needle, and stitch markers if desired. Having these tools ready will make your Chicken hat with crochet tutorial more efficient and enjoyable.
Choosing the right yarn is essential for the Chicken hat with crochet tutorial. Soft and durable yarn is recommended to ensure comfort and longevity of the hat.
Selecting the appropriate crochet hook size is also important. In this Chicken hat with crochet tutorial, using the correct hook ensures even stitches and proper sizing.
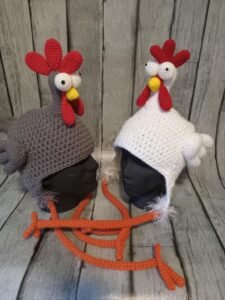
Color selection plays a key role in the Chicken hat with crochet tutorial. Traditional chicken colors like white, yellow, and red are popular, but you can explore creative variations.
Preparing your workspace is another important step. A clean and well-lit area helps you focus while working on the Chicken hat with crochet tutorial.
Finally, organize your tools before starting. This preparation step in the Chicken hat with crochet tutorial helps maintain a smooth workflow.
Step-by-Step Instructions for Chicken hat with crochet tutorial
The first step in the Chicken hat with crochet tutorial is creating the base of the hat. Start by crocheting in rounds to form a snug and comfortable fit.
Continue increasing stitches until you reach the desired size. This part of the Chicken hat with crochet tutorial ensures proper shaping.
Next, work on the body of the hat by maintaining consistent stitch patterns. This stage in the Chicken hat with crochet tutorial builds the main structure.
Create the decorative elements such as the comb, beak, and wings. These features in the Chicken hat with crochet tutorial give the hat its playful character.
Attach all the components securely. This step in the Chicken hat with crochet tutorial ensures durability and stability.
Finally, weave in loose ends and adjust the fit. This completes your Chicken hat with crochet tutorial with a polished finish.
Creative Ideas for Chicken hat with crochet tutorial
One of the most exciting aspects of the Chicken hat with crochet tutorial is customization. You can experiment with different yarn colors to create unique designs.
Adding extra details is another idea in the Chicken hat with crochet tutorial. You can include small embellishments to enhance the look.
You can also adjust the size for different age groups. This flexibility in the Chicken hat with crochet tutorial makes it suitable for everyone.
Using textured stitches is another creative option. This technique in the Chicken hat with crochet tutorial adds depth and uniqueness.
Personalizing facial expressions can make each hat different. This detail in the Chicken hat with crochet tutorial adds charm.
Finally, consider making matching accessories. This expands your Chicken hat with crochet tutorial into a coordinated set.
Tips for Best Results in Chicken hat with crochet tutorial
Maintaining consistent tension is essential in the Chicken hat with crochet tutorial. This ensures a neat and professional look.
Take your time with each step. Rushing the Chicken hat with crochet tutorial may lead to mistakes.
Use high-quality materials for durability. This improves the final result of your Chicken hat with crochet tutorial.
Check your measurements regularly. Accuracy is important throughout the Chicken hat with crochet tutorial.
Practice basic techniques if needed. This builds confidence when working on the Chicken hat with crochet tutorial.
Most importantly, enjoy the process. The Chicken hat with crochet tutorial is meant to be fun and creative.
Chicken hat with crochet tutorial
Is this tutorial suitable for beginners?
Yes, the Chicken hat with crochet tutorial is beginner-friendly with basic crochet knowledge.
What type of yarn should I use?
Soft and durable yarn is ideal for the Chicken hat with crochet tutorial.
How long does it take to complete?
The time required for the Chicken hat with crochet tutorial depends on your experience level.
Can I customize the design?
Yes, customization is a key feature of the Chicken hat with crochet tutorial.
Do I need special tools?
No, basic crochet tools are enough for the Chicken hat with crochet tutorial.
How do I care for the hat?
After completing the Chicken hat with crochet tutorial, gentle washing is recommended.
Conclusion
This complete Chicken hat with crochet tutorial has guided you through every step needed to create a fun and functional handmade accessory.
From selecting materials and learning techniques to exploring creative ideas and refining your skills, you now have everything needed to succeed.
The Chicken hat with crochet tutorial is a perfect way to combine creativity with practicality while making something unique and enjoyable. If you found this guide helpful, please leave your honest opinion and share your suggestions. Your feedback is valuable and helps inspire future creative tutorials.