
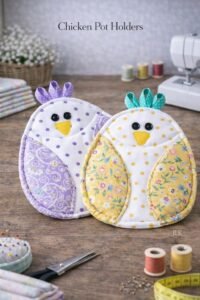
Chicken quilt potholder tutorial is a delightful and practical project that combines creativity, functionality, and the timeless charm of quilting. If you love handmade crafts, this Chicken quilt potholder tutorial will guide you step by step through creating a unique kitchen accessory that is both decorative and useful. Whether you are a beginner or an experienced quilter, this project allows you to explore textures, colors, and patterns while producing something meaningful for your home or as a thoughtful gift.
Creating your own Chicken quilt potholder tutorial project is also a wonderful way to use fabric scraps efficiently. Many crafters accumulate small pieces of fabric over time, and this tutorial gives you the perfect opportunity to transform those leftovers into something beautiful. The chicken design adds a playful and cozy farmhouse aesthetic, making it especially popular among those who enjoy rustic or country-style decor.
Another advantage of following a Chicken quilt potholder tutorial is that it helps you improve essential quilting skills. From cutting fabric accurately to assembling layers and stitching patterns, each step contributes to building your confidence. Over time, projects like this can lead you to more complex quilting creations, expanding your abilities and creative expression in the world of handmade crafts.
Materials and Preparation for Your Chicken Quilt Potholder Tutorial
Before starting your Chicken quilt potholder tutorial, it is essential to gather all the necessary materials. Having everything ready will make the process smoother and more enjoyable. You will need cotton fabric in various colors, especially for the chicken body, beak, comb, and background. Additionally, batting is required to provide insulation and thickness for the potholder.
Choosing high-quality fabric is important in any Chicken quilt potholder tutorial. Cotton is recommended because it is durable, heat-resistant, and easy to sew. Selecting vibrant colors can bring your chicken design to life, while softer tones can create a more subtle and elegant look depending on your style preference.
Another important preparation step in the Chicken quilt potholder tutorial is cutting your fabric pieces accurately. Use a rotary cutter and a ruler to ensure straight edges and consistent shapes. Precision at this stage will help your final piece look professional and well-crafted.
You should also prepare your sewing tools for the Chicken quilt potholder tutorial. A sewing machine is ideal, but hand stitching is also possible if you prefer a more traditional approach. Make sure your needles are sharp and your thread matches your fabric colors.
Ironing your fabric before starting the Chicken quilt potholder tutorial is a small but crucial step. Smooth fabric helps prevent mistakes and ensures better alignment when assembling the quilt layers. This simple preparation can significantly improve your final result.
Finally, take a moment to plan your design in the Chicken quilt potholder tutorial. Visualizing the placement of each fabric piece will help you stay organized and avoid confusion during the sewing process. A clear plan makes the entire project more enjoyable and efficient.
Step-by-Step Assembly in the Chicken Quilt Potholder Tutorial
The first step in assembling your Chicken quilt potholder tutorial is creating the chicken appliqué. Cut out the shapes for the body, wings, comb, and beak, and arrange them on the background fabric. This step allows you to adjust the design before permanently attaching the pieces.
Once you are satisfied with the layout in your Chicken quilt potholder tutorial, secure the appliqué pieces using pins or fabric glue. This ensures that nothing shifts while sewing, helping maintain the intended design and proportions.
Next, stitch around each appliqué piece in your Chicken quilt potholder tutorial. You can use a zigzag stitch or a straight stitch depending on your preference. This step not only secures the pieces but also adds decorative detail to the potholder.
After completing the appliqué, it is time to assemble the quilt layers in the Chicken quilt potholder tutorial. Place the top fabric, batting, and backing fabric together. Make sure all layers are aligned properly to avoid uneven edges later.
Quilting is the next stage of the Chicken quilt potholder tutorial. Sew through all layers using simple patterns such as straight lines or gentle curves. This step adds texture and helps hold the layers together securely.
Finally, trim the edges neatly in your Chicken quilt potholder tutorial. Clean edges make a big difference in the final appearance and prepare the potholder for the binding process.
Finishing Touches in the Chicken Quilt Potholder Tutorial
Binding is an essential finishing step in any Chicken quilt potholder tutorial. Use a strip of fabric to cover the raw edges, folding it neatly around the potholder and stitching it in place. This not only strengthens the edges but also gives a polished look.
Adding a hanging loop is a practical feature in your Chicken quilt potholder tutorial. A small fabric loop allows you to hang the potholder in your kitchen, making it both decorative and accessible.
You can also personalize your Chicken quilt potholder tutorial by adding embroidery details. Small stitches can define the chicken’s eyes, feathers, or other features, giving your project a unique and charming character.
Another creative idea in the Chicken quilt potholder tutorial is experimenting with different quilting patterns. Instead of simple lines, you can try decorative motifs that complement the chicken design.
Color coordination plays a big role in the final result of your Chicken quilt potholder tutorial. Choosing harmonious colors ensures that your potholder looks balanced and visually appealing.
Lastly, take time to inspect your finished Chicken quilt potholder tutorial. Check for loose threads or uneven stitches and make small adjustments if needed. Attention to detail ensures a high-quality finished product.
Tips and Creative Ideas for Your Chicken Quilt Potholder Tutorial
One helpful tip for your Chicken quilt potholder tutorial is to start with simple designs if you are a beginner. As you gain confidence, you can experiment with more complex patterns and details.
Using fabric scraps creatively is a key advantage of the Chicken quilt potholder tutorial. Mixing patterns and textures can add depth and uniqueness to your project, making each potholder one of a kind.
Another idea in the Chicken quilt potholder tutorial is creating themed sets. You can make multiple potholders with similar designs to decorate your kitchen or give as gifts.
Time management is also important in your Chicken quilt potholder tutorial. Breaking the project into smaller steps makes it easier to complete without feeling overwhelmed.
Practicing consistency in stitching will improve the overall quality of your Chicken quilt potholder tutorial. Even stitches create a neat and professional appearance.
Finally, enjoy the creative process of the Chicken quilt potholder tutorial. Crafting should be relaxing and rewarding, allowing you to express your personality through handmade items.
Chicken Quilt Potholder Tutorial
What is the best fabric for a Chicken quilt potholder tutorial
Cotton fabric is the best choice because it is durable, heat-resistant, and easy to work with.
Can beginners follow a Chicken quilt potholder tutorial
Yes, this project is beginner-friendly and a great way to learn basic quilting techniques.
How long does it take to complete a Chicken quilt potholder tutorial
It usually takes a few hours depending on your experience and the level of detail you choose.
Do I need a sewing machine for a Chicken quilt potholder tutorial
A sewing machine is helpful but not required, as hand stitching can also be used.
How do I make my Chicken quilt potholder tutorial more durable
Using quality batting and secure stitching will increase durability and longevity.
Can I customize the design in a Chicken quilt potholder tutorial
Absolutely, you can change colors, patterns, and details to match your personal style.
Conclusion
The Chicken quilt potholder tutorial is a rewarding and creative project that combines functionality with artistic expression.
Throughout this article, you learned how to prepare materials, assemble the design, apply finishing touches, and explore creative ideas.
This step-by-step guide helps both beginners and experienced crafters create a beautiful and practical kitchen accessory. If you enjoyed this tutorial, feel free to share your honest opinion and suggestions, as your feedback is always valuable and helps improve future projects.