
Stylish crochet glove tutorial is the perfect starting point for anyone who wants to blend creativity, comfort, and fashion into a single handmade project. Whether you are a beginner or someone with experience in yarn crafts, learning a Stylish crochet glove tutorial allows you to explore textures, stitches, and personal style in a practical way. Gloves are not only functional but also a great canvas for artistic expression, making them a popular project among crochet enthusiasts.
When you dive into a Stylish crochet glove tutorial, you begin to understand how small details can transform a simple accessory into something truly unique. From choosing the right yarn to mastering the correct tension, every step contributes to the final result. This process is not just about following instructions—it’s about developing your skills and confidence while creating something useful and beautiful.
Another reason why the Stylish crochet glove tutorial is so appealing is its versatility. You can customize gloves for different seasons, occasions, and personal tastes. Lightweight designs are perfect for mild weather, while thicker yarns provide warmth during colder months. With endless variations in patterns and colors, this tutorial becomes more than a guide—it becomes a foundation for creativity.
Understanding the Basics of a Stylish Crochet Glove Tutorial
The foundation of any successful Stylish crochet glove tutorial begins with understanding the essential materials. Choosing the right yarn is crucial, as it determines the comfort, elasticity, and durability of your gloves. Soft acrylic blends or cotton yarns are often recommended for beginners because they are easy to handle and widely available.
Equally important is selecting the correct crochet hook size. A hook that is too large can create loose stitches, while a smaller hook may make the fabric too tight. In a Stylish crochet glove tutorial, achieving the right balance ensures that the gloves fit comfortably and maintain their shape over time.
Learning basic stitches is another key step. Most Stylish crochet glove tutorial patterns rely on stitches like chain, single crochet, and half double crochet. These stitches form the building blocks of your project and help create a consistent texture throughout the gloves.
Understanding gauge is often overlooked but plays a significant role in the outcome. A proper gauge ensures that your gloves will fit as intended. Following a Stylish crochet glove tutorial carefully helps you measure and adjust your work before completing the entire piece.
Hand measurements are also essential. A good Stylish crochet glove tutorial will guide you on how to measure your hand accurately, including the width of your palm and the length of your fingers. This ensures a custom fit that feels both comfortable and secure.
Finally, patience and practice are vital. Every Stylish crochet glove tutorial requires attention to detail and a willingness to learn from mistakes. Over time, your technique will improve, and your gloves will reflect your growing skills.
Step-by-Step Process to Create Stylish Crochet Gloves
Following a Stylish crochet glove tutorial step by step helps simplify what might initially seem like a complex project. The first step usually involves creating a foundation chain that matches the circumference of your wrist. This forms the base of your glove and sets the tone for the rest of the design.
Next, you will work in rounds or rows to build the body of the glove. In a Stylish crochet glove tutorial, consistency is key, so maintaining even stitches ensures a smooth and professional appearance. This stage allows you to see your glove gradually take shape.
Creating the thumb opening is one of the most important parts. A well-structured Stylish crochet glove tutorial will guide you in leaving space for the thumb without disrupting the overall pattern. This step requires careful counting and placement of stitches.
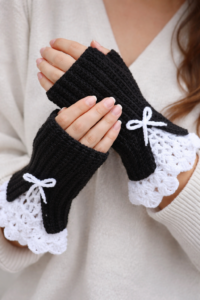
Once the thumb section is prepared, the tutorial typically moves on to shaping the fingers or leaving the gloves fingerless. Many beginners prefer fingerless designs because they are simpler and faster to complete while still being stylish.
Adding finishing touches is where your creativity shines. A Stylish crochet glove tutorial often includes options for decorative edges, ribbing, or textured stitches. These details enhance the overall look and make your gloves stand out.
Finally, weaving in ends and blocking your gloves ensures a polished finish. This last step in the Stylish crochet glove tutorial helps the stitches settle and gives your gloves a clean, professional appearance.
Tips to Customize Your Stylish Crochet Glove Tutorial
One of the most exciting aspects of a Stylish crochet glove tutorial is the ability to customize your project. Choosing different yarn colors can completely change the look of your gloves, allowing you to match them with your wardrobe or create bold, eye-catching designs.
Experimenting with stitch patterns is another way to add personality. While a basic Stylish crochet glove tutorial might use simple stitches, you can incorporate more advanced techniques like shell stitches or cables to create unique textures.
Adjusting the length of your gloves is also a popular customization. Some people prefer wrist-length gloves, while others enjoy longer styles that extend up the arm. A flexible Stylish crochet glove tutorial makes it easy to adapt the pattern to your preferences.
Adding embellishments such as buttons, beads, or embroidery can elevate your gloves to a new level. These small details can turn a simple project into a statement accessory that reflects your personal style.
You can also modify the fit by adjusting the number of stitches. A well-explained Stylish crochet glove tutorial helps you understand how to scale the pattern for different hand sizes without compromising the design.
Finally, consider seasonal variations. Lightweight yarns are perfect for spring and fall, while thicker yarns provide warmth during winter. This adaptability makes the Stylish crochet glove tutorial a year-round favorite.
Common Mistakes and How to Avoid Them
Even with a detailed Stylish crochet glove tutorial, beginners may encounter common challenges. One frequent mistake is inconsistent tension, which can lead to uneven stitches and an irregular shape. Practicing tension control is essential for achieving a professional result.
Another issue is incorrect sizing. Skipping measurements or ignoring gauge instructions in a Stylish crochet glove tutorial can result in gloves that are too tight or too loose. Taking the time to measure properly can save frustration later.
Losing track of stitches is also common. Counting stitches regularly ensures that your pattern stays consistent. A reliable Stylish crochet glove tutorial often includes tips to help you keep track of your progress.
Mistakes in the thumb section can affect the overall fit. Carefully following the instructions in your Stylish crochet glove tutorial helps you create a comfortable and functional thumb opening.
Using the wrong materials can impact the final result. Not all yarns behave the same way, so choosing materials recommended in the Stylish crochet glove tutorial is important for success.
Finally, rushing through the process can lead to errors. Taking your time and enjoying each step of the Stylish crochet glove tutorial ensures a better outcome and a more enjoyable experience.
FAQ About Stylish Crochet Glove Tutorial
What is the best yarn for a Stylish crochet glove tutorial?
The best yarn depends on your needs, but soft acrylic, cotton blends, or lightweight wool are popular choices. They provide comfort, flexibility, and durability for everyday use.
Is a Stylish crochet glove tutorial suitable for beginners?
Yes, many tutorials are designed with beginners in mind. Starting with simple stitches and fingerless designs makes the learning process easier and more enjoyable.
How long does it take to complete a Stylish crochet glove tutorial?
The time varies depending on your skill level and the complexity of the design. Beginners may take a few hours to a couple of days, while experienced crocheters can finish more quickly.
Can I customize a Stylish crochet glove tutorial?
Absolutely. You can change colors, adjust sizes, experiment with stitches, and add decorative elements to make your gloves unique.
Why are my gloves not fitting properly?
This usually happens بسبب incorrect measurements or gauge. Following the instructions in the Stylish crochet glove tutorial carefully helps ensure a proper fit.
Do I need special tools for a Stylish crochet glove tutorial?
Basic tools like a crochet hook, yarn, scissors, and a yarn needle are typically sufficient. Some projects may also recommend stitch markers for better accuracy.
Conclusion
The Stylish crochet glove tutorial offers a rewarding and creative journey for anyone interested in handmade fashion. Throughout this article, you learned about the essential materials, step-by-step process, customization options, and common mistakes to avoid. By following a well-structured Stylish crochet glove tutorial, you can create gloves that are both functional and stylish while improving your crochet skills.
In addition, the flexibility of the Stylish crochet glove tutorial allows you to adapt your designs for different seasons and personal preferences. This makes it a versatile project that you can revisit again and again, each time experimenting with new ideas and techniques.
Now it’s your turn to try your own Stylish crochet glove tutorial and bring your creativity to life. Share your honest opinion about this guide and feel free to leave suggestions for future improvements. Your feedback is valuable and helps make each tutorial even better for everyone.