
Tutorial for a denim picnic blanket is the perfect project for anyone who loves combining sustainability, creativity, and practical design into one handmade piece. If you have old jeans stored away and want to transform them into something beautiful and useful, this project is an excellent opportunity. A well-crafted blanket not only serves as a functional outdoor accessory but also tells a story through the fabrics used.
The idea behind a tutorial for a denim picnic blanket is simple yet inspiring. Instead of discarding worn-out denim, you can repurpose it into a durable and stylish blanket that is perfect for picnics, beach outings, or even home décor. Denim is known for its strength and versatility, making it an ideal material for a project that requires both comfort and resistance.
Another reason why this tutorial for a denim picnic blanket stands out is its beginner-friendly nature. Even if you have limited sewing experience, you can follow basic steps to achieve a professional-looking result. With patience and attention to detail, you will not only learn valuable sewing techniques but also create a unique piece that reflects your personal style.
Materials and Preparation for a Denim Picnic Blanket
Before starting your tutorial for a denim picnic blanket, gathering the right materials is essential. You will need several pairs of old jeans, fabric scissors, a sewing machine or needle and thread, pins, and a backing fabric. Choosing high-quality denim pieces ensures durability and a better final result.
Preparing the denim is the first practical step in this tutorial for a denim picnic blanket. Wash and dry all jeans to remove dirt and prevent future shrinking. Clean fabric ensures that your blanket remains fresh and long-lasting.
Cutting the denim into uniform squares or rectangles is another important stage. In this tutorial for a denim picnic blanket, consistency in size helps create a balanced and visually appealing design. You can use a ruler or template to maintain precision.
Selecting a backing fabric adds comfort and functionality. A soft cotton or fleece layer complements the sturdiness of denim in your tutorial for a denim picnic blanket, making it more pleasant to sit or lie on.
Organizing your pieces before sewing is highly recommended. Lay out your denim squares on a flat surface to visualize the pattern. This step in the tutorial for a denim picnic blanket allows you to experiment with color variations and textures.
Finally, ensure your workspace is comfortable and well-lit. A good environment helps you focus and enjoy the process of completing your tutorial for a denim picnic blanket.
Step-by-Step Sewing Process
The construction phase of your tutorial for a denim picnic blanket begins by sewing the denim pieces together row by row. Align edges carefully and use pins to keep everything in place before stitching.
Once rows are completed, join them to form the main top layer. This stage of the tutorial for a denim picnic blanket requires patience to ensure seams are straight and secure.
Pressing the seams with an iron helps flatten the fabric and improves the overall appearance. In any tutorial for a denim picnic blanket, this step is crucial for achieving a polished finish.
After assembling the top layer, attach it to the backing fabric. Place both layers together with the right sides facing each other. This part of the tutorial for a denim picnic blanket ensures the blanket has structure and comfort.
Sew around the edges, leaving a small opening to turn the blanket inside out. This technique is commonly used in a tutorial for a denim picnic blanket to hide seams and create a clean look.
Finally, turn the blanket right side out and close the opening with a neat stitch. Completing this step marks the final stage of your tutorial for a denim picnic blanket construction process.
Tips for Enhancing Your Denim Picnic Blanket
Adding decorative elements can elevate your tutorial for a denim picnic blanket project. Consider using embroidery, patches, or contrasting stitching to give your blanket a personalized touch.
Reinforcing seams is especially important when working with denim. In your tutorial for a denim picnic blanket, strong seams ensure the blanket withstands frequent use and washing.
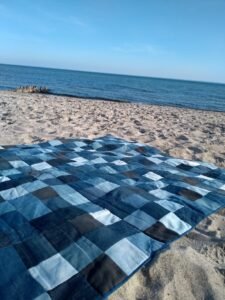
Using different shades of denim creates a patchwork effect. This technique in the tutorial for a denim picnic blanket adds visual interest and makes your design more dynamic.
Incorporating pockets from old jeans is a creative idea. Your tutorial for a denim picnic blanket can include functional pockets for storing small items like utensils or napkins.
Adding a waterproof layer between fabrics is another practical tip. This feature enhances your tutorial for a denim picnic blanket, making it suitable for damp surfaces.
Lastly, consider quilting the layers together. Quilting not only secures the fabric but also adds texture to your tutorial for a denim picnic blanket, improving both durability and style.
Creative Uses and Benefits of a Denim Picnic Blanket
One of the main advantages of following a tutorial for a denim picnic blanket is sustainability. Reusing old jeans reduces waste and promotes eco-friendly crafting practices.
Your finished blanket can be used for various outdoor activities. A tutorial for a denim picnic blanket results in a versatile item suitable for picnics, camping, and beach outings.
It also serves as a unique home accessory. A tutorial for a denim picnic blanket can double as a decorative throw for sofas or beds, adding a rustic charm to your space.
Gifting a handmade blanket is a thoughtful gesture. Completing a tutorial for a denim picnic blanket allows you to create meaningful presents for friends and family.
For those interested in small businesses, this project can become a source of income. A well-made tutorial for a denim picnic blanket product has market value due to its uniqueness and durability.
Finally, this project encourages creativity and skill development. By completing a tutorial for a denim picnic blanket, you gain confidence in sewing and upcycling techniques.
Tutorial for a Denim Picnic Blanket
What type of denim is best for this project?
Medium-weight denim from jeans is ideal because it balances durability and ease of sewing.
Can beginners follow a tutorial for a denim picnic blanket?
Yes, this project is suitable for beginners with basic sewing knowledge and patience.
How many jeans are needed?
Typically, 4 to 8 pairs of jeans are enough, depending on the desired blanket size.
Is a sewing machine necessary?
While a machine is recommended for efficiency, hand sewing can also be used in a tutorial for a denim picnic blanket.
How do I clean the finished blanket?
Machine washing on a gentle cycle and air drying is recommended to maintain quality.
Can I customize the design?
Absolutely, a tutorial for a denim picnic blanket allows for endless creativity in patterns, colors, and details.
Conclusion
The tutorial for a denim picnic blanket provides a rewarding and practical way to transform old materials into something beautiful and functional.Now that you understand every step of the tutorial for a denim picnic blanket, it’s time to start your own project and bring your ideas to life.
Throughout this guide, you learned how to prepare materials, assemble the blanket, enhance its design, and explore creative uses. This project not only promotes sustainability but also helps you develop valuable sewing skills.
Share your honest opinion about this guide and feel free to leave suggestions or creative ideas. Your feedback is important and can inspire even more innovative projects in the future.