
Star-shaped crochet bag tutorial is a creative and rewarding project that combines beauty, functionality, and artistic expression in one handmade piece. If you are looking to expand your crochet skills while crafting something truly eye-catching, this guide will walk you through every essential detail. Throughout this Star-shaped crochet bag tutorial, you will learn techniques, tips, and creative variations that can help you produce a unique and stylish bag suitable for everyday use or special occasions.
Creating a bag from scratch may seem challenging at first, but with the right approach and patience, it becomes an enjoyable and fulfilling experience. This Star-shaped crochet bag tutorial is designed for both beginners and intermediate crocheters who want to explore geometric patterns and textured stitches. By following the instructions carefully, you will gain confidence and improve your ability to read patterns, control tension, and combine colors effectively.
Another important aspect of this Star-shaped crochet bag tutorial is its versatility. You can customize your bag in countless ways, from choosing vibrant yarns to adjusting the size and adding decorative elements. Whether you prefer a minimalist look or a bold statement piece, this project allows you to express your creativity while mastering essential crochet techniques that will benefit you in many future projects.
Understanding the Basics of a Star-Shaped Crochet Bag Tutorial
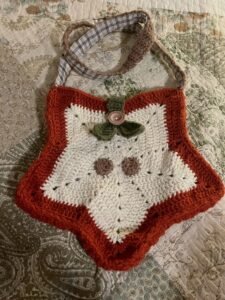
Before diving into the actual process, it is important to understand the structure behind a Star-shaped crochet bag tutorial. This type of bag is typically constructed using a star motif, which can be made as a single large piece or multiple smaller motifs joined together. The geometric design gives the bag its distinctive and stylish appearance.
The foundation of this Star-shaped crochet bag tutorial lies in mastering basic stitches such as chain, slip stitch, single crochet, and double crochet. These stitches form the backbone of the pattern and are repeated in different combinations to create the star effect. Practicing these stitches beforehand can make the process smoother and more enjoyable.
Yarn selection plays a crucial role in the final outcome of your project. For a durable and functional bag, cotton yarn is often recommended because of its strength and structure. However, acrylic or blended yarns can also be used depending on your preference and the intended use of the bag.
Hook size is another important factor to consider in this Star-shaped crochet bag tutorial. A slightly smaller hook than recommended for your yarn can help create tighter stitches, making the bag sturdier and more suitable for carrying items without stretching excessively.
Color choices can dramatically impact the look of your finished bag. Using contrasting colors for each point of the star can highlight the geometric design, while a single-color approach can create a more elegant and subtle appearance.
Finally, understanding pattern reading is essential. Even if you are following a step-by-step guide, being familiar with common crochet abbreviations and instructions will make it easier to adapt and personalize your Star-shaped crochet bag tutorial.
Step-by-Step Process for Creating Your Star-Shaped Crochet Bag
The first step in any Star-shaped crochet bag tutorial is creating the center of the star. This usually begins with a magic ring or a chain loop, followed by a series of stitches worked into the center to form a circular base. This base will serve as the starting point for the star’s points.
Once the base is complete, you will begin shaping the star by increasing stitches at specific intervals. This is what creates the pointed edges that define the star shape. Careful counting is important here to maintain symmetry and ensure each point looks consistent.
As you continue the Star-shaped crochet bag tutorial, you will build each round outward, reinforcing the structure of the star. Each new round adds depth and size to the bag, gradually transforming the flat motif into a functional piece.
After completing the star shape, the next step involves creating the sides of the bag. This is typically done by working evenly around the edges of the star without increasing stitches. This technique allows the sides to rise naturally, forming the body of the bag.
Handles or straps are an essential component of the project. In this Star-shaped crochet bag tutorial, you can choose between crocheting the handles directly onto the bag or attaching separate straps. Both methods have their advantages depending on the style and durability you want.
The final step is finishing touches. This includes weaving in loose ends, adding a lining if desired, and possibly incorporating closures like buttons or zippers. These details enhance both the functionality and the aesthetic appeal of your finished bag.
Tips and Techniques to Improve Your Star-Shaped Crochet Bag Tutorial
One of the most valuable tips in any Star-shaped crochet bag tutorial is maintaining consistent tension. Uneven tension can distort the star shape and affect the overall appearance of the bag. Practicing with scrap yarn before starting can help you achieve better control.
Blocking your finished star motif can make a significant difference. This process involves shaping and setting the crochet piece using moisture and pins, ensuring that each point of the star is well-defined and symmetrical.
Using stitch markers can greatly simplify your work. In a detailed Star-shaped crochet bag tutorial, markers help you keep track of the beginning of rounds and important stitch placements, reducing the risk of mistakes.
Experimenting with textures can elevate your design. Incorporating stitches like puff stitches or bobbles into your Star-shaped crochet bag tutorial can add dimension and visual interest to your project.
Durability is another key consideration. Reinforcing the bottom of the bag or adding a fabric lining can extend its lifespan, especially if you plan to use it frequently or carry heavier items.
Lastly, patience is essential. Crochet projects require time and attention to detail, and rushing through the steps can lead to errors. Taking your time ensures a higher-quality result and a more enjoyable crafting experience.
Creative Variations for Your Star-Shaped Crochet Bag Tutorial
One of the most exciting aspects of a Star-shaped crochet bag tutorial is the ability to customize your project. You can experiment with different sizes by adjusting the number of rounds in the star motif, creating anything from a small purse to a large tote bag.
Color gradients are a popular variation. By gradually changing yarn colors, you can create a stunning ombré effect that enhances the visual appeal of your bag while maintaining the integrity of the star design.
Adding embellishments is another way to personalize your Star-shaped crochet bag tutorial. Decorative elements such as beads, tassels, or embroidery can transform a simple bag into a unique fashion statement.
You can also explore different yarn types to achieve various textures. For example, using chunky yarn will result in a thicker, more structured bag, while lighter yarn creates a softer and more flexible design.
Functional modifications are equally important. Adding pockets inside the bag or incorporating a zipper closure can improve usability without compromising the overall design.
Finally, consider making matching accessories. A coin purse or keychain using the same star pattern can complement your bag and create a cohesive handmade set.
Star-Shaped Crochet Bag Tutorial
What skill level is required for a Star-shaped crochet bag tutorial?
Most projects are suitable for beginners to intermediate crocheters. Basic knowledge of stitches and pattern reading is usually enough to get started.
How long does it take to complete a Star-shaped crochet bag tutorial?
The time required varies depending on the complexity of the design and your experience level, but most projects can be completed within a few days to a week.
What type of yarn is best for a Star-shaped crochet bag tutorial?
Cotton yarn is highly recommended for durability and structure, although other yarn types can also be used based on personal preference.
Can I wash my crochet bag?
Yes, most crochet bags can be washed, but it is important to follow the care instructions for your chosen yarn to avoid damage or shrinking.
How can I make my bag more durable?
Using tight stitches, reinforcing stress points, and adding a fabric lining can significantly improve the durability of your bag.
Is it possible to sell bags made from a Star-shaped crochet bag tutorial?
Yes, handmade crochet bags are popular items, and many people successfully sell their creations, especially when they add unique touches and high-quality craftsmanship.
Conclusion
This Star-shaped crochet bag tutorial has guided you through every essential step, from understanding the basics to exploring creative variations and improving your technique. By following these instructions, you can create a beautiful and functional bag that reflects your personal style while enhancing your crochet skills.
We covered important aspects such as stitch selection, yarn choice, shaping techniques, and finishing details, all of which contribute to a successful project. Additionally, the tips and variations provided allow you to customize your bag and make it truly one of a kind.
Now it’s your turn to put this Star-shaped crochet bag tutorial into practice. Try experimenting with different colors and textures, and don’t be afraid to add your own creative touch. Share your honest opinion about this tutorial and feel free to suggest improvements or new ideas. Your feedback is valuable and helps inspire even more creative crochet projects in the future.