
Churn Dash Patchwork Block Tutorial is one of the most beloved and timeless quilting techniques, offering both simplicity and elegance for quilters of all skill levels. From the very first stitch, a Churn Dash Patchwork Block Tutorial introduces you to a classic block design that has been cherished for generations. This traditional quilt block is known for its clean lines and striking geometric layout, making it a perfect choice for both beginners and experienced quilters who want to create something beautiful and meaningful.
Learning through a Churn Dash Patchwork Block Tutorial is not only about assembling fabric pieces but also about understanding the history and structure behind this iconic pattern. The churn dash block has roots in early American quilting, symbolizing practicality and creativity. By following a Churn Dash Patchwork Block Tutorial, you are continuing a legacy of handmade artistry that has stood the test of time.
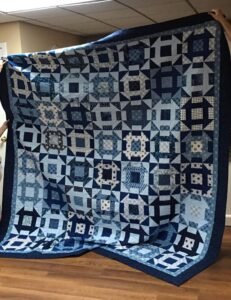
Another reason why the Churn Dash Patchwork Block Tutorial remains so popular is its versatility. This block can be used in a wide variety of projects, from full quilts to table runners and decorative pillows. The adaptability of the Churn Dash Patchwork Block Tutorial allows you to experiment with colors, fabrics, and layouts, making each project unique and personal.
Understanding the Basics of Churn Dash Patchwork Block Tutorial
A Churn Dash Patchwork Block Tutorial typically begins with an introduction to the components of the block. The design consists of a central square surrounded by a combination of half-square triangles and rectangles. These elements come together to form the distinctive churn dash pattern.
Fabric selection plays a crucial role in the success of a Churn Dash Patchwork Block Tutorial. Choosing contrasting fabrics helps highlight the geometric shapes and makes the design stand out. Many quilters prefer using a mix of light and dark tones to create visual balance.
Accurate cutting is essential when following a Churn Dash Patchwork Block Tutorial. Each piece must be measured and cut precisely to ensure that the block assembles correctly. Even small errors can affect the final result.
Seam allowance is another important factor. A consistent quarter-inch seam is typically recommended in a Churn Dash Patchwork Block Tutorial. This ensures that all pieces fit together seamlessly.
Understanding how to create half-square triangles is key. These units are a fundamental part of the Churn Dash Patchwork Block Tutorial and are used to form the block’s outer sections.
Finally, pressing techniques can make a significant difference. Proper pressing in a Churn Dash Patchwork Block Tutorial helps keep seams flat and ensures a professional-looking finish.
Step-by-Step Guide to Churn Dash Patchwork Block Tutorial
To begin a Churn Dash Patchwork Block Tutorial, start by cutting your fabric pieces according to the pattern measurements. This usually includes squares and rectangles in coordinating colors.
The next step is creating half-square triangles. In a Churn Dash Patchwork Block Tutorial, this is done by sewing two squares together and then cutting them diagonally to form triangular units.
After preparing the triangle units, you will assemble the side sections. A Churn Dash Patchwork Block Tutorial guides you in combining rectangles with half-square triangles to create the outer frame.
The center square is then prepared. In a Churn Dash Patchwork Block Tutorial, this piece acts as the focal point and ties the design together.
Once all components are ready, you can begin assembling the block. A Churn Dash Patchwork Block Tutorial typically arranges the pieces in a grid before sewing them together row by row.
The final step is joining the rows and pressing the block. Completing a Churn Dash Patchwork Block Tutorial results in a balanced and visually appealing quilt block ready for use in larger projects.
Creative Variations of Churn Dash Patchwork Block Tutorial
One of the most exciting aspects of a Churn Dash Patchwork Block Tutorial is the opportunity for customization. You can experiment with different color combinations to create unique effects.
Using patterned fabrics is another way to enhance a Churn Dash Patchwork Block Tutorial. Floral, geometric, or themed prints can add personality and charm to your design.
Scaling the block size is also possible. A Churn Dash Patchwork Block Tutorial can be adapted to create larger or smaller blocks depending on your project needs.
You can also create a scrappy version. A Churn Dash Patchwork Block Tutorial using leftover fabric pieces results in a vibrant and eclectic look.
Another idea is to incorporate sashing between blocks. This technique, often used with a Churn Dash Patchwork Block Tutorial, adds structure and highlights each individual block.
Finally, combining the churn dash block with other patterns can create complex quilt designs. A Churn Dash Patchwork Block Tutorial serves as a versatile foundation for creative exploration.
Common Mistakes and Tips for Success
One common mistake in a Churn Dash Patchwork Block Tutorial is inaccurate cutting. Taking the time to measure carefully ensures better results and easier assembly.
Another issue is inconsistent seam allowances. A Churn Dash Patchwork Block Tutorial relies on uniform seams to maintain proper alignment of all pieces.
Improper pressing can also affect the final outcome. Pressing seams correctly in a Churn Dash Patchwork Block Tutorial helps keep the block flat and neat.
Rushing through the process is another common problem. A Churn Dash Patchwork Block Tutorial requires patience and attention to detail for the best results.
Choosing fabrics with insufficient contrast can make the design less visible. A Churn Dash Patchwork Block Tutorial benefits from clear color differences to highlight its structure.
Finally, skipping layout planning can lead to mistakes. Arranging pieces before sewing in a Churn Dash Patchwork Block Tutorial helps ensure correct placement.
FAQ About Churn Dash Patchwork Block Tutorial
What is a Churn Dash Patchwork Block Tutorial?
A Churn Dash Patchwork Block Tutorial is a step-by-step guide that teaches how to create a traditional quilt block using simple geometric shapes.
Is it suitable for beginners?
Yes, a Churn Dash Patchwork Block Tutorial is beginner-friendly and a great introduction to quilting techniques.
What materials are needed?
To follow a Churn Dash Patchwork Block Tutorial, you will need fabric, a rotary cutter, a ruler, thread, and a sewing machine or needle.
How long does it take to make one block?
A Churn Dash Patchwork Block Tutorial can typically be completed in a short time, depending on your experience level.
Can I customize the design?
Absolutely, a Churn Dash Patchwork Block Tutorial allows for endless customization with different fabrics and layouts.
Why is this pattern popular?
The Churn Dash Patchwork Block Tutorial is popular due to its simplicity, versatility, and timeless appeal.
Conclusion
The Churn Dash Patchwork Block Tutorial is a classic and rewarding quilting project that combines tradition with creativity. Throughout this article, you learned about the fundamentals, step-by-step process, creative variations, and common mistakes to avoid.
By following a Churn Dash Patchwork Block Tutorial, you can develop essential quilting skills while creating beautiful and functional designs. The flexibility of this pattern makes it suitable for a wide range of projects.
Now it’s your turn to try a Churn Dash Patchwork Block Tutorial and explore your creativity. Share your honest opinion about this guide and leave your suggestions for improvement. Your feedback is valuable and helps inspire future quilting ideas.