
Crocheted skunk bear pattern is a delightful and imaginative concept that blends the charm of woodland animals with the creativity of handmade crochet art.
Creating a crocheted skunk bear pattern is more than just following instructions; it is about bringing a character to life through yarn and stitches.
Another reason the crocheted skunk bear pattern stands out is its versatility. It can be adapted into different sizes, from small keychains to larger plush toys. Additionally, it offers opportunities to explore various crochet techniques such as color changes, increases, decreases, and embroidery details. By mastering these techniques, you not only complete a charming project but also improve your overall crochet skills. This makes the pattern a valuable addition to any crafter’s collection.
Understanding the Basics of a Crocheted Skunk Bear Pattern
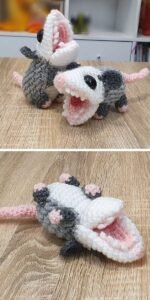
The foundation of a successful crocheted skunk bear pattern begins with understanding its structure and design elements. Typically, the pattern combines a rounded bear body with distinct skunk features, such as a contrasting stripe running along the back. This blend of characteristics creates a unique and recognizable look that sets it apart from standard crochet toys.
The head is often designed with soft curves and small ears, reflecting the bear influence. Meanwhile, the skunk-inspired stripe is carefully incorporated using color changes during the crochet process. This requires attention to detail and consistency to ensure the pattern looks balanced and visually appealing.
The body of the crocheted skunk bear pattern is usually worked in continuous rounds, a common technique in amigurumi. This method helps create a seamless and smooth finish. Understanding how to manage stitch markers and maintain even tension is essential for achieving professional-looking results.
Limbs are typically crocheted separately and then attached to the body. This allows for better control over positioning and symmetry. Proper attachment ensures that the finished piece is sturdy and durable, especially if it is intended for play or frequent handling.
Facial features play a crucial role in bringing the character to life. Simple embroidery techniques can be used to create eyes, a nose, and a mouth, giving the crocheted skunk bear pattern its personality. These small details make a significant difference in the final appearance.
Overall, mastering the basics of this pattern provides a strong foundation for more advanced projects. It also helps build confidence in handling different crochet techniques and understanding pattern instructions.
Materials and Tools for Crocheted Skunk Bear Pattern Projects
Choosing the right materials is essential when working on a crocheted skunk bear pattern. Yarn selection plays a major role in the final look and feel of the project. Soft, medium-weight yarn is often recommended, as it provides a good balance between structure and comfort.
Color choice is particularly important for this pattern. Traditional skunk colors such as black and white are commonly used, but you can also experiment with different shades to create a unique version. The ability to customize colors makes this project even more enjoyable.
A suitable crochet hook is necessary to achieve the correct gauge. Using the recommended hook size ensures that your stitches are tight enough to hold the stuffing securely without gaps. This is especially important for amigurumi projects like the crocheted skunk bear pattern.
Stuffing material is another key component. High-quality fiberfill helps maintain the shape of the toy while keeping it soft and squeezable. Even distribution of stuffing is essential to avoid lumps and ensure a smooth finish.
Additional tools such as stitch markers, yarn needles, and scissors are also required. Stitch markers help keep track of rounds, while yarn needles are used for sewing parts together and weaving in ends. Having the right tools makes the process more efficient and enjoyable.
Finally, safety features should not be overlooked. If the finished piece is intended for children, consider using embroidered eyes instead of plastic safety eyes. This ensures that the crocheted skunk bear pattern remains safe and suitable for all ages.
Step-by-Step Process for Crocheted Skunk Bear Pattern
The first step in creating a crocheted skunk bear pattern is to prepare your materials and review the pattern instructions carefully. Understanding each step before you begin helps prevent mistakes and ensures a smoother workflow. Taking the time to plan your project is always worthwhile.
Start by crocheting the head, as it is often the most detailed part of the pattern. Work in continuous rounds and follow the instructions for increases and decreases to shape the piece. Pay close attention to the placement of color changes for the skunk stripe.
Next, move on to the body. The body is usually larger and requires consistent tension to maintain an even shape. Continue incorporating the stripe pattern as specified, ensuring that it aligns with the head for a cohesive look.
The limbs are created separately and should be stuffed lightly before attachment. Position them carefully to achieve balance and symmetry. Secure stitching is important to ensure that the limbs stay in place during use.
After assembling the main parts, focus on the details. Embroider the facial features and add any additional decorations. These finishing touches bring the crocheted skunk bear pattern to life and give it character.
Finally, inspect your work and make any necessary adjustments. Check for loose ends, uneven stuffing, or misaligned features. Completing these final steps ensures that your project looks polished and professional.
Creative Tips for Customizing Your Crocheted Skunk Bear Pattern
One of the most enjoyable aspects of a crocheted skunk bear pattern is the ability to customize it. You can experiment with different yarn textures to create a variety of looks, from fluffy and soft to sleek and smooth. Each choice adds a unique touch to your project.
Color variations offer another way to personalize your creation. While traditional skunk colors are popular, you can explore pastel shades or vibrant tones for a more whimsical design. This flexibility allows you to match your project to your personal style.
Adding accessories can enhance the overall appearance of your crocheted skunk bear pattern. Consider including items such as scarves, hats, or small bags. These additions not only make the toy more interesting but also provide an opportunity to practice new crochet techniques.
You can also adjust the size of your project by using different yarn weights and hook sizes. This allows you to create anything from a small keychain to a large plush toy. Scaling the pattern adds versatility and expands its کاربرد.
Texture can be further enhanced by incorporating different stitches. For example, using bobble stitches or loop stitches can create a more dynamic and tactile surface. These techniques add depth and visual interest to your design.
Lastly, don’t hesitate to experiment and innovate. Each variation of the crocheted skunk bear pattern is a chance to learn and grow as a crafter. Embracing creativity makes the process more enjoyable and rewarding.
FAQ About Crocheted Skunk Bear Pattern
What is a crocheted skunk bear pattern?
A crocheted skunk bear pattern is a crochet design that combines features of a skunk and a bear into a single amigurumi-style toy, characterized by its unique shape and color pattern.
Is the crocheted skunk bear pattern suitable for beginners?
Yes, many versions of the crocheted skunk bear pattern are beginner-friendly, especially those with simple shapes and clear instructions. Beginners can start with basic designs and gradually try more complex variations.
What type of yarn is best for this pattern?
Soft, medium-weight yarn is ideal for a crocheted skunk bear pattern, as it provides structure while remaining comfortable and easy to work with.
How long does it take to complete the project?
The time required depends on your experience and the complexity of the design, but most crocheted skunk bear pattern projects can be completed within a few hours to a couple of days.
Can I sell items made from this pattern?
In many cases, yes, but it is important to check the specific pattern’s usage terms. Some designers allow selling finished items made from their crocheted skunk bear pattern.
How can I make my project look more professional?
Focus on even tension, secure stitching, and neat finishing. Paying attention to details such as symmetry and proper stuffing can greatly improve the final result of your crocheted skunk bear pattern.
Conclusion
The crocheted skunk bear pattern is a creative and rewarding project that combines imagination with practical crochet skills. Throughout this article, you have explored the basics of the pattern, essential materials and tools, step-by-step instructions, and various ways to customize your design. Each stage of the process offers an opportunity to learn and express your creativity.
By working on a crocheted skunk bear pattern, you not only create a charming handmade item but also develop valuable techniques that can be applied to future projects. From mastering color changes to refining your stitching, every step contributes to your growth as a crafter.
If you enjoyed this guide, consider sharing your experience and results. Your honest feedback and suggestions are always welcome, as they help improve future content and inspire others to explore the wonderful world of crochet.