
Carpenter’s Star Quilt Tutorial projects are among the most admired designs in the quilting world because they combine bold geometry, timeless elegance, and endless color possibilities.
One reason why the Carpenter’s Star Quilt Tutorial continues to attract quilters is the ability to customize every detail.
Another important advantage of following a Carpenter’s Star Quilt Tutorial is the opportunity to improve quilting skills step by step. This project teaches essential techniques such as accurate cutting, precise piecing, matching seams, and arranging blocks effectively. By practicing these quilting fundamentals throughout the process, many quilters gain confidence and develop stronger sewing habits. The pattern may look complex at first glance, but with patience and organization, it becomes manageable and highly enjoyable for crafters of all experience levels.
Understanding the Basics of the Carpenter’s Star Quilt Pattern
The Carpenter’s Star Quilt Tutorial begins with understanding the structure of the traditional star design. The pattern is built using half-square triangles, squares, and carefully arranged geometric shapes that create the iconic star appearance. Many quilters appreciate this design because it combines simple units into a sophisticated final composition. Once the layout becomes familiar, the sewing process feels much more approachable and organized.
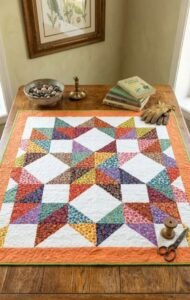
A common feature of the Carpenter’s Star Quilt Tutorial is the use of contrasting fabrics to emphasize the star points. Light and dark tones work especially well because they create visual depth and help the star shape stand out clearly. Choosing fabrics carefully is one of the most important steps when preparing for this quilting project. Even subtle color variations can dramatically affect the final appearance of the quilt.
Fabric quality also plays an essential role in successful quilting. High-quality cotton fabrics are often recommended for a Carpenter’s Star Quilt Tutorial because they are durable, easy to sew, and maintain their shape well during cutting and piecing. Prewashing fabrics is optional, but many quilters prefer to wash and iron their materials beforehand to reduce shrinking and remove excess dye.
Cutting accuracy is another critical part of creating a beautiful Carpenter’s Star quilt. Using quilting rulers, rotary cutters, and cutting mats helps maintain precise measurements. Small cutting errors can affect how the star points align later in the process. Taking extra time during preparation often saves frustration during assembly.
Another helpful technique in the Carpenter’s Star Quilt Tutorial is chain piecing. This method allows quilters to sew multiple units continuously without cutting thread between pieces. Chain piecing improves efficiency, saves time, and keeps the sewing process organized. Many experienced quilters rely on this method when assembling large quilt blocks.
The beauty of the Carpenter’s Star pattern is that it can be adapted into many sizes. Some quilters create small wall hangings, while others sew full-sized bed quilts using oversized star blocks. This flexibility makes the pattern ideal for personalized projects, gifts, and seasonal home décor.
Choosing Fabrics and Colors for a Stunning Quilt Design
One of the most exciting parts of any Carpenter’s Star Quilt Tutorial is selecting fabrics and planning the color arrangement. The pattern’s bold structure provides endless opportunities for creativity. Traditional designs often feature deep reds, navy blues, forest greens, and cream backgrounds, while modern interpretations may use pastel shades, monochromatic palettes, or bright contemporary prints.
Color contrast is especially important in the Carpenter’s Star pattern because the star shape depends on clear visual separation between sections. Using similar shades may soften the design, while strong contrast creates a dramatic effect. Many quilters experiment with fabric placement before sewing to preview the final arrangement and ensure the star stands out properly.
Background fabrics can significantly influence the overall mood of the quilt. White or cream backgrounds create a fresh and airy appearance, while darker backgrounds produce a bold and elegant finish. Neutral backgrounds are popular because they allow the star itself to remain the main focal point of the quilt design.
Print scale is another factor worth considering in a Carpenter’s Star Quilt Tutorial. Large prints can sometimes hide the sharp geometry of the star, while smaller prints and solids highlight the design more clearly. Combining solids with subtle prints often creates a balanced and visually appealing result.
Seasonal themes also work beautifully with this quilt pattern. Autumn-inspired fabrics create warm and cozy quilts, while floral fabrics can produce a softer springtime look. Holiday-themed color palettes are another popular option for quilters who enjoy creating decorative seasonal projects.
Many quilters enjoy using fabric scraps in their Carpenter’s Star Quilt Tutorial projects. Scrap quilting adds personality and uniqueness to the final piece while helping reduce fabric waste. Carefully coordinating scrap colors allows quilters to create beautiful, artistic quilts filled with character and charm.
Step-by-Step Sewing Techniques for Better Results
The sewing process in a Carpenter’s Star Quilt Tutorial becomes much easier when approached step by step. Breaking the project into smaller sections helps maintain accuracy and prevents feeling overwhelmed. Many quilters begin by assembling individual units first before combining them into larger blocks.
Half-square triangles are among the most important units used in the Carpenter’s Star design. These simple components form many of the star points and geometric shapes throughout the quilt. Accurate stitching and trimming are essential because uneven triangles can affect the final alignment of the pattern.
Pressing seams correctly is another important quilting habit. Some quilters prefer pressing seams open, while others press to one side depending on the block structure. Consistent pressing helps reduce bulk and improves seam matching throughout the quilt top. A well-pressed quilt top often looks more polished and professional.
Pinning pieces carefully before sewing can improve accuracy significantly. Matching corners and seam intersections helps maintain sharp star points and straight lines. Although pinning may seem time-consuming, it often prevents mistakes and reduces the need for ripping stitches later.
A reliable sewing machine and a quarter-inch seam allowance are essential tools for a successful Carpenter’s Star Quilt Tutorial. Even small variations in seam allowance can affect how the blocks fit together. Many quilters use quarter-inch presser feet to maintain consistent stitching throughout the project.
Assembling the quilt top slowly and checking measurements frequently can help avoid major alignment problems. Quilters often lay blocks on a design wall or flat surface to preview the arrangement before final assembly. This step allows adjustments to color placement and orientation before everything is sewn permanently.
Finishing, Quilting, and Caring for Your Carpenter’s Star Quilt
After completing the quilt top, the next phase of the Carpenter’s Star Quilt Tutorial involves layering, quilting, and binding the project. Quilt batting selection depends on personal preference and intended use. Cotton batting offers a traditional flat appearance, while polyester batting provides more loft and softness.
Backing fabric should complement the quilt top without distracting from the main design. Many quilters choose wide backing fabrics to reduce seams and simplify assembly. Coordinating backing colors help create a polished and professional finish for the entire quilt.
Quilting designs can dramatically enhance the final appearance of the Carpenter’s Star pattern. Straight-line quilting emphasizes the geometric structure, while free-motion quilting adds texture and artistic detail. Some quilters stitch around the star points to highlight the central design even further.
Binding is the final step that frames the quilt beautifully. Double-fold binding is especially popular because it provides durability and a clean edge finish. Carefully attached binding helps protect the quilt from wear and extends its lifespan over time.
Proper quilt care is essential for maintaining the beauty of handmade quilts. Gentle washing methods, mild detergents, and air drying can help preserve fabric quality and stitching integrity. Many quilters also store quilts in cool, dry areas away from direct sunlight to prevent fading.
A completed Carpenter’s Star Quilt Tutorial project becomes more than just a blanket. Handmade quilts often carry emotional value, family memories, and creative pride. Many quilters pass these quilts down through generations as treasured heirlooms filled with personal meaning and craftsmanship.
FAQ About Carpenter’s Star Quilt Tutorial
What is a Carpenter’s Star quilt?
A Carpenter’s Star quilt is a traditional quilt pattern featuring a large geometric star created with smaller pieced units such as half-square triangles and squares. It is known for its dramatic appearance and timeless style.
Is the Carpenter’s Star quilt difficult for beginners?
Although the pattern may look advanced, many beginners can successfully complete a Carpenter’s Star Quilt Tutorial by working carefully and following step-by-step instructions. Accuracy and patience are the most important skills.
What fabrics work best for a Carpenter’s Star quilt?
High-quality cotton quilting fabrics are commonly recommended because they are durable, easy to cut, and simple to sew. Strong color contrast also helps highlight the star design.
How large should a Carpenter’s Star quilt be?
The size depends entirely on personal preference. Some quilters create small decorative wall hangings, while others sew large bed quilts using oversized blocks.
What quilting style works best with this pattern?
Straight-line quilting and free-motion quilting are both popular choices. The best option depends on the desired texture and visual effect.
Can I use scrap fabrics in a Carpenter’s Star quilt?
Yes, scrap fabrics work beautifully in this pattern. Coordinated scraps can create a colorful and unique quilt filled with personality and charm.
How do I keep my star points sharp?
Accurate cutting, consistent seam allowances, careful pressing, and proper pinning all help maintain crisp and sharp star points throughout the quilt.
How long does it take to complete a Carpenter’s Star quilt?
Completion time varies depending on the quilt size, skill level, and available sewing time. Some projects take a few days, while larger quilts may require several weeks.
Conclusion
This Carpenter’s Star Quilt Tutorial explored the essential steps needed to create a beautiful and timeless quilt design, from understanding the pattern structure to selecting fabrics, sewing accurate blocks, and finishing the quilt professionally. By practicing careful cutting, precise stitching, and thoughtful color coordination, quilters can transform simple fabric pieces into an impressive handmade creation filled with artistry and personality.
The Carpenter’s Star pattern remains one of the most beloved quilting projects because of its versatility, elegance, and creative possibilities. Whether you prefer traditional color palettes or modern fabric combinations, this quilt design offers endless opportunities to express your style and improve your quilting skills at the same time.
Now that you have learned the basics of the Carpenter’s Star Quilt Tutorial, feel free to experiment with different layouts, sizes, and quilting techniques to create a project that feels uniquely yours. Share your honest opinion about this tutorial and leave suggestions about what quilting topics or patterns you would like to explore next.