
Crochet headband pattern is one of the most enjoyable and rewarding projects for anyone who loves handmade accessories.
A beautiful Crochet headband pattern is also an excellent way to practice basic crochet stitches without feeling overwhelmed by a large project.
Besides being fun to create, a Crochet headband pattern is a thoughtful handmade gift suitable for every season. Lightweight cotton versions are perfect for spring and summer, while thicker wool or acrylic headbands keep ears warm during autumn and winter. With just a few simple stitches and a little patience, you can create accessories that are both beautiful and functional.
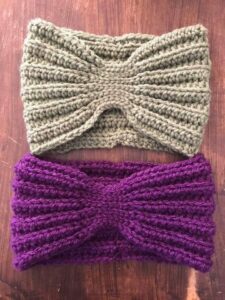
Why Choose a Crochet Headband Pattern?
One of the biggest advantages of following a Crochet headband pattern is its simplicity. Unlike sweaters or blankets that require hundreds of rows, a headband is small enough to finish quickly while still allowing you to practice important crochet techniques.
Another benefit is affordability. Since the project uses very little yarn, it is one of the most budget-friendly crochet accessories you can make. Even premium yarns become affordable because only a single skein is often enough.
Customization is another reason why this project remains popular. You can easily adjust the width, length, color, texture, and decorative details to match your personal style or wardrobe.
Headbands also make wonderful gifts. Handmade accessories show care and attention, making birthdays, holidays, and special celebrations even more meaningful.
Many crocheters enjoy making multiple headbands in different colors because they work perfectly with seasonal outfits. Neutral shades create timeless elegance, while vibrant colors add personality and charm.
Finally, a Crochet headband pattern helps build crochet confidence. Every completed project improves stitch consistency, tension control, and finishing skills that will be valuable for larger creations.
Materials and Step-by-Step Crochet Instructions
Before beginning your Crochet headband pattern, gather all your supplies. You will need approximately 80 to 120 yards of medium-weight yarn, a crochet hook that matches the yarn label (usually 4.5 mm to 5.5 mm), scissors, a yarn needle, and a measuring tape.
For beginners, the following stitches are recommended:
- Chain (ch)
- Slip Stitch (sl st)
- Single Crochet (sc)
- Half Double Crochet (hdc)
Begin by making 16 chain stitches. This number creates a medium-width headband, but you can add or remove chains if you prefer a narrower or wider design.
Row 1: Starting in the second chain from the hook, work 1 single crochet (sc) into each chain across. You should have 15 single crochet stitches. Chain 1 and turn your work.
Row 2: Work 1 half double crochet (hdc) into every stitch across. Chain 1 and turn.
Rows 3 to 42: Repeat Row 2 until your strip measures approximately 20 to 22 inches, depending on the desired head size and yarn elasticity.
When the desired length is reached, fold the two ends together and join them using slip stitches or sew them neatly with a yarn needle. Weave in all loose ends carefully for a clean finish.
Creative Ideas to Personalize Your Crochet Headband
Once you master the basic Crochet headband pattern, adding decorative details becomes easy. One popular option is creating a twisted front by folding and sewing the ends in a simple twist before joining them.
Another beautiful variation is adding a crochet flower. A small layered flower attached near one side instantly transforms a simple headband into an elegant accessory.
Textured stitches also create stunning results. Bobble stitches, puff stitches, and front-post stitches give the fabric extra dimension while remaining comfortable to wear.
Color changes offer endless possibilities. Soft pastel shades are perfect for spring, earthy neutrals work well during autumn, while bright rainbow colors create cheerful everyday accessories.
Different yarn fibers can completely change the appearance of the finished project. Cotton creates lightweight breathable headbands, while wool offers warmth during colder months. Velvet yarn produces luxurious softness with beautiful texture.
You can also embellish your headband using wooden buttons, faux leather labels, satin bows, or small crochet appliqués. These finishing touches make every project feel unique and handcrafted.
Tips for Perfect Results Every Time
Consistent tension is one of the most important factors when creating a successful Crochet headband pattern. Try to maintain even stitches throughout the project to ensure a smooth and professional appearance.
Always measure your work before joining the ends. Yarn stretches differently depending on the fiber, so checking the length prevents the headband from becoming too loose or too tight.
Choosing the right hook size also affects the final result. A larger hook creates a softer, stretchier fabric, while a smaller hook produces a firmer structure with better stitch definition.
Blocking is another helpful finishing technique. Lightly dampening and shaping the completed headband allows the stitches to settle evenly, giving the accessory a polished appearance.
Taking time to weave in the yarn tails securely ensures long-lasting durability. Proper finishing prevents unraveling even after repeated washing and daily use.
Finally, enjoy experimenting with new stitch patterns. Every completed headband teaches valuable crochet skills while encouraging creativity and confidence for future handmade projects.
Frequently Asked Questions
Is a Crochet headband pattern suitable for beginners?
Yes. This project is considered one of the easiest crochet accessories because it mainly uses basic stitches such as chain, single crochet, and half double crochet.
How much yarn do I need?
Most adult headbands require approximately 80 to 120 yards of medium-weight yarn, although decorative designs may use slightly more.
Which yarn is best?
Cotton is ideal for warm weather because it is breathable, while acrylic and wool provide extra warmth during colder seasons.
How long does it take to complete one headband?
Most crocheters can finish a simple headband in one to three hours depending on their experience and the stitch pattern.
Can I adjust the size?
Absolutely. Simply crochet more or fewer rows until the headband fits the intended head circumference comfortably.
Which crochet hook should I use?
A hook between 4.5 mm and 5.5 mm works well for most medium-weight yarns, but always check the yarn label for recommendations.
Can children wear crochet headbands?
Yes. Simply reduce the length according to the child’s head measurement while maintaining the same stitch pattern.
Are crochet headbands good for selling?
Yes. Handmade headbands are popular at craft fairs, online marketplaces, and local boutiques because they are fashionable, practical, and affordable.
Conclusion
Creating a Crochet headband pattern is a wonderful way to improve your crochet skills while making an accessory that is both practical and stylish.
Throughout this guide, you learned how to choose the right materials, complete the project step by step using simple crochet stitches, customize your design with creative embellishments, and apply useful finishing techniques for professional-looking results.
Whether you prefer classic, textured, colorful, or elegant designs, this versatile project offers endless opportunities for creativity. With regular practice, each new headband becomes easier, faster, and even more beautiful than the last. If you enjoyed this tutorial, we would love to hear your honest opinion. Feel free to share your experience, suggestions, and favorite design ideas to inspire other crochet enthusiasts.