
Denim bow tutorial is one of the easiest and most rewarding sewing projects for anyone who loves handmade crafts and creative upcycling.
Working with denim allows you to recycle old jeans while creating something beautiful and practical. Instead of throwing away worn clothing, you can give the fabric a completely new purpose.
One of the best things about this Denim bow tutorial is that it does not require expensive materials or advanced sewing skills. With a few basic sewing tools, a small piece of denim, and a little patience, you can create professional-looking bows that last for years. Throughout this guide, you will learn every important step, from selecting the right fabric to finishing your project with beautiful details that make each bow unique.
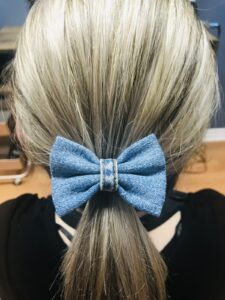
Choosing the Best Materials for Your Denim Bow Tutorial
The first step in any successful Denim bow tutorial is selecting the right denim. Medium-weight denim is usually the easiest to sew because it is sturdy without becoming too thick. Old jeans are an excellent choice since the fabric has already softened through washing, making it easier to fold and stitch.
Before cutting your fabric, wash and iron the denim thoroughly. Clean fabric removes dust, oils, and wrinkles that could affect accurate cutting. Pressing the fabric also helps you achieve crisp folds and symmetrical shapes during assembly.
Prepare your sewing supplies before beginning the project. You will need sharp fabric scissors, sewing pins or clips, matching thread, a sewing needle or sewing machine, measuring tape, chalk or fabric marker, and an iron for pressing the finished bow.
Choose thread that blends naturally with your denim or create contrast using white, gold, or decorative topstitching thread. Contrasting stitches can highlight the rustic appearance of denim and add a professional handmade touch.
If you want a more decorative bow, prepare optional embellishments such as lace trim, wooden buttons, pearls, rhinestones, ribbon, fabric flowers, or leather labels. These details allow you to personalize every project according to your own style.
Finally, organize your workspace with good lighting and enough room for cutting and sewing. A clean workspace improves precision and helps make the entire crafting process more enjoyable.
Step-by-Step Sewing Instructions for the Denim Bow Tutorial
Begin by cutting one rectangle measuring approximately 24 cm x 14 cm for the main bow. Then cut a second small strip measuring about 8 cm x 3 cm that will wrap around the center of the bow. You may increase or decrease these measurements depending on the desired size.
Fold the large rectangle in half with the right sides facing together. Sew around the edges using approximately a 1 cm seam allowance, leaving a small opening that will allow you to turn the fabric right side out afterward.
Trim the corners carefully without cutting through the stitching. This simple step reduces bulk and creates sharper corners once the fabric is turned. Turn the piece right side out and gently push out the corners using a blunt tool or chopstick.
Press the rectangle with an iron until it becomes perfectly flat. Fold both short ends toward the center so they overlap slightly. Secure them with a few hand stitches or machine stitches placed discreetly in the middle.
To create the characteristic bow shape, pinch the center using your fingers to form even pleats. Stitch through the middle several times to permanently secure the folds. This stitching will later be hidden by the center strip.
Wrap the smaller strip tightly around the center of the bow. Fold the raw edges underneath and sew the ends together neatly on the back. Your denim bow is now complete and ready to be attached to hair accessories, bags, keychains, clothing, wreaths, gift wrapping, or decorative home projects.
Creative Ideas to Personalize Your Denim Bow
One of the greatest advantages of following a Denim bow tutorial is the endless opportunity for customization. Every bow can become completely unique by mixing different textures, colors, and decorative elements.
Try combining light and dark denim together. The contrast creates beautiful dimension while highlighting the layered folds of the bow. Recycled denim from different pairs of jeans often produces especially interesting results.
Embroidery is another excellent option. Small flowers, initials, hearts, stars, or simple decorative stitches can transform a basic bow into a personalized handmade gift that feels truly special.
Adding lace along the edges softens the rustic appearance of denim. Cotton lace, crochet lace, or vintage trims pair beautifully with blue denim and create a charming farmhouse-inspired style.
Decorative buttons placed in the center can become the focal point of the design. Wooden buttons, pearl buttons, antique metal buttons, or colorful resin buttons each create a different personality for the finished bow.
These bows are incredibly versatile. Attach them to headbands, hair clips, tote bags, backpacks, gift boxes, baby blankets, table decorations, Christmas ornaments, wreaths, or handmade keychains. They also make wonderful craft fair products because they are quick to sew while offering many customization possibilities.
Tips for Professional Results and Common Mistakes to Avoid
Accurate measuring is one of the biggest secrets to creating symmetrical bows. Even small differences in cutting can affect the final appearance, so always double-check your measurements before making the first cut.
Press the fabric throughout the project instead of waiting until the end. Ironing after every major step helps maintain clean folds, smooth edges, and professional structure that greatly improves the finished result.
Avoid using excessively thick denim layers if your sewing machine struggles with heavy fabrics. If necessary, remove bulky seam allowances or choose softer recycled denim to make stitching much easier.
Take your time when sewing the center pleats. Even, balanced folds create a fuller and more elegant bow. Rushing this step often produces uneven sides that are difficult to correct later.
Experiment with different bow sizes once you master the basic design. Small bows work beautifully for baby accessories, while oversized bows become eye-catching decorations for bags, wreaths, or home décor projects.
Most importantly, enjoy the creative process. Handmade projects rarely need to be absolutely perfect. Every bow reflects your own craftsmanship and becomes more beautiful as your sewing skills continue to improve with practice.
FAQ About the Denim Bow Tutorial
Is this Denim bow tutorial suitable for beginners?
Yes. The project uses simple straight sewing techniques, making it an excellent introduction to sewing with denim.
Can I make the bow entirely by hand without a sewing machine?
Absolutely. Hand sewing works very well for this project. Although it may take slightly longer, the final result can be just as beautiful.
What type of denim works best?
Medium-weight denim from recycled jeans is usually the easiest option because it combines durability with flexibility.
Can I wash the finished denim bow?
Yes. Wash gently with similar colors and allow it to air dry to preserve its shape and decorative details.
How can I make larger or smaller bows?
Simply adjust the dimensions of the main rectangle while keeping the same construction method. Larger rectangles create oversized bows, while smaller rectangles produce delicate miniature versions.
Can children help make this project?
Yes, with adult supervision. Children can participate by choosing fabrics, arranging decorations, pressing with assistance, or helping assemble the finished bow.
What are the best uses for handmade denim bows?
They are perfect for hair accessories, handbags, backpacks, gift wrapping, clothing embellishments, nursery décor, seasonal decorations, keychains, and many other creative sewing projects.
How do I keep the bow looking full over time?
Press it occasionally with a warm iron and gently reshape the center pleats if necessary. Proper storage also helps maintain its original form.
Conclusion
This Denim bow tutorial demonstrates that beautiful handmade accessories do not require expensive materials or complicated sewing techniques.
By recycling denim, preparing your materials carefully, following each construction step, and adding your own creative details, you can produce elegant bows suitable for countless decorative purposes.
As your confidence grows, you can experiment with different sizes, colors, embellishments, and applications to create unique pieces that reflect your personal style. Handmade denim bows are wonderful gifts, attractive craft fair items, and satisfying beginner-friendly sewing projects that encourage creativity while reducing fabric waste. I hope this guide has inspired you to start your own project today. If you found this tutorial helpful, please share your sincere opinion in the comments and let us know your suggestions or creative ideas for future sewing tutorials.