
Crochet cow keychain pattern lovers are always looking for adorable, practical, and beginner-friendly projects that can be completed in just a few hours.
Creating a Crochet cow keychain pattern is more than simply following a list of stitches. It is about understanding how each crochet round builds the character of the little cow.
One of the greatest advantages of this project is its versatility. You can customize the colors, facial expression, accessories, and even the size of your miniature cow. Add a tiny flower, a colorful scarf, or a miniature bell to give your handmade creation its own personality. Because of its compact size, this pattern is also perfect for craft fairs, handmade shops, and personalized gifts that people of all ages can appreciate.
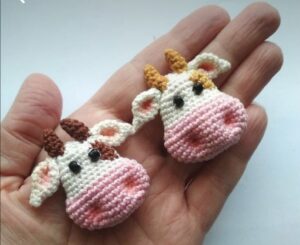
Gather Your Materials and Learn the Basic Crochet Stitches
Before starting your Crochet cow keychain pattern, prepare all your materials in advance. Having everything within reach makes the crochet process smoother and helps maintain consistent stitch tension from beginning to end.
For this project, you will need cotton or acrylic yarn in white, black, pink, and a light beige shade for the horns. A 2.0 mm to 2.5 mm crochet hook usually produces tight stitches that prevent the stuffing from showing through the fabric.
You will also need polyester fiberfill, stitch markers, embroidery needle, scissors, safety eyes or black embroidery thread, and a small metal keychain ring with a chain attachment.
Most amigurumi projects begin with the magic ring. This adjustable loop creates a tightly closed center, preventing visible holes in the first round and giving the cow a polished appearance.
The primary crochet stitches used in this project include magic ring (MR), chain (ch), slip stitch (sl st), single crochet (sc), increase (inc), invisible decrease (dec), and fasten off (FO). Becoming comfortable with these stitches will make the project much easier.
Maintaining even tension throughout every round is one of the secrets to creating a professional-looking Crochet cow keychain pattern. Consistent stitches help keep the head and body symmetrical while making stuffing easier.
Step-by-Step Crochet Cow Keychain Pattern
Begin with the head using white yarn.
Round 1: Make a magic ring with 6 sc. (6)
Round 2: Inc in every stitch around. (12)
Round 3: (1 sc, inc) repeat around. (18)
Round 4: (2 sc, inc) repeat around. (24)
Rounds 5–9: Sc in every stitch around. (24)
If using safety eyes, insert them between Rounds 6 and 7 with approximately six stitches between them. If you prefer embroidered eyes, wait until the assembly stage.
Round 10: (2 sc, dec) repeat around. (18)
Begin lightly stuffing the head with polyester fiberfill. Add small portions at a time to maintain a smooth round shape.
Round 11: (1 sc, dec) repeat around. (12)
Round 12: Dec around until closed. Fasten off and weave in the yarn tail securely.
For the muzzle, use pink yarn.
Round 1: Magic ring with 6 sc.
Round 2: Increase evenly to 12 stitches.
Round 3: Crochet one round without increases. Fasten off, lightly stuff if desired, and sew onto the lower front of the head.
Create two tiny horns using beige yarn.
Round 1: Magic ring with 4 sc.
Rounds 2–3: Sc around. Fasten off leaving a sewing tail.
Make two ears using white yarn.
Round 1: Magic ring with 6 sc.
Round 2: Crochet evenly around.
Flatten each ear slightly before sewing to create a natural folded appearance.
For the body, use white yarn.
Round 1: Magic ring with 6 sc.
Round 2: Increase to 12 stitches.
Round 3: (1 sc, inc) repeat around. (18)
Rounds 4–6: Sc around.
Round 7: (1 sc, dec) repeat around. (12)
Stuff the body firmly.
Round 8: Decrease evenly until closed.
Sew the head securely onto the body, making sure it is centered and balanced before tightening the stitches.
Adding Details and Personalizing Your Crochet Cow
The black spots give every Crochet cow keychain pattern its distinctive appearance. Instead of following an exact arrangement, crochet or embroider irregular spots of different sizes to create a natural cow pattern.
Embroider the nostrils using black embroidery thread. Two small vertical stitches on the pink muzzle immediately bring the face to life.
A gentle embroidered smile adds warmth and personality. Keep facial features simple since the project is very small and tiny details often produce the cutest results.
For the legs, cut four equal strands of white yarn or crochet miniature tubes using six single crochet stitches in a magic ring. Attach them evenly underneath the body.
A small tail can be made using six chains with a tiny tassel tied at the end. Sew it onto the back of the body before attaching the keychain hardware.
Finally, attach the metal keychain ring securely through the top of the head or the upper back. Reinforce the attachment with several tight stitches to ensure the keychain remains durable during everyday use.
Tips for a Professional Finish and Long-Lasting Results
Choosing quality yarn greatly improves the final appearance of your Crochet cow keychain pattern. Smooth cotton yarn often creates cleaner stitches and sharper details than fuzzy novelty yarns.
Stuff the head gradually instead of adding all the filling at once. This prevents lumps and helps maintain a perfectly rounded shape.
Invisible decreases produce a smoother surface than traditional decreases. They are especially useful in amigurumi because they reduce gaps between stitches.
Always weave in yarn tails carefully inside the stuffed pieces before trimming. Loose ends may eventually work themselves out after frequent handling.
If making several cows for gifts or craft fairs, keep notes about stitch counts, yarn brands, and hook sizes. Consistency allows every finished keychain to have the same professional appearance.
Practice is the key to improvement. Even if your first Crochet cow keychain pattern is not perfect, every new project helps you develop better stitch control, cleaner shaping, and greater confidence with amigurumi techniques.
Frequently Asked Questions
Is this Crochet cow keychain pattern suitable for beginners?
Yes. Anyone familiar with basic amigurumi techniques such as the magic ring, single crochet, increases, and decreases can complete this project successfully.
What is the best yarn for this project?
Cotton yarn is highly recommended because it creates crisp stitches, excellent durability, and beautiful stitch definition for small details.
Can I use embroidered eyes instead of safety eyes?
Absolutely. Embroidered eyes are an excellent choice and create a classic handmade appearance.
Approximately how long does it take to complete?
Most crocheters finish this project within two to four hours, depending on their experience level and the amount of decorative details they choose to add.
How large is the finished keychain?
Using the recommended yarn and hook size, the finished cow typically measures between 7 and 10 centimeters tall, excluding the keychain hardware.
Can I sell finished keychains made from this pattern?
Yes. Handmade crochet keychains are popular at craft fairs, gift shops, and online handmade marketplaces. Always ensure your finished products maintain excellent craftsmanship and high-quality finishing.
How do I keep the stuffing from showing?
Use a smaller crochet hook than normally recommended for your yarn. Tight stitches create a dense fabric that hides the stuffing inside.
Can I customize the colors?
Certainly. While the traditional white-and-black cow is classic, you can create brown cows, pink cows, gray cows, or fantasy-inspired colorful versions for a unique collection.
Conclusion
Creating a Crochet cow keychain pattern is a rewarding project that combines creativity, practical crochet skills, and charming design in one small handmade accessory.
Throughout this guide, you learned how to prepare your materials, work the essential crochet stitches, shape each part of the miniature cow, assemble the pieces securely, and add personalized finishing touches that make every keychain unique. With patience and consistent practice, you can confidently create beautiful handmade cow keychains for yourself, thoughtful gifts, or even to sell as part of your crochet business.
I hope this tutorial has inspired your next crochet project. If you enjoyed this guide, please leave your honest opinion, share your experience making your own crochet cow, and feel free to suggest ideas or future patterns you would like to see.