
Quilted Square Bag Pattern is a timeless sewing project that combines beauty, functionality, and creativity into a single handmade accessory.
One of the reasons the Quilted Square Bag Pattern remains so popular is its versatility. You can personalize every detail, from the size of each fabric square to the quilting design, handle length, pocket placement, and lining fabric.
Throughout this guide, you will learn how to create a beautiful quilted square bag from start to finish. The step-by-step process covers material selection, fabric cutting, patchwork assembly, quilting, bag construction, and finishing techniques. Even if this is your first quilted bag, following these instructions carefully will help you create a durable and professional-looking project that you can proudly use or gift.
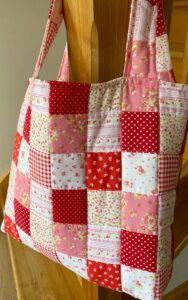
Choosing Materials and Preparing the Quilted Square Bag Pattern
The first step in creating a Quilted Square Bag Pattern is selecting high-quality quilting cotton fabrics. Choose several coordinating prints along with one or two solid fabrics to create contrast between the patchwork squares. A harmonious color palette gives the finished bag a polished and elegant appearance.
For a medium-sized square bag, cut 32 fabric squares measuring 4½ x 4½ inches (11.5 x 11.5 cm). Sixteen squares will form the front panel, while the remaining sixteen squares will create the back panel. If you prefer a larger bag, simply increase both the number and size of the squares while maintaining a balanced layout.
Cut two lining pieces measuring 16½ x 16½ inches (42 x 42 cm). These pieces form the interior of the bag and provide a clean, finished look. Select a coordinating cotton fabric that complements the outer patchwork while remaining durable enough for everyday use.
Prepare the batting by cutting two pieces measuring 16½ x 16½ inches (42 x 42 cm). Low-loft cotton batting works particularly well because it adds structure without making the bag bulky. Fusible fleece can also be used if you prefer a slightly firmer finish.
For the handles, cut two fabric strips measuring 4 x 24 inches (10 x 61 cm). After folding and stitching, these become sturdy fabric handles that are both comfortable and attractive. Alternatively, cotton webbing or ready-made bag handles may also be used.
Before sewing, press every fabric square carefully. Accurate cutting and well-pressed fabric make patchwork assembly much easier, helping all seams align neatly throughout the project.
Step-by-Step Construction of the Quilted Square Bag Pattern
Arrange the sixteen front squares into four rows of four squares each. Move the fabrics around until you are satisfied with the balance of colors and prints. Repeat this process for the back panel, ensuring both sides coordinate while maintaining their own unique appearance.
Sew each row together using a ¼-inch (6 mm) seam allowance, pressing the seams in alternating directions after every row. This simple technique helps the seam intersections nest together, producing crisp and accurate patchwork points.
Join the completed rows to create one large patchwork panel. Repeat exactly the same process for the second panel. At this stage, both the front and back of the bag should measure approximately 16½ x 16½ inches (42 x 42 cm).
Layer each patchwork panel with one batting piece, placing the batting behind the fabric. Quilt through both layers using straight lines, diagonal stitching, grid quilting, or simple free-motion quilting. Even quilting distributes the batting evenly and strengthens the finished bag.
Next, place each quilted panel right sides together with one lining piece. Stitch around the top edge only, then turn and press. This creates neat upper edges before assembling the bag body.
Position the front and back panels with right sides facing each other. Stitch both side seams and the bottom seam using a ½-inch (1.3 cm) seam allowance, leaving the top open. The bag now begins to take shape.
Shaping, Handles, and Finishing the Quilted Square Bag Pattern
To create a flat-bottomed bag, box each lower corner. Measure 2½ inches (6.5 cm) from the corner point, draw a straight line, stitch across the line, and trim away the excess fabric. Repeat for all bottom corners. This technique creates a stable base that allows the bag to stand upright.
Turn the bag right side out and gently push out every corner using a blunt turning tool. Avoid using sharp objects, which may damage the fabric or create holes in the corners.
Prepare the handles by folding each strip lengthwise with wrong sides together and pressing. Open the strip, fold both long edges toward the center, fold again, and topstitch along both sides. This creates strong double-fold handles suitable for everyday use.
Attach the handles approximately 4 inches (10 cm) from each side seam. Stitch a reinforced square with an X inside each attachment point for maximum durability. This professional finishing technique prevents the handles from pulling loose during regular use.
If desired, add an interior pocket measuring 8 x 8 inches (20 x 20 cm) before assembling the lining. A simple patch pocket provides convenient storage for keys, phones, or other small accessories.
Complete the project by giving the entire bag a final pressing. Steam pressing smooths the seams, enhances the quilting texture, and gives the Quilted Square Bag Pattern a beautifully finished appearance.
Customizing and Caring for Your Quilted Square Bag Pattern
One of the greatest advantages of the Quilted Square Bag Pattern is its endless customization possibilities. Experiment with floral fabrics, modern geometric prints, seasonal collections, or classic patchwork color schemes to create bags for every occasion.
You can also vary the quilting designs. Straight-line quilting offers a clean modern style, while echo quilting, crosshatch quilting, or gentle free-motion designs add additional texture and visual interest.
Decorative details such as buttons, fabric labels, embroidered initials, or fabric appliqués allow each finished bag to reflect your own creative style. Personalized bags also make thoughtful handmade gifts for birthdays, holidays, or special celebrations.
If you need additional storage, consider sewing exterior pockets, zipper compartments, magnetic snaps, or fabric dividers inside the bag. These practical additions increase the bag’s everyday functionality without significantly increasing construction difficulty.
To keep the bag looking beautiful, wash it gently using cool water and mild detergent when necessary. Air drying helps preserve the quilting texture and prevents excessive shrinkage of both fabric and batting.
Store the finished bag flat or lightly stuffed with tissue paper when not in use. Proper storage helps maintain its shape and keeps the quilted structure looking fresh for many years.
Frequently Asked Questions
Is the Quilted Square Bag Pattern suitable for beginners?
Yes. Beginners with basic sewing knowledge can successfully complete this project by carefully following each step and taking time to align the patchwork accurately.
What fabric is best?
High-quality quilting cotton is the most popular choice because it is durable, easy to sew, presses well, and comes in countless beautiful prints.
Can I make the bag larger?
Absolutely. Increase both the number and size of the fabric squares while adjusting the lining and batting accordingly. The construction process remains the same.
Do I need batting?
Yes. Batting provides the quilted texture, softness, and structure that distinguish a quilted bag from a standard fabric tote.
How long does this project usually take?
Depending on quilting complexity and sewing experience, most makers complete the project within one full day or over a relaxing weekend.
Can I sell bags made from this pattern?
Yes. Handmade quilted bags are popular at local craft fairs, handmade markets, and online shops. High-quality craftsmanship and careful finishing help create products customers appreciate.
Conclusion
Creating a Quilted Square Bag Pattern is an enjoyable sewing project that combines patchwork, quilting, and practical bag construction into one beautiful handmade accessory.
Throughout this guide, you learned how to select suitable fabrics, cut accurate squares, assemble the patchwork, quilt each panel, shape the bag, construct durable handles, and apply professional finishing techniques.
With thoughtful fabric choices and careful sewing, you can create a unique quilted bag that is both functional and stylish for everyday use. As you gain confidence, you can easily personalize future versions with different colors, quilting designs, pockets, and decorative details, making every bag a one-of-a-kind creation. We hope this tutorial has inspired your next sewing project. If you enjoyed this article, please leave your honest opinion, share your experience creating your own Quilted Square Bag Pattern, and feel free to send your suggestions for future quilting and sewing tutorials.