
Creating an amigurumi crochet monster bear – Step by Step Tutorial is a fun and creative project that blends imagination with the art of crochet. Amigurumi is a Japanese-inspired technique that involves crocheting small stuffed animals or dolls, and the monster bear is one of the cutest and most playful designs you can try. This tutorial will help beginners and experienced crafters alike understand how to make their own monster bear, while also learning the basics of amigurumi. By following this guide, you’ll discover how enjoyable and rewarding it is to make a toy by hand, especially one as unique as a monster bear.
When crocheting amigurumi, every detail matters—from the yarn selection to the stitching pattern, and even the stuffing inside the toy. This amigurumi crochet monster bear is not only a charming handmade gift but also a great project to improve your crochet skills. It’s designed to be beginner-friendly but also customizable for advanced crocheters who want to add more personality to their creations. By using this Step by Step Tutorial, you’ll avoid confusion and learn how to create each part of the bear with clarity and confidence.
One of the best things about amigurumi projects is their versatility. You can make your monster bear playful, spooky, or even whimsical, depending on the colors and features you choose. With the right yarn, stitches, and imagination, your monster bear can become a toy for kids, a decoration for a special event, or even part of a seasonal Halloween or fantasy-themed collection. This amigurumi crochet monster bear – Step by Step Tutorial will break down the entire process into simple sections so you can enjoy crocheting without feeling overwhelmed.
Understanding Amigurumi Crochet Monster Bear
To start, it’s important to understand what amigurumi really is and how it relates to this monster bear project. Amigurumi crochet focuses on making small, stuffed, and often cute characters using yarn and a hook. In this case, we are creating a monster bear, which combines the cuddly charm of a bear with the imaginative twist of a monster. This makes it an exciting project for people who love both classic teddy bears and quirky designs. By mastering this technique, you’ll not only create one toy but also gain the skills to make many others.
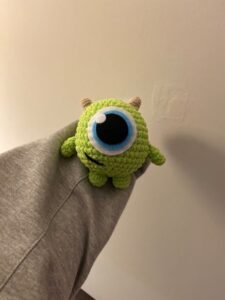
The monster bear itself is typically characterized by exaggerated or playful features. Some designs may have fangs, mismatched eyes, or colorful patterns that make the bear look like a friendly monster rather than a traditional stuffed animal. This gives you the freedom to personalize your creation however you like. Whether you want a cute and silly bear or a slightly spooky one, this project gives you plenty of space for creativity.
One of the key aspects of amigurumi is working in the round. Unlike traditional flat crochet projects, amigurumi uses continuous rounds of stitches to create three-dimensional shapes. This technique is perfect for crafting the bear’s head, body, arms, and legs. Once you learn how to master the magic ring and increase or decrease stitches, you’ll find that creating the different parts of the monster bear becomes simple and fun.
Another thing to keep in mind when making your amigurumi crochet monster bear is the type of yarn and hook you use. Beginners usually do well with medium-weight cotton yarn because it provides good stitch definition and is easy to work with. A smaller hook size is also recommended for amigurumi so the stitches are tight enough to keep the stuffing inside. These details are essential to ensure your monster bear looks neat and holds its shape.
Stuffing is also an important step in making your bear come alive. Polyester fiberfill is the most common choice, as it is lightweight and holds its form well. Proper stuffing not only makes the bear cuddly but also helps emphasize its unique features. You’ll want to add enough stuffing to keep it firm but not so much that the stitches stretch. The balance here will make your monster bear look professional and durable.
Finally, safety eyes, embroidery, and accessories give personality to your monster bear. You can make it scary, cute, or even comical, depending on how you design the face. Some crocheters like to use buttons or felt pieces to decorate their amigurumi, but if you’re making this for a child, safety eyes or embroidered features are safer. This is where your creativity truly shines in the project.
Step by Step Tutorial for Amigurumi Crochet Monster Bear
Now let’s dive into the actual Step by Step Tutorial for creating your amigurumi crochet monster bear. Each part of the bear is crocheted separately and then sewn together at the end. This makes it easier to handle smaller sections and focus on details as you go. By breaking it down into steps, you’ll be able to see the progress clearly and stay motivated throughout the project.
First, you’ll start with the head of the monster bear. Using the magic ring method, you create a small circle and then increase stitches evenly until you reach the desired size. This circular base forms the round head shape. Adding different colors or even uneven increases can help you design a quirky monster-like appearance. For example, using bright green or purple yarn instead of traditional brown gives the bear a fun, spooky vibe.
Next, you’ll move on to the body, which is usually larger and slightly oval-shaped. This is also worked in rounds, starting small and then increasing before tapering off to create the bottom. Depending on the style of monster you want, you can make the body slimmer or rounder. You might also add stripes, spikes, or other creative features as you crochet.
The arms and legs are usually cylindrical and smaller than the body. These parts are also made in continuous rounds and stuffed lightly. Once sewn onto the body, they give the bear its character and make it poseable. Some monster bears even have one leg shorter than the other for a whimsical touch. This is a fun opportunity to get creative with proportions.
For the ears, you can crochet simple semicircles or more exaggerated shapes. A monster bear might have pointed ears, floppy ears, or even asymmetrical ones. The ears are small details, but they play a big role in giving personality to your bear. Sew them firmly to the head after stuffing and shaping them properly.
Once all the parts are completed, it’s time to assemble the bear. Use a yarn needle and the same yarn color to sew the head to the body, attach the arms and legs, and finish with the ears. This step requires patience, but it’s also where you’ll see your project come to life. Make sure everything is attached securely so the toy remains durable.
Lastly, decorate the bear with facial features and accessories. Embroider a smile, add safety eyes, or sew on felt patches for extra detail. Some crafters like to give their monster bear a tiny scarf, a bow, or even little horns. This finishing stage transforms the bear into a unique creation that reflects your personal style.
Tips for Beginners Making a Crochet Monster Bear
If you’re new to crochet, making an amigurumi crochet monster bear might seem intimidating, but with the right tips, you’ll find it surprisingly doable. One of the most important tips is to practice the magic ring technique before starting the project. This foundation is used in almost all amigurumi designs, and mastering it early will save you a lot of frustration later.
Another beginner-friendly tip is to use stitch markers. Since amigurumi is worked in continuous rounds without joining, it’s easy to lose track of where one round ends. A simple stitch marker helps you count rounds accurately and ensures your bear’s shape stays even. This makes the entire Step by Step Tutorial much easier to follow.
It’s also a good idea to start with simple yarn and hook choices. Cotton or acrylic yarn works well for beginners, and a hook size slightly smaller than recommended for the yarn ensures tighter stitches. Avoid fuzzy yarns at first, as they make it harder to see stitches clearly. Once you’re confident, you can experiment with different textures for creative monster bears.
Don’t worry if your stitches aren’t perfect right away. Every crocheter improves with practice, and slight imperfections can even make your monster bear more unique. The beauty of amigurumi is that every creation has its own personality, and small differences add charm. Embrace these quirks as part of the handmade process.
Be patient with stuffing and sewing. These steps can be tricky for beginners, but they are essential for shaping the toy. Add stuffing gradually and distribute it evenly, especially in the head and body. When sewing, take your time to place each part symmetrically, or intentionally asymmetrical if you want a quirky monster look.
Finally, remember to enjoy the process. The joy of amigurumi comes not just from the finished toy but also from the relaxing and rewarding journey of crocheting. Every stitch brings your monster bear closer to life, and that sense of accomplishment is what makes handmade crafts so special.
Creative Ideas to Personalize Your Monster Bear
One of the best parts of making an amigurumi crochet monster bear is the freedom to personalize it. Since this is a playful and whimsical project, you can explore endless creative ideas to make your bear one-of-a-kind. For example, you could give your bear two different colored eyes to create a mismatched monster effect.
Another fun idea is to add accessories. Tiny hats, scarves, or even wings can transform the monster bear into a character. These additions can be crocheted separately and then attached, making them removable if desired. This adds another layer of creativity and playability to the toy.
Experimenting with colors is another way to make your bear unique. Instead of classic brown, try vibrant shades like neon green, orange, or purple. You could even make a striped monster bear or one with polka dots by changing yarn colors at different rounds. This adds visual interest and highlights the “monster” theme.
Adding textures is also a great idea. You can use loop stitches or fuzzy yarns to create fur-like effects, giving your bear a wild and quirky look. Alternatively, using smooth yarn and clean stitches can make the toy look neat and polished. The choice depends on the style you want to achieve.
Some crafters like to add extra limbs or horns to their monster bear. This playful detail makes the toy stand out as a monster rather than just a teddy bear. For instance, giving the bear three arms or horns on its head turns it into a fun fantasy creature. This is a perfect way to push your creativity to the limit.
Finally, consider making a collection of monster bears with different themes. You could create a Halloween-themed set with spooky colors, or a rainbow set with each bear representing a different hue. This makes the project even more enjoyable and provides you with multiple keepsakes or gifts.
FAQ About Amigurumi Crochet Monster Bear
1. What is an amigurumi crochet monster bear?
An amigurumi crochet monster bear is a handmade stuffed toy that combines the cute shape of a bear with playful or monster-like features. It’s made using crochet techniques and stuffed with fiberfill.
2. Do I need advanced crochet skills to make a monster bear?
Not at all. While some experience with basic stitches helps, this Step by Step Tutorial is designed to guide beginners through the process. Even if you’re new, you can create a lovely bear with patience.
3. What materials do I need for this project?
You’ll need yarn, a crochet hook, stuffing, safety eyes or embroidery thread, a yarn needle, and scissors. Optional materials include felt, buttons, or accessories for decoration.
4. How long does it take to make a crochet monster bear?
The time varies depending on skill level, but most people can finish one in a few evenings of work. Beginners may take longer, but the process is enjoyable and worth the effort.
5. Can I customize my monster bear?
Yes! That’s the beauty of this project. You can experiment with colors, shapes, and accessories to make a bear that matches your imagination. No two monster bears need to look alike.
6. Is this project safe for children?
Yes, but if you’re making the toy for a child, avoid small parts like buttons that could be a choking hazard. Embroidered eyes and securely sewn pieces make the bear safe for kids.
Conclusion
In this article, we explored how to create an amigurumi crochet monster bear – Step by Step Tutorial from start to finish. You learned what amigurumi is, how to crochet the different parts of the bear, and how to personalize it with fun and creative touches.
We also shared tips for beginners, ideas for customization, and answers to common questions to make your crafting journey easier.
Now it’s your turn to bring your own monster bear to life. Try the tutorial, enjoy the creative process, and don’t be afraid to experiment with your own ideas. If you decide to make this project, please share your honest opinion and any suggestions for improvement. Your feedback helps inspire new designs and keeps the joy of crochet alive!