
Creating an amigurumi crochet penguin-Step by Step Tutorial is one of the most enjoyable projects for crochet lovers. Amigurumi, the Japanese art of crocheting small stuffed toys, has become increasingly popular because of its charm and creativity. The penguin design is especially beloved since it combines cuteness, simplicity, and versatility. Whether you want to make a decorative piece, a children’s toy, or a handmade gift, this project is perfect for all skill levels. By following this tutorial carefully, you will learn the essential stitches, the techniques to shape your penguin, and tips for finishing it beautifully.
When learning how to make an amigurumi crochet penguin-Step by Step Tutorial, the main goal is to guide beginners through an easy yet rewarding process. Each step will build your skills as you learn how to crochet in the round, increase and decrease stitches, and assemble parts like the wings, beak, and feet. Even if you are a complete beginner, don’t worry—you will discover that the process is both relaxing and fun. Plus, the result is a soft, handmade penguin that you can proudly display or gift to someone special.
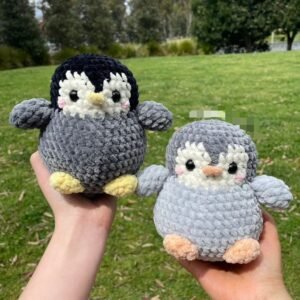
The beauty of following an amigurumi crochet penguin-Step by Step Tutorial is that it allows room for creativity. You can customize the size, color, and features of your penguin according to your preference. Some people love using the classic black and white color scheme, while others enjoy experimenting with pastel shades or even adding accessories like a little scarf or hat. This makes the project adaptable for different occasions, from holiday decorations to personalized handmade toys. With patience and practice, you will soon have a delightful penguin ready to brighten up any space.
Materials You Need for Amigurumi Crochet Penguin
To start the amigurumi crochet penguin-Step by Step Tutorial, gathering the right materials is essential. Having all your supplies ready will make the process smoother and more enjoyable. The materials are quite basic and easy to find, which is why amigurumi is such a beginner-friendly craft.
First, you will need yarn. Choose a medium-weight yarn in the colors you prefer for your penguin. Typically, crafters use black or dark gray for the body, white for the belly, and yellow or orange for the beak and feet. Cotton or acrylic yarn works very well because they hold shape nicely and are easy to handle. Make sure you also have a small amount of contrasting yarn for details.
Next, you will need a crochet hook. The size of your hook depends on the yarn you choose, but a smaller hook, usually around 2.5 mm to 3.5 mm, is recommended. Using a smaller hook ensures tight stitches so the stuffing does not show through. Beginners should check the yarn label for hook recommendations to get the best match.
Stuffing is another key material. You can use polyester fiberfill to stuff your penguin and give it a soft, plush texture. Be sure not to overfill the body, as this can stretch the stitches, but also avoid underfilling to keep your penguin from looking flat.
Safety eyes or small black beads are often used for the penguin’s eyes. However, if the toy is meant for very young children, it’s safer to embroider the eyes with black yarn to avoid choking hazards. This is an important consideration to keep your amigurumi both cute and safe.
Finally, you will need basic crochet tools: a yarn needle for sewing the parts together, stitch markers to keep track of your rounds, and scissors for trimming ends. With these simple materials, you are ready to begin your penguin project.
Step by Step Process to Make the Penguin Body
The most important part of the amigurumi crochet penguin-Step by Step Tutorial is learning how to create the body. The body is crocheted in the round using single crochet stitches, which form a tight and neat structure.
Start with a magic ring, which is the foundation for most amigurumi projects. Into the ring, crochet six single crochet stitches. Pull the ring tight to close it. This forms the base of the penguin’s body. From here, you will work in spirals rather than joined rounds. Using a stitch marker will help you track the beginning of each round.
The next step is increasing. To shape the round body, you will add stitches evenly around the circle. For example, in round two, make two single crochets in each stitch from the previous round. Continue increasing in a pattern until your circle starts to form a ball-like shape. This gradual increase is key to making a smooth body.
After the base is wide enough, you will continue crocheting without increases to build the height of the penguin. This section forms the middle of the body, and you can adjust the number of rows depending on how tall you want your penguin. Beginners usually find this part relaxing because it involves repeating the same simple stitches.
When the body reaches the desired height, it’s time to decrease. Decreasing involves crocheting two stitches together, which makes the opening smaller and rounds out the top of the penguin. Before closing the top completely, remember to add stuffing inside the body. Press gently to spread the fiber evenly so the penguin holds a soft but firm shape.
Once the body is fully closed, you will have a round, solid base to which you can attach the smaller parts like wings, feet, and beak. This step lays the foundation for the rest of your amigurumi crochet penguin-Step by Step Tutorial.
Making the Wings, Beak, and Feet
A penguin wouldn’t be complete without its adorable details. This section of the amigurumi crochet penguin-Step by Step Tutorial explains how to make and attach the wings, beak, and feet. Each piece is crocheted separately and then sewn to the body.
To make the wings, start with a small magic ring and crochet a few rounds in single crochet. Unlike the body, the wings are usually smaller and slightly oval-shaped. Once finished, make two identical pieces and sew them on each side of the penguin’s body. Position them slightly toward the upper half for a balanced look.
The beak is made with yellow or orange yarn. Begin with a magic ring and crochet just a few stitches before closing it to create a tiny triangular shape. This piece should be small and neat. Once ready, attach it to the center of the penguin’s face. The beak instantly gives character and charm to your project.
For the feet, use the same yellow or orange yarn. Each foot can be made by crocheting a small flat oval or semi-circle. Some crafters prefer to make simple flat feet, while others create slightly raised ones for extra detail. Sew the feet at the bottom front of the penguin’s body so it looks like it’s standing upright.
These small parts may take a bit of practice, but they are essential for giving the penguin personality. Adjust their size and placement as needed until you are happy with the look. Don’t worry if the first attempt isn’t perfect—practice will make each new penguin even cuter.
Finally, once all the pieces are attached, you can embroider small details like eyebrows or add a scarf with leftover yarn. These finishing touches make your penguin unique and special.
Final Assembly and Customization
In this part of the amigurumi crochet penguin-Step by Step Tutorial, you will learn how to bring everything together. The final assembly is what transforms separate crochet pieces into a cohesive and adorable penguin.
Begin by attaching the wings firmly with a yarn needle. Make sure they are symmetrical so the penguin looks balanced. Next, sew the beak in place, carefully centering it on the face. Take your time during this step because facial features are the highlight of any amigurumi design.
Once the wings and beak are in position, attach the feet to the bottom. A good tip is to pin them temporarily with safety pins before sewing, so you can adjust placement and ensure they look even. Proper alignment makes the final result more polished.
After assembling the main parts, add the safety eyes or embroidered eyes above the beak. Eyes are incredibly important for expressing personality in amigurumi. A slightly higher or lower placement can change the entire expression of your penguin, so test before securing them.
Now it’s time for customization. This is where your creativity shines. You can crochet a small scarf, a hat, or even add tiny buttons to your penguin. Seasonal accessories are popular—like a red scarf for winter or pastel shades for spring. These little extras make your amigurumi more personal and fun.
Lastly, check that all parts are securely attached. Tug lightly on each piece to confirm it’s firmly sewn. This step ensures durability, especially if the penguin will be handled by children. Now your penguin is complete and ready to be enjoyed.
FAQ About Amigurumi Crochet Penguin
1. How long does it take to make an amigurumi crochet penguin?
It depends on your skill level. Beginners might take a few days, working on it a little each day. Experienced crocheters may finish within a few hours.
2. What is the best yarn for an amigurumi crochet penguin?
Cotton and acrylic yarn are the most recommended. They are durable, easy to work with, and keep their shape well.
3. Can I make the penguin larger or smaller?
Yes, you can adjust the size by using thicker or thinner yarn and matching crochet hook sizes. The pattern stays the same; only the proportions change.
4. Is it safe to give an amigurumi penguin to a baby?
Yes, but only if you avoid small parts like safety eyes. For infants, always embroider the eyes and securely stitch all parts.
5. Do I need advanced crochet skills for this project?
Not at all. The penguin is perfect for beginners since it uses basic stitches like single crochet, increases, and decreases.
6. Can I wash my amigurumi crochet penguin?
Yes, but hand washing with mild soap is recommended. Avoid machine washing to preserve the shape and stitching.
Conclusion
By following this amigurumi crochet penguin-Step by Step Tutorial, you have learned how to create a charming handmade penguin from start to finish. From preparing materials to crocheting the body, wings, beak, and feet, and finally assembling everything with care, each step helps you build confidence in your crochet skills.
Amigurumi is a craft that combines creativity, relaxation, and joy, and this penguin project is a perfect example of that.
Now that you’ve completed your penguin, take pride in your accomplishment and enjoy the result. Each penguin you make can be customized and improved as your skills grow. I’d love to hear your honest opinion about this tutorial and any suggestions you have. Share your thoughts, and let’s keep inspiring each other with creative ideas.