
If you love small and meaningful crochet projects, this Amigurumi Heart Keychain – Step by Step Tutorial will absolutely steal your heart. Creating an amigurumi heart keychain is not only a relaxing activity but also a beautiful way to express affection through handmade art. These adorable crochet hearts make perfect gifts for Valentine’s Day, anniversaries, or as a daily reminder of love. In this guide, you’ll learn how to make one from start to finish, even if you’re a beginner in the world of crochet.
The beauty of making an amigurumi heart keychain lies in its simplicity and versatility. You can customize it with your favorite colors, add cute faces, or keep it classic and minimalist. It’s a quick project that doesn’t require a lot of materials, but the result is always heartwarming. This step-by-step tutorial will walk you through the materials, the crochet process, and even decoration ideas to make your heart keychain unique and full of charm.
This Amigurumi Heart Keychain – Step by Step Tutorial is also a wonderful way to practice basic amigurumi techniques such as the magic ring, single crochet, and invisible decreases. Once you master this small piece, you can easily adapt the pattern to create larger hearts or different shapes. So, grab your yarn and crochet hook—it’s time to create something full of love and personality that you can carry with you wherever you go!
Materials You’ll Need for the Amigurumi Heart Keychain
Before starting your amigurumi heart keychain, it’s essential to gather all the materials you’ll need. Having everything ready will make the process smoother and more enjoyable. The great thing about this project is that it requires very few supplies, making it ideal for quick crafting sessions or for using leftover yarn.
You’ll need some cotton or acrylic yarn in the color of your choice. Red and pink are the most popular shades for hearts, but you can experiment with pastel tones or even rainbow yarn for a fun twist. Make sure your yarn is medium weight so that the heart has good structure and shape.
A 2.5mm or 3mm crochet hook is perfect for small amigurumi projects like this one. The smaller hook ensures tight stitches that keep the stuffing securely inside. You’ll also need fiberfill stuffing, which gives the heart its volume and softness. Use small amounts to avoid lumps.
A yarn needle will be essential for sewing the two parts of the heart together and weaving in the ends neatly. You’ll also need a pair of scissors to cut the yarn. For the keychain part, prepare a metal key ring or small chain with a clasp. You can find these easily in craft stores.
Optional items include safety eyes or embroidery thread if you want to add facial details to your heart. A small ribbon bow can also make your keychain look extra cute. Once everything is ready, it’s time to move on to the exciting part—crocheting your adorable heart!
Step by Step Tutorial: Crocheting the Heart
Now let’s begin the heart of the Amigurumi Heart Keychain – Step by Step Tutorial. The process is simple and perfect for beginners who want to learn amigurumi techniques in a practical way. The heart is made in two halves that are later joined together.
Start by creating a magic ring and work six single crochets into it. This will form the beginning of one side of the heart. On the next round, increase in each stitch, making 12 single crochets. Continue with another round of single crochets, then add increases every few stitches until the circle reaches the size you want for half of the heart.
Repeat the same steps to make the second half. When you have two identical pieces, do not fasten off the second one—this is where you’ll join both halves. Use single crochets to connect them around the edge, filling them with fiberfill as you go. Make sure the shape stays even and full but not overstuffed.
Once the heart starts to close, use invisible decreases to shape the bottom tip of the heart. This creates that smooth curve and pointy end that gives the heart its recognizable form. Always check that your stuffing is evenly distributed before sealing it completely.
Finish off by weaving in any loose yarn ends using your yarn needle. Give the heart a gentle squeeze to even out the shape. You’ll now have a soft, plush mini heart ready to become your new keychain!
To attach the keychain, simply sew or insert a metal ring into the top center of the heart. If you want extra durability, you can crochet a small loop before closing the heart and attach the keyring through it. Now your heart is ready to accompany your keys, bags, or to be gifted to someone special.
Decorating and Personalizing Your Crochet Heart
The most enjoyable part of this Amigurumi Heart Keychain – Step by Step Tutorial is personalizing your finished heart. Adding decorations makes each piece unique and gives it character. You can adapt the design for different occasions, moods, or recipients.
If you love a minimalist look, keep your heart plain with a clean and neat finish. The simple crochet texture already looks charming and elegant. However, if you want to give it a playful touch, try adding a pair of safety eyes and embroider a tiny smile using black thread. This transforms your amigurumi heart into a cute character!
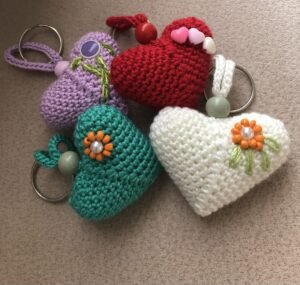
For an extra romantic touch, you can stitch a small bow or ribbon on top of the heart. Choose a matching or contrasting color to make it pop. You could also add tiny felt pieces shaped like flowers, stars, or initials to personalize your keychain for a friend or loved one.
Another creative idea is to use variegated yarn, which automatically gives your heart a multicolored or gradient look. It’s an easy way to make your project stand out without extra effort. You can even use metallic or glitter yarn to make it sparkle—perfect for festive occasions.
If you’re making multiple hearts, consider creating a set of amigurumi heart keychains in different colors. They can represent emotions, friendship, or even be part of a themed gift collection. Imagine a rainbow set of crochet hearts—each one symbolizing love, happiness, and creativity.
Finally, you can turn your heart into more than just a keychain. Use it as a bag charm, car decoration, or even a small Valentine’s ornament. The possibilities are endless, and every version will reflect your personal style and craftsmanship.
Tips, Tricks, and Creative Ideas
Even though this Amigurumi Heart Keychain – Step by Step Tutorial is simple, there are some helpful tips that can make your crochet experience smoother and more enjoyable. Paying attention to small details can make a big difference in the quality and look of your finished piece.
First, always keep your stitch tension consistent. Tight, even stitches will give your heart a professional appearance and prevent gaps between stitches where stuffing might show through. If you’re new to amigurumi, practice with a small sample before starting the main project.
Second, use a stitch marker to track the beginning of each round. Amigurumi patterns are often worked in continuous rounds, so it’s easy to lose track without a marker. This will help keep your shape symmetrical.
When stuffing your heart, take your time. Add small amounts of fiberfill gradually to avoid uneven lumps. Use the back of your crochet hook to push the stuffing into the corners and curves. The goal is a firm yet soft heart that holds its shape beautifully.
If you want your keychain to last longer, use strong yarn and make sure your seams are tightly sewn. The keychain will likely get some handling, so durability is important. You can also apply a light fabric stiffener if you want the heart to hold an even firmer shape.
Finally, don’t hesitate to experiment. Try making tiny hearts to create a charm set or larger ones for hanging decorations. Once you master this tutorial, the technique can be applied to many creative projects like heart garlands, plushies, or baby mobiles.
Amigurumi Heart Keychain
1. Can beginners make the Amigurumi Heart Keychain?
Yes! This Amigurumi Heart Keychain – Step by Step Tutorial is perfect for beginners. It uses simple stitches like single crochet, increases, and decreases.
2. What is the best type of yarn for this project?
Cotton or acrylic yarn works best. Cotton gives a firm structure, while acrylic provides a soft, fluffy texture.
3. How do I keep my heart shape even?
Stuff the heart gradually and evenly. Use tight stitches to maintain structure and shape.
4. Can I make the heart bigger or smaller?
Absolutely. Increase or decrease the number of rounds to change the size while following the same steps.
5. How do I attach the keychain securely?
Use a metal key ring and sew it firmly to the top of the heart or attach it through a small crocheted loop.
6. Can I sell my amigurumi heart keychains?
Yes, as long as the design is your own interpretation, these keychains make lovely handmade items for sale or gifts.
Conclusion
Through this Amigurumi Heart Keychain – Step by Step Tutorial, you’ve learned how to create a cute, handmade heart full of love and creativity. From gathering your materials and crocheting each stitch to decorating and personalizing the final piece, this project shows how simple yarn can turn into something truly meaningful.
Crafting an amigurumi heart keychain is a wonderful way to express your affection through art. It’s a small but powerful symbol of care that you can carry with you or share with others. Every handmade heart tells a story—your story—made with time, patience, and love.
If you enjoyed this tutorial, please leave your honest opinion and share your suggestions. We’d love to know what colors, decorations, or ideas you used to make your own amigurumi heart keychain unique and special!