
If you are searching for Crochet bats 🦇🦇 so cute for Halloween! – Step by Step Tutorial, you are in the right place. Crochet bats are one of the most adorable handmade decorations you can create for spooky season. They add a charming touch to your Halloween setup while also being fun and relaxing to make. Whether you are a beginner or an experienced crocheter, this tutorial will guide you through everything you need to know to create your own little bat friends.
Making crochet bats is more than just a craft project; it is an opportunity to express creativity and bring a festive, cozy atmosphere to your home. Halloween is known for its scary decorations, but adding something handmade gives it a special warmth. These bats are not only great for decorating your house but can also be given as thoughtful gifts, used as keychains, or even strung together to make garlands. By following this step by step tutorial, you will learn how to crochet each part of the bat and assemble them into a perfect little creature.
In this article, you will learn about the materials you need, the stitches required, and the process of shaping the body, wings, and details of the crochet bat. Each step is broken down so that even beginners can follow along with confidence. By the end of this tutorial, you will feel proud of your handmade Halloween bats and may even want to make a whole colony of them to decorate every corner of your space. Let’s dive into the details of this Crochet bats 🦇🦇 so cute for Halloween! – Step by Step Tutorial.
Materials Needed for Crochet Bats 🦇
The first step in this Crochet bats 🦇🦇 so cute for Halloween! – Step by Step Tutorial is gathering the right materials. You will need basic crochet supplies that are easy to find. Start with yarn in black or dark gray, as this gives the bats their traditional spooky look. However, you can also experiment with purple, orange, or even glitter yarn for a fun twist.
Next, you will need the correct crochet hook. A smaller hook, usually 2.5mm to 3.5mm, works best because it keeps the stitches tight, preventing stuffing from showing through. Tight stitches will give your crochet bat a neat and polished appearance.
You will also need stuffing, which is usually polyester fiberfill. This helps give the bat its shape, making the body soft but firm. Don’t overstuff, as that can stretch the stitches too much. Just enough to fill the bat and keep it in shape works perfectly.
Safety eyes or small beads are another important material. They give your crochet bat its personality and make it extra cute. You can also embroider eyes with yarn if you prefer a safer option for children’s toys.
A yarn needle and scissors are essential for sewing pieces together and weaving in ends. These finishing touches ensure your crochet bat looks tidy and professional. With all these materials ready, you can confidently move to the next steps of the tutorial.
Lastly, remember that creativity is part of the process. While the tutorial provides a clear step by step method, feel free to add your own details like small fangs, bows, or even wings in different colors. Personal touches make your crochet bats unique.
Step by Step Instructions for the Body
Creating the bat’s body is the foundation of this Crochet bats 🦇🦇 so cute for Halloween! – Step by Step Tutorial. You will typically start with a magic ring, which is a common technique used in amigurumi crochet. This allows you to begin crocheting in the round without leaving a hole at the center.
After forming the magic ring, work single crochet stitches in the round, gradually increasing stitches to form a sphere-like shape. The body should be firm but not too stiff, allowing the stuffing to shape it nicely.
Once you reach the widest point, continue crocheting evenly for several rows. This creates the body length and gives the bat its main structure. Keep counting stitches to ensure symmetry and avoid accidental increases or decreases.
As you near the top, start decreasing stitches gradually. This helps close the shape while keeping it smooth. Before closing it entirely, add stuffing to the body. Make sure it is evenly distributed so the bat doesn’t look lopsided.
The body should be slightly oval, representing the bat’s torso. This simple shape is versatile and easy for beginners while still forming a strong base for the rest of the bat’s details.
By completing this step, you already have the foundation of your crochet bat. Now, the fun part comes—adding wings, ears, and tiny details that bring it to life.
Making the Wings and Ears
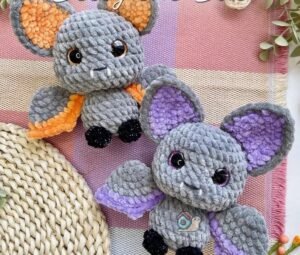
Wings are the signature feature of any bat, and in this Crochet bats 🦇🦇 so cute for Halloween! – Step by Step Tutorial, you will learn to make them lightweight and adorable. To start, crochet small triangular or semi-circular shapes that mimic real bat wings.
These wings are typically made flat and then sewn onto the sides of the body. Using black yarn, crochet a chain and build rows with increases and decreases to create a wing-like silhouette. Some crafters also add little picot stitches to mimic the wing’s curved edges.
Ears are made similarly to wings but are much smaller and usually triangular. Start with a small chain, work in rows, and shape it into a pointed ear. Make two identical pieces to attach symmetrically on top of the bat’s head.
Placement is key for both wings and ears. Wings should be sewn to the sides of the bat’s body, aligned evenly. Ears should be added at the top, giving your bat an alert and playful look.
Feel free to play with proportions. Larger wings make the bat look dramatic, while smaller wings give it a cute, cartoonish style. Similarly, bigger ears can make your bat more whimsical and fun.
These details add character and personality. Combined with the body, your bat will now start looking like a real amigurumi figure, perfect for Halloween decorations.
Adding the Final Details
No Crochet bats 🦇🦇 so cute for Halloween! – Step by Step Tutorial would be complete without the finishing details. This is where your project truly comes to life. Start by attaching safety eyes or embroidered eyes. Position them symmetrically so your bat looks friendly and cute.
If you want, you can crochet or stitch on a small nose and even add fangs with white yarn. This little touch makes the bat look like a fun Halloween character rather than a scary one.
Some crocheters also add accessories, like a small bow tie, ribbon, or even tiny hats. These decorative elements can be customized depending on whether your bat will be used as a toy, ornament, or gift.
Another fun idea is to turn your crochet bats into keychains or hanging decorations. Simply attach a loop or string to the top, and you can hang them on doorknobs, Christmas trees, or Halloween garlands.
Make sure all attachments are securely sewn so they don’t come loose, especially if children will handle them. Safety and durability are important for any handmade item.
Once finished, you can create several crochet bats in different sizes. Arrange them together for a spooky yet adorable Halloween display.
FAQ About Crochet Bats 🦇
Q: How long does it take to make a crochet bat?
A: For beginners, one bat might take 2–3 hours. With practice, you can make them in under an hour.
Q: Can I use leftover yarn for crochet bats?
A: Yes! Crochet bats are small, making them perfect for using up yarn scraps.
Q: Do I need special stitches to make crochet bats?
A: No. Basic stitches like chain, single crochet, increase, and decrease are enough.
Q: Can I make crochet bats without safety eyes?
A: Absolutely. You can embroider eyes with yarn or felt for a child-friendly version.
Q: What size should crochet bats be?
A: The size depends on your yarn and hook, but most bats are small, fitting in your hand.
Q: Can I sell crochet bats I make from this tutorial?
A: Yes, handmade crochet bats are popular at craft fairs and online shops, especially near Halloween.
Conclusion
In this Crochet bats 🦇🦇 so cute for Halloween! – Step by Step Tutorial, you learned how to create an adorable handmade bat from start to finish. From preparing materials and crocheting the body to shaping wings, ears, and final details, every step was explained to help you succeed.
Crochet bats are not only fun to make but also versatile. They can be used as Halloween decorations, gifts, or even as small accessories like keychains. With just yarn, a hook, and some creativity, you can bring these little creatures to life.
Now it’s your turn! Try this tutorial, make your own bats, and share them with friends or family. Don’t forget to leave your opinion below and share any suggestions for future tutorials. Your feedback will help make each project even better. 🦇✨