
If you are looking for a fun and creative fall project, the Easy Crochet Rustic Rib Pumpkin Tutorial 🎃- Step by Step Tutorial is the perfect choice for you. This beginner-friendly guide will show you how to make a charming rustic pumpkin with beautiful ribbed texture using simple crochet techniques. Whether you are new to crocheting or have some experience, this tutorial will help you create a decorative piece that adds warmth and coziness to your home.
The best thing about the Easy Crochet Rustic Rib Pumpkin Tutorial 🎃- Step by Step Tutorial is that it uses basic stitches, so you don’t need to be a crochet expert. You will learn how to shape the pumpkin, create the rustic rib design, and finish it with a cute stem for the perfect autumn touch. Plus, you can customize the size, colors, and style to match your seasonal decorations.
Throughout this tutorial, we will break everything down into clear steps so you can follow along easily. We will also discuss tips for choosing the right yarn, how to stuff the pumpkin for the right shape, and ways to make your pumpkin unique. By the end of the Easy Crochet Rustic Rib Pumpkin Tutorial 🎃- Step by Step Tutorial, you will have a beautiful handmade pumpkin that will impress your friends and family.
Materials and Tools Needed for the Easy Crochet Rustic Rib Pumpkin Tutorial 🎃- Step by Step Tutorial
Before we begin the Easy Crochet Rustic Rib Pumpkin Tutorial 🎃- Step by Step Tutorial, it’s important to gather all the materials and tools you will need. Having everything ready will make the process smoother and more enjoyable.
First, you will need medium-weight yarn in your chosen color. Traditional orange is perfect for a classic look, but you can also use cream, brown, or even soft pastels for a modern rustic vibe. Cotton yarn works well because it gives a nice stitch definition, but acrylic yarn is also a good option for beginners because it is affordable and easy to work with.
Next, you will need a crochet hook in the recommended size for your yarn. Usually, a 4mm or 5mm hook works well for this project, but always check the yarn label for the best results. A slightly larger hook can make your pumpkin softer and squishier, while a smaller hook will create a tighter, firmer shape.
You will also need a yarn needle for sewing the edges together, scissors for cutting the yarn, and some fiberfill stuffing to give your pumpkin a nice round shape. If you prefer a more eco-friendly option, you can use fabric scraps or yarn leftovers as stuffing instead of fiberfill.
Finally, for the pumpkin stem, you can use a small stick from your garden for a rustic look or crochet a small stem using brown yarn. Some people even like to add twine or ribbon around the stem for a decorative touch. These little details make your pumpkin extra charming and unique.
Once you have gathered all your materials, you are ready to start the Easy Crochet Rustic Rib Pumpkin Tutorial 🎃- Step by Step Tutorial and bring your pumpkin to life.
Step-by-Step Instructions for the Easy Crochet Rustic Rib Pumpkin Tutorial 🎃- Step by Step Tutorial
Now let’s get into the fun part: actually making the pumpkin. The Easy Crochet Rustic Rib Pumpkin Tutorial 🎃- Step by Step Tutorial breaks everything into simple steps so even beginners can follow along easily.
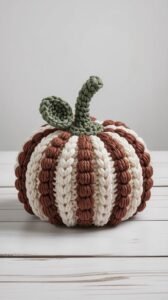
Start by making a chain in the length you want for your pumpkin. Remember, this will determine the height of your pumpkin, so if you want a taller one, make a longer chain. Once you have your chain, begin working rows of half double crochet stitches in the back loops only. This is what creates the ribbed texture that makes the pumpkin so unique.
Continue crocheting back and forth until your rectangle reaches the width you want. The width will determine how round your pumpkin will be, so you can experiment with different sizes. Once you are happy with the size, it’s time to shape the pumpkin.
Fold the rectangle in half and use your yarn needle to sew the sides together, creating a tube shape. Then gather one open end tightly to close it off completely. Now you have one side closed, and you can start stuffing the pumpkin with fiberfill or any stuffing material you have chosen.
After stuffing, gather the remaining open end and close it tightly. To create the classic pumpkin segments, thread your needle with a long piece of yarn and wrap it around the pumpkin several times, pulling slightly to form the indentations. This gives your pumpkin that realistic, rustic look.
Finally, attach the stem by sewing or gluing it in place. You can add extra decorations like leaves, twine, or even small flowers if you want to give your pumpkin a personal touch. And just like that, the Easy Crochet Rustic Rib Pumpkin Tutorial 🎃- Step by Step Tutorial is complete!
Tips and Tricks for the Easy Crochet Rustic Rib Pumpkin Tutorial 🎃- Step by Step Tutorial
While the Easy Crochet Rustic Rib Pumpkin Tutorial 🎃- Step by Step Tutorial is simple, there are a few tips that can make the process even easier and the results more beautiful.
First, experiment with different yarn colors and textures. Rustic pumpkins look amazing in earthy tones like cream, brown, and mustard yellow, but bright colors can create a fun, whimsical look for kids’ rooms or holiday decorations.
Second, don’t be afraid to play with sizes. Making a set of pumpkins in different sizes creates a lovely decorative arrangement for your home. Small pumpkins are quick to make and perfect for table centerpieces, while larger ones can be used on the porch or living room.
Third, pay attention to the stuffing amount. Too much stuffing can stretch the stitches and ruin the shape, while too little stuffing can make the pumpkin look flat. Aim for a firm but slightly squishy texture for the best result.
Another helpful tip is to use a stitch marker if you are new to crocheting. It will help you keep track of your rows and ensure both ends of your rectangle are even before sewing them together.
Also, if you want to make your pumpkin extra special, try adding a touch of cinnamon stick as the stem. Not only does it look cute, but it also adds a wonderful fall scent to your home.
Lastly, remember that practice makes perfect. Your first pumpkin might not look exactly how you imagined, but each one you make will get better and better. The Easy Crochet Rustic Rib Pumpkin Tutorial 🎃- Step by Step Tutorial is all about learning and having fun with your creativity.
Creative Ideas for Using Your Crochet Rustic Rib Pumpkins
Once you finish the Easy Crochet Rustic Rib Pumpkin Tutorial 🎃- Step by Step Tutorial, you will have a beautiful handmade decoration, but what can you do with it? Here are some creative ideas.
Use them as centerpieces for your dining table during the fall season. A few pumpkins in different sizes arranged with candles and autumn leaves create a cozy and festive look.
Place them on your mantelpiece or bookshelf to add a warm, rustic charm to your home décor. Handmade decorations like these always make a space feel more personal and inviting.
You can also give them as gifts to friends and family. Handmade presents show thoughtfulness and care, and a set of crochet pumpkins makes a wonderful seasonal gift.
Another fun idea is to use small pumpkins as place settings for Thanksgiving dinner. Attach a name tag to each one, and your guests will love the creative and personal touch.
If you sell handmade crafts, these pumpkins are perfect for fall craft fairs or online shops. People love unique seasonal decorations, and the Easy Crochet Rustic Rib Pumpkin Tutorial 🎃- Step by Step Tutorial helps you make them quickly and easily.
Lastly, you can make them into ornaments by adding a string loop on top. Hang them on a fall wreath or even on your Christmas tree for a rustic holiday look.
FAQ About the Easy Crochet Rustic Rib Pumpkin Tutorial 🎃- Step by Step Tutorial
Q: Is the Easy Crochet Rustic Rib Pumpkin Tutorial 🎃- Step by Step Tutorial suitable for beginners?
A: Yes, this tutorial uses basic stitches and simple techniques, making it perfect for beginners who want to try a fun and easy crochet project.
Q: How long does it take to complete one pumpkin?
A: It depends on the size, but most pumpkins can be finished in one to two hours, especially after you get some practice.
Q: Can I use leftover yarn for this project?
A: Absolutely! This is a great way to use up yarn scraps, and mixing colors can create unique and creative designs.
Q: What kind of stuffing works best for the pumpkins?
A: Fiberfill stuffing works best, but you can also use fabric scraps, old pillow stuffing, or yarn leftovers as eco-friendly alternatives.
Q: How do I make the pumpkin segments look more defined?
A: Wrap your yarn tightly but gently around the pumpkin several times, pulling slightly to create deep, even indentations.
Q: Can I wash the crochet pumpkins if they get dusty?
A: Yes, but hand washing is recommended to maintain the shape and texture of the crochet stitches.
Conclusion
The Easy Crochet Rustic Rib Pumpkin Tutorial 🎃- Step by Step Tutorial is a wonderful project for crafters of all levels. It teaches you how to make a beautiful rustic pumpkin using simple stitches and techniques while letting you get creative with colors, sizes, and decorations.
By following this tutorial, you can create cozy, handmade decorations that bring warmth and charm to your home during the fall season. We hope this guide has inspired you to pick up your crochet hook and start crafting.
If you try this tutorial, please leave your honest opinion and suggestions. We would love to hear about your experience and see how your pumpkins turned out!