
How to crochet a violin- Step by Step Tutorial is a fascinating project that combines creativity, patience, and attention to detail. Crocheting a violin is not only a fun craft idea but also a way to celebrate music through art. Unlike traditional crochet projects such as blankets or scarves, creating a crochet violin allows you to explore shapes, textures, and dimensions in an innovative way. This makes it an excellent challenge for crafters who want to expand their skills.
When learning how to crochet a violin- Step by Step Tutorial, it is important to understand that the process involves building the violin in parts, just like constructing a real instrument. You will work on the body, neck, fingerboard, and strings separately before assembling them into one cohesive piece. The result is a charming decorative item that can be displayed in your home, gifted to a music lover, or even used as an educational tool for children to appreciate both crafts and instruments.
This tutorial will guide you through each step carefully so that even if you are a beginner, you can still follow along. By using basic stitches such as single crochet, double crochet, and slip stitches, you can create the curved shapes and detailed parts of the violin. The keyword phrase How to crochet a violin- Step by Step Tutorial will be highlighted throughout to ensure you can easily follow the process and remember the main focus of this article. Now, let’s dive into the details and bring this beautiful crochet project to life.
Materials and Preparation
Before you start with how to crochet a violin- Step by Step Tutorial, you need to gather the right materials. Having everything prepared makes the process smoother and more enjoyable. Choose a yarn that holds its shape well, such as cotton or acrylic. These types of yarns provide structure, which is essential when making three-dimensional objects like a violin.
You will also need a crochet hook that matches your yarn weight. A smaller hook is often better for this project since it creates tighter stitches, giving your violin a neat and sturdy finish. Using a larger hook might leave gaps in your work, making it difficult to maintain the proper shape of the violin’s body.
Additional tools include a tapestry needle for sewing parts together, scissors for cutting yarn, and stitch markers to help keep track of rounds. Having some soft stuffing is also essential, as it will give the violin its realistic 3D structure. Fiberfill is a popular choice for stuffing, but you can also use fabric scraps if you prefer an eco-friendly option.
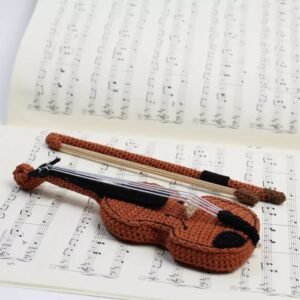
When preparing your yarn colors, think about the classic look of a violin. Most violins are a warm brown with darker accents on the fingerboard and scroll. To achieve this look, choose shades of brown, black, and cream. However, you can also get creative and make colorful violins for a more playful effect.
Before beginning, take a few minutes to review the basic stitches that will be used in this How to crochet a violin- Step by Step Tutorial. These include the chain stitch, single crochet, increase, and decrease. Familiarizing yourself with these stitches will make the process smoother and help you avoid mistakes along the way.
Finally, set up a comfortable workspace with good lighting. Crocheting detailed items like a violin requires focus, so having a distraction-free environment will help you stay on track and enjoy the creative process.
Crocheting the Body of the Violin
The body is the largest and most detailed part of the project. In this section of the How to crochet a violin- Step by Step Tutorial, you will learn how to form the rounded base that gives the violin its recognizable shape.
Start with a magic ring and work single crochets in the round to create the base. Gradually increase your stitches to expand the circle until it reaches the desired width. This forms the bottom of the violin’s body.
Next, you will begin shaping the sides. Continue working in rounds without increasing to build height. This gives the violin a three-dimensional look. As you progress, you can slightly adjust your stitch counts to create the curved silhouette typical of a violin.
Once the sides are complete, you will crochet the top piece separately using the same method. The top and bottom pieces will later be sewn together and lightly stuffed to create the full body.
To add detail, consider crocheting small appliqué shapes for the violin’s f-holes. These are the curved openings on the body of a real violin. Attach them with a few neat stitches or fabric glue to give your crochet violin a more realistic touch.
Finally, sew the top and bottom parts together, leaving a small opening for stuffing. Insert fiberfill until the body is firm but not overstuffed. Then close the opening with invisible stitches. The body is now complete and ready for the next steps.
Crocheting the Neck and Fingerboard
The neck and fingerboard are essential parts of the How to crochet a violin- Step by Step Tutorial because they give the violin its elongated shape. These parts must be firm to maintain balance with the body.
Begin by crocheting a long rectangular strip in black or dark brown yarn. This will serve as the fingerboard. Work in rows, using single crochet stitches for density and strength. Make sure the length matches the size of your violin body for correct proportions.
Next, create the neck of the violin by crocheting a narrow tube. Start with a small chain and join in the round, then continue crocheting upwards to form a cylinder. Stuff it lightly to give it firmness without making it too bulky.
Once the neck and fingerboard are complete, sew the fingerboard onto the front of the neck. This creates the look of a traditional violin. Pay attention to alignment to ensure the parts sit straight when attached to the body.
You can also crochet a small scroll, which is the decorative curved end at the top of the violin. This can be achieved by crocheting a flat spiral and attaching it to the top of the neck. Even though it’s small, this detail adds realism to your project.
After finishing the neck and fingerboard, securely attach them to the body. Use strong stitches to ensure the parts stay in place, especially if the violin will be handled often as a decorative item.
Finally, check that the proportions look balanced. Adjustments can be made by adding extra stitches or rows if needed. Once you’re satisfied, the violin is ready for its final touches.
Adding Strings and Finishing Details
In this section of the How to crochet a violin- Step by Step Tutorial, you will bring the violin to life with details that make it recognizable. The strings and fine features are what transform it from a simple crochet project into a realistic violin.
For the strings, you can use thin yarn, embroidery thread, or even metallic thread for a shiny effect. Attach the strings by securing them at the top of the neck and pulling them down to the bottom of the body. Make sure they are evenly spaced and taut.
Next, crochet a small bridge, which is the piece that holds the strings slightly above the violin body. This can be a small crocheted rectangle stitched firmly in place. Position it at the correct spot to give the violin its authentic appearance.
Add small decorative details such as tuning pegs, which can be made by crocheting tiny circles or attaching beads. These small parts give your violin a finished look and show your attention to detail.
If you want, you can also crochet a miniature bow to accompany your violin. Use a thin stick or pipe cleaner covered with yarn as the base, then add crocheted details to complete the bow.
Finally, inspect your work for any loose threads and trim them neatly. Lightly shape the violin with your hands to ensure everything looks smooth and aligned. With these finishing touches, your crochet violin is complete.
At this point, you have successfully followed How to crochet a violin- Step by Step Tutorial, creating a unique handmade piece that showcases your creativity.
FAQ about How to crochet a violin- Step by Step Tutorial
1. Is crocheting a violin suitable for beginners?
Yes, beginners can try it as long as they are comfortable with basic stitches like single crochet and slip stitch.
2. How long does it take to complete a crochet violin?
On average, it can take 8–12 hours depending on your skill level and the amount of detail you add.
3. What type of yarn works best for a crochet violin?
Cotton or acrylic yarn is recommended because it provides good structure and holds its shape.
4. Do I need stuffing for the violin body?
Yes, stuffing is important to give the violin a 3D shape. Fiberfill is the most common choice.
5. Can I customize the colors of my crochet violin?
Absolutely! While traditional violins are brown, you can use any color combination to make your project unique.
6. Is the crochet violin functional as a musical instrument?
No, this project is decorative only. It cannot produce sound like a real violin.
7. Can children help with this project?
Older children who know basic crochet techniques can participate, but younger kids may need supervision.
Conclusion
In this article, we explored How to crochet a violin- Step by Step Tutorial in detail. We began with materials and preparation, then moved on to crocheting the body, neck, and fingerboard, and finally added strings and finishing details. Each step builds on the last to create a realistic and charming crochet violin.
This project is a wonderful way to combine the love of music and crochet into one creative expression. Whether you make it as a gift, decoration, or personal challenge, the result will be a unique handmade piece.
Now it’s your turn! Share your honest opinion about this tutorial, let us know how your violin turned out, and suggest future projects you would love to see. Your feedback helps inspire more creative ideas for our crafting community.