
If you are searching for How to crochet an inch worm Amigurumi crochet Tutorial- Step by Step Tutorial, you are in the right place. In this article, you will learn everything about creating a charming inch worm using the amigurumi crochet technique. This craft project is perfect for beginners and experienced crocheters alike because it combines creativity, relaxation, and functionality. Making your own inch worm toy is a wonderful way to create handmade gifts, decorations, or even unique pieces to sell at craft fairs.
Crocheting an inch worm amigurumi might look complicated at first glance, but once you understand the basic steps, it becomes an easy and enjoyable process. This tutorial will guide you through everything from the materials you need to the detailed instructions on shaping the body, attaching the eyes, and finishing your project beautifully. The best part is that this method works well with different yarn colors and textures, allowing you to customize your worm to fit any style or theme you prefer.
Before diving into the detailed steps, let’s talk about why this How to crochet an inch worm Amigurumi crochet Tutorial- Step by Step Tutorial has become so popular. Amigurumi toys have taken the crafting world by storm because they are cute, easy to make, and suitable for all ages. Whether you want a cheerful green inch worm for a child’s toy or a decorative piece for your home, this guide will give you everything you need to succeed.
Materials and Preparation for the Inch Worm Amigurumi
Before starting the How to crochet an inch worm Amigurumi crochet Tutorial- Step by Step Tutorial, gathering the right materials will make the process much smoother. You will need soft yarn, usually in green or bright colors, a matching crochet hook size recommended for your yarn, fiberfill stuffing, safety eyes or beads, a yarn needle, and scissors. These simple tools will help you achieve a professional and neat finish for your inch worm amigurumi.
Choosing the correct yarn is essential because the texture and thickness will affect the overall look of your worm. Cotton yarn works well because it holds its shape nicely, while acrylic yarn offers more color options at a lower price. Make sure to pick a yarn weight suitable for small projects, as thicker yarn may result in a bulky and less defined toy.
Another important aspect before following the How to crochet an inch worm Amigurumi crochet Tutorial- Step by Step Tutorial is selecting the right hook size. A smaller hook creates tighter stitches, preventing the stuffing from showing through the fabric. Typically, a 2.5 mm to 3.5 mm crochet hook works perfectly for amigurumi projects.
Once you have the yarn and hook ready, gather fiberfill stuffing to give the worm its shape. High-quality stuffing will ensure your amigurumi keeps its form even after long use. Safety eyes add a touch of personality to your inch worm, but if the toy is for a child under three years old, embroidered eyes might be a safer alternative.
Finally, organize all materials in one place so you can work comfortably without interruptions. This small preparation step will make the entire process enjoyable and stress-free, especially if it’s your first time creating an amigurumi inch worm.
Step-by-Step Instructions to Crochet the Inch Worm
Now that you have prepared everything, let’s follow the How to crochet an inch worm Amigurumi crochet Tutorial- Step by Step Tutorial step by step. We will start by creating the small connected segments that form the worm’s body. Each segment is crocheted separately and then joined together to give the worm its signature curved look.
Begin with a magic ring and work single crochet stitches in the round to form a small ball. Increase stitches evenly to make the sphere grow, then decrease to close it. Stuff each segment before finishing to keep it firm and round. The number of segments depends on how long you want your inch worm to be—usually five to seven segments look great for a small toy.
Once all segments are completed, sew them together in a slight curve. This gives your inch worm a realistic crawling shape rather than a straight line. Attaching the segments carefully ensures the worm moves naturally when held or displayed.
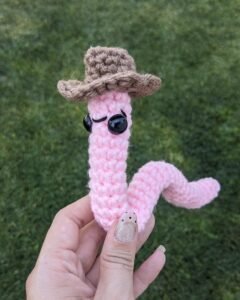
After assembling the body, add safety eyes to the first segment and embroider a small smile using black yarn or embroidery thread. This simple step transforms your project from plain crochet shapes into a cheerful and charming amigurumi toy.
Next, make a tiny crochet chain or two to create little antennas on top of the head. This detail adds extra character to your inch worm, making it look even cuter. Secure the antennas firmly so they stay in place even during play.
Finally, weave in all yarn ends neatly with a yarn needle to give your inch worm a professional finish. Your How to crochet an inch worm Amigurumi crochet Tutorial- Step by Step Tutorial is now complete, and your adorable worm is ready to be admired or gifted.
Tips for Beginners to Improve Their Crochet Skills
If this How to crochet an inch worm Amigurumi crochet Tutorial- Step by Step Tutorial is your first amigurumi project, don’t worry—crochet becomes easier with practice. One helpful tip is to keep your stitches tight and consistent. Loose stitches may cause gaps where the stuffing can peek through, affecting the final look.
Another tip is to use stitch markers when working in the round. They help you keep track of each round’s beginning and ensure your increases and decreases stay aligned, especially for beginners still learning to read patterns.
Practicing basic stitches such as single crochet, increase, and decrease before starting the project will make the process smoother. Amigurumi patterns often rely on these simple techniques, so mastering them first builds confidence.
Take your time when sewing segments together. A neat assembly makes a big difference in the final appearance of your inch worm. Rushing through this part can lead to a lopsided or uneven toy.
Experiment with different yarn colors to create playful and unique worms. Striped yarn can give your inch worm a fun multicolor effect without changing colors manually.
Finally, don’t be afraid to make mistakes. Every crocheter learns through trial and error, and each project helps you improve your skills for future creations.
Creative Ways to Use Your Crochet Inch Worm
Once you finish the How to crochet an inch worm Amigurumi crochet Tutorial- Step by Step Tutorial, you can use the completed toy in many creative ways. It makes a delightful gift for children, especially when paired with a small storybook about worms or insects. Handmade toys carry sentimental value that store-bought items simply cannot match.
You can also use your inch worm as a decorative piece for your home. Place it on a shelf, near potted plants, or in a child’s room to add a touch of handmade charm. Its cheerful design brightens any space instantly.
For crafters who sell handmade items, inch worm amigurumi toys are excellent products because they are quick to make and highly appealing. Customers love cute and affordable handmade toys at craft fairs or online shops.
Teachers and parents can use crochet inch worms as educational tools. They are great for teaching counting, colors, or storytelling activities with young children.
Crocheted inch worms also work as stress-relief toys. Their soft texture and flexible body make them enjoyable to hold and squeeze during moments of anxiety or boredom.
Lastly, making seasonal versions with themed colors—such as red and green for Christmas or pastel shades for Easter—adds variety and makes your inch worm collection even more special.
FAQ about How to Crochet an Inch Worm Amigurumi
1. Is this inch worm amigurumi suitable for beginners?
Yes, this How to crochet an inch worm Amigurumi crochet Tutorial- Step by Step Tutorial is perfect for beginners because it uses simple stitches and small pieces.
2. How long does it take to finish the project?
On average, it takes two to three hours, but beginners might need a little longer depending on their speed.
3. Can I use leftover yarn for this project?
Absolutely! This is a great way to use small yarn scraps since each worm segment is tiny.
4. How do I wash the inch worm amigurumi?
Hand wash gently with mild soap and air dry to maintain its shape and colors.
5. Is it safe for small children?
If you replace safety eyes with embroidered eyes, the toy becomes safe for all ages, including babies.
6. Can I sell inch worm amigurumi toys I make from this tutorial?
Yes, handmade toys sell well, especially if you add creative touches and market them locally or online.
Conclusion
We have now completed the full How to crochet an inch worm Amigurumi crochet Tutorial- Step by Step Tutorial with clear instructions, helpful tips, and creative ideas.
You learned how to prepare materials, crochet the body segments, assemble them neatly, and personalize your project with eyes and antennas.
If you enjoyed this guide, please share your honest opinion in the comments and let us know if you have suggestions for future tutorials. Your feedback helps improve and inspire more creative crochet projects for everyone.