
If you have ever wanted to try making an adorable and charming crochet toy, this how to make an amigurumi duck – step by step tutorial is the perfect guide for you. Amigurumi, the Japanese art of crocheting small stuffed creatures, has become a beloved craft among crochet enthusiasts around the world. With just a few basic stitches, some colorful yarn, and a bit of patience, you can bring your own cute little duck to life. This handmade creation makes a great gift, a decorative piece, or even a cozy toy for children.
In this amigurumi duck tutorial, you will learn everything you need to know to create a soft, round, and cuddly crochet duck from start to finish. Whether you’re new to crochet or already experienced, this project is both enjoyable and relaxing. The finished duck will have a plump body, a tiny beak, and charming little wings — the perfect combination of simplicity and cuteness. You’ll also discover that making amigurumi is not just a craft, but also a form of mindfulness and self-expression.
This step-by-step amigurumi duck tutorial will guide you through the entire process, from selecting your materials to stitching the final details. By the end, you’ll not only have a delightful handmade duck, but also the confidence to try other amigurumi animals in the future. Let’s get started on this joyful and creative journey into the world of crochet!
Materials and Tools Needed for Your Amigurumi Duck
Before we start the how to make an amigurumi duck – step by step tutorial, it’s important to gather all the necessary materials and tools. Having everything prepared will make your crochet experience smoother and more enjoyable.
The first thing you’ll need is yarn. For your amigurumi duck, choose soft yarn in yellow, orange, and white. Yellow will be used for the body, head, and wings, while orange will be for the beak and feet. Cotton or acrylic yarn works best because it holds shape well and is easy to crochet with.
Next, you’ll need a crochet hook that matches your yarn thickness — usually a 2.5 mm to 3.5 mm hook works perfectly for amigurumi projects. Using a smaller hook helps to keep the stitches tight, which prevents the stuffing from showing through the gaps.
You’ll also need fiberfill stuffing to give your duck its adorable, squishy shape. Be sure to stuff it gradually and evenly to maintain smoothness. A yarn needle will help you sew the parts together securely once all the pieces are made.
For safety eyes, you can use plastic safety eyes or simply embroider the eyes using black yarn. If the duck is meant for small children, embroidered eyes are safer and equally cute. Finally, don’t forget a pair of scissors and stitch markers to help you keep track of rounds.
Having all these items ready before starting your amigurumi duck project will ensure a relaxing crafting session without interruptions.
Step-by-Step Crochet Instructions
Now we’re ready to begin the exciting part of this how to make an amigurumi duck – step by step tutorial. The process is simple when followed carefully, even if you’re a beginner. Let’s start crocheting the adorable little duck!
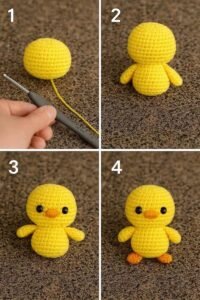
Begin with the head and body, which are usually crocheted in one continuous piece using the magic ring technique. Start with six single crochets inside a magic ring using yellow yarn. Continue working in rounds, increasing the stitch count every few rows to form a round, plump head shape. Once the head reaches the desired size, stop increasing and continue with even stitches to shape the body.
After the head and body are complete, move on to making the wings. Crochet two small oval shapes with yellow yarn. These will later be sewn on each side of the duck’s body. Keep your stitches tight so that the wings look neat and even.
Next, it’s time to make the beak using orange yarn. Chain two stitches and work in a small oval shape, then crochet around it to form a short, flat piece. The beak should be slightly curved upward for a friendly expression.
For the feet, crochet two small shapes in orange, similar to miniature flippers. You can make them simple by forming flat ovals or more detailed by shaping webbed toes. Attach them securely to the bottom of your duck.
Finally, assemble the parts. Use your yarn needle to sew the wings, beak, and feet onto the body. Attach the eyes between rounds of the head, making sure they’re evenly spaced. Once everything is attached, stuff the body carefully, then close the final opening with neat stitches. Your amigurumi duck is complete!
Helpful Tips for a Perfect Amigurumi Duck
While this amigurumi duck step-by-step tutorial is easy to follow, a few professional tips can help make your final creation look more polished and adorable.
First, always keep your tension consistent. Tight and even stitches create a smoother finish and ensure your stuffing doesn’t peek through. If your stitches are too loose, your duck may look lumpy or uneven.
Second, use quality fiberfill stuffing and distribute it evenly. Insert small pieces at a time to prevent clumps. Stuff the head and body firmly but not too tightly to maintain softness.
Third, when assembling your duck, pin the parts in place before sewing. This helps you visualize the final look and ensures that everything is symmetrical. Adjust the placement until you’re happy before stitching them permanently.
If you want to personalize your duck, you can add accessories like a tiny bow tie, a scarf, or even a little hat. These small details can make your creation unique and perfect for gifting.
Another important tip is to count your stitches carefully. Amigurumi relies on precise stitch counts, so using a stitch marker will help you avoid mistakes. Losing track of your rounds can change the shape of your duck.
Finally, practice patience and enjoy the process. Every amigurumi project improves your crochet skills and creativity, so don’t rush. Remember, each handmade duck will have its own charm and personality!
Creative Variations and Customization Ideas
One of the most enjoyable aspects of this how to make an amigurumi duck – step by step tutorial is that you can customize it however you like. Your crochet duck doesn’t have to be identical to anyone else’s — let your creativity guide you!
You can start by experimenting with colors. Instead of classic yellow, try making pastel-colored ducks, such as mint green, lavender, or baby blue. These variations are perfect for themed decorations or nursery toys.
If you want to make a whole duck family, create different sizes by adjusting your yarn thickness and hook size. A smaller hook and thinner yarn make a tiny duckling, while thicker yarn will produce a larger mother duck.
You can also add accessories like a tiny bow or ribbon around the neck for a more playful appearance. Crocheting a small hat or flower crown is another fun way to personalize your creation.
For a festive touch, turn your amigurumi duck into a holiday ornament by attaching a loop of yarn at the top of its head. These make adorable handmade gifts for friends and family during special occasions.
If you’re planning to give your duck to a child, remember to embroider the eyes and features instead of using plastic ones for safety. Embroidered details are soft and secure while still giving your duck a sweet expression.
Lastly, consider turning your crochet duck into a keychain or bag charm. Simply attach a keyring to the top and you’ll have a cute, handmade accessory to carry wherever you go. The possibilities are endless when you create with your imagination!
Frequently Asked Questions
1. What materials do I need to make an amigurumi duck?
You’ll need yarn in yellow and orange, a crochet hook, fiberfill stuffing, a yarn needle, scissors, and safety or embroidered eyes.
2. Is this project suitable for beginners?
Yes! This how to make an amigurumi duck – step by step tutorial is perfect for beginners. The pattern uses basic stitches like single crochet, increases, and decreases.
3. How long does it take to finish an amigurumi duck?
On average, it takes 3–5 hours to complete one duck, depending on your crochet speed and experience.
4. Can I wash my amigurumi duck?
Yes, but it’s best to hand wash gently with mild soap and cold water. Squeeze out excess water and let it air dry completely.
5. What can I use instead of safety eyes?
If you prefer not to use safety eyes, you can embroider the eyes using black yarn or thread. This is safer for young children and still looks adorable.
6. Can I make the duck in different sizes?
Absolutely! Use thicker yarn and a larger hook for a bigger duck, or thinner yarn and a smaller hook for a mini version. Adjusting the stuffing amount will also affect the size.
7. How do I prevent gaps between stitches?
Keep your tension tight and consistent, and use a smaller hook than recommended for your yarn. This keeps the stuffing securely inside.
8. Can I use leftover yarn for this project?
Yes, amigurumi is perfect for using small amounts of leftover yarn. Just make sure the yarns are of similar thickness to maintain even stitching.
Conclusion
By following this how to make an amigurumi duck – step by step tutorial, you’ve learned how to create a charming handmade toy that’s full of personality and warmth. From gathering your materials to stitching the final details, every step brings joy and satisfaction. Crocheting an amigurumi duck is not just about crafting an object — it’s about expressing creativity, patience, and love for handmade art.
Now that you’ve completed your cute little duck, take pride in your work and consider gifting one to someone special. Each handmade piece carries a part of your effort and creativity, making it truly unique.
We hope this tutorial inspired you to continue exploring the wonderful world of amigurumi. Please leave your sincere opinion and suggestions about this tutorial below — your feedback helps make future projects even better. Happy crocheting!