
If you’re looking for the perfect handmade decoration that combines the coziness of autumn with the charm of Disney, this Mickey-inspired crochet pumpkin – Step by Step Tutorial is just what you need! These adorable pumpkins bring together the magic of Mickey Mouse and the beauty of fall décor in a single crochet project. Whether you want to add a touch of whimsy to your Halloween decorations or simply make your home feel more festive, these crochet pumpkins are an ideal choice. They’re fun to make, easy to customize, and suitable for all crochet skill levels.
The best part of this Mickey-inspired crochet pumpkin – Step by Step Tutorial is how creative and enjoyable it is. You’ll learn how to make the main pumpkin body, the little ears that give it Mickey’s signature look, and the decorative stem that completes the piece. With a bit of yarn and imagination, you can create a beautiful fall decoration that will impress both kids and adults alike. These pumpkins make great gifts, party decorations, or centerpieces for your dining table during Halloween or Thanksgiving season.
Crocheting themed pumpkins like this is not only about crafting—it’s about creating memories. Imagine crocheting your Mickey-inspired pumpkins while sipping on pumpkin spice coffee or watching your favorite Disney movie. This Mickey-inspired crochet pumpkin – Step by Step Tutorial will help you slow down, enjoy the process, and bring some playful Disney magic into your autumn décor. Let’s dive into this creative crochet adventure!
Materials Needed for the Mickey-Inspired Crochet Pumpkin
Before starting your Mickey-inspired crochet pumpkin – Step by Step Tutorial, it’s important to gather all your supplies. Preparing your materials beforehand will make the process smoother and more enjoyable. The first thing you’ll need is yarn. Choose soft, medium-weight yarn in a bright orange shade for the main pumpkin body, along with black or dark brown for Mickey’s ears and green or brown for the stem. Acrylic or cotton yarn works best for durability and structure.
Next, select an appropriate crochet hook. A 4 mm or 5 mm hook is usually perfect for this project. However, always check your yarn label for recommendations to ensure your stitches come out neat and consistent. You’ll also need a yarn needle for sewing the parts together, a pair of scissors, and some fiberfill stuffing to give your pumpkin a full, plush shape.
You can also use stitch markers to help keep track of your rounds, especially if you’re crocheting in continuous spirals. A hot glue gun or fabric glue might be helpful to attach the smaller parts, though stitching them together gives a more professional and durable finish.
For optional decorations, you can add felt leaves, ribbons, or small embellishments to make your Mickey-inspired crochet pumpkin – Step by Step Tutorial even more unique. These personal touches will give your pumpkin a distinct character and make it stand out in your fall collection.
Lastly, make sure your workspace is comfortable, well-lit, and organized. Crocheting is more enjoyable when you have all your tools close at hand. Put on your favorite playlist or Disney movie, grab your yarn, and get ready to bring your Mickey pumpkin to life!
Step by Step Instructions for the Mickey-Inspired Crochet Pumpkin
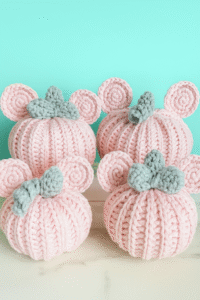
Now it’s time to begin the fun part of this Mickey-inspired crochet pumpkin – Step by Step Tutorial—making your pumpkin! Start by crocheting the pumpkin body. Begin with a magic ring and work six single crochets into it. Continue crocheting in the round, increasing evenly each round until you reach the desired width of your pumpkin. This will form the base of your design.
Once your pumpkin is wide enough, continue crocheting without increasing to build height. This creates the round body shape. When you’ve reached the height you want, start decreasing evenly to close the top. Before closing completely, stuff the pumpkin with fiberfill until it’s firm but still squeezable. Close it tightly with your yarn needle, leaving a small indentation at the top and bottom for that classic pumpkin look.
Next, let’s make Mickey’s iconic ears. Crochet two small, flat circles using black yarn. You can start each ear the same way as the pumpkin base—with a magic ring and six single crochets—then increase until the circle is about 2 inches in diameter. Make sure both ears are equal in size. Once finished, attach them symmetrically to the top sides of the pumpkin using a yarn needle or glue.
Now, create the stem. Use green or brown yarn and crochet a small tube shape by chaining a few stitches and working single crochets around. Once it reaches the desired height, sew it onto the top center of the pumpkin. You can slightly bend it to give it a more natural look.
If you’d like to make your Mickey-inspired crochet pumpkin – Step by Step Tutorial even cuter, add a small bow between the ears using red yarn to create a Minnie version! This variation is adorable and perfect for pairing pumpkins together.
When all parts are assembled, use your fingers to fluff and shape your pumpkin. Adjust the ears and stem until you’re happy with the final look. Your Mickey-inspired crochet pumpkin is now complete and ready to brighten up your home!
Creative Ways to Use Your Mickey-Inspired Crochet Pumpkin
One of the best things about completing this Mickey-inspired crochet pumpkin – Step by Step Tutorial is how many ways you can use your finished project. These cute pumpkins make excellent decorations for a variety of occasions, from Halloween parties to cozy autumn gatherings.
You can display them as part of a fall-themed centerpiece on your dining table. Combine them with real pumpkins, candles, and autumn leaves for a beautiful and festive look.
They also make wonderful additions to your children’s rooms or play areas. The Mickey-inspired design will delight Disney fans of all ages, and the soft crochet texture makes them safe for kids to handle.
You can even hang small versions of your Mickey pumpkins on a garland for a fun and creative Halloween decoration. A string of crocheted pumpkins adds warmth and personality to your home.
If you’re feeling generous, these crochet pumpkins make thoughtful handmade gifts. Wrap them with a bit of ribbon and give them to friends, teachers, or family members as a seasonal surprise.
Finally, use your Mickey-inspired crochet pumpkin – Step by Step Tutorial as a base for other themed designs. Change the colors to make Christmas versions, pastel ones for spring, or bold patterns for year-round décor. The possibilities are endless when you add your creative touch.
Helpful Tips and Tricks for the Perfect Crochet Pumpkin
To get the most out of this Mickey-inspired crochet pumpkin – Step by Step Tutorial, here are some tips to make your project easier and more enjoyable. First, pay attention to your tension. Consistent tension keeps your pumpkin’s shape even and helps the stuffing distribute smoothly.
If your pumpkin looks uneven or lumpy, adjust your stuffing amount or use smaller stitches on the closing rounds. A firm but not overly stuffed pumpkin looks best and holds its shape for longer.
When attaching the ears, make sure they’re securely sewn in place. Loose stitches can make them flop to one side. You can reinforce them with an extra round of stitching for better durability.
Consider using a combination of colors or adding small details to make your pumpkin unique. For example, a golden thread border around the ears or a tiny embroidered Mickey face on the pumpkin adds charm.
For a clean, professional finish, weave in all loose yarn ends neatly inside the pumpkin using your yarn needle. This small detail gives your project a polished look and ensures it lasts for years.
Lastly, take your time and enjoy the process! Crocheting is meant to be relaxing. Don’t worry if your first pumpkin isn’t perfect—each one will improve as you practice and add your personal style.
FAQ about Mickey-Inspired Crochet Pumpkin
Q1: Can beginners make this Mickey-inspired crochet pumpkin?
Yes! This Mickey-inspired crochet pumpkin – Step by Step Tutorial is beginner-friendly. It uses simple stitches like single crochet and basic increases and decreases.
Q2: What type of yarn should I use for this project?
Medium-weight acrylic or cotton yarn is ideal. Cotton gives a neat look, while acrylic makes your pumpkin soft and cozy.
Q3: How big should the pumpkin be?
The size depends on your preference. A small pumpkin (4–5 inches wide) is great for table décor, while larger ones can serve as statement pieces.
Q4: How do I make the pumpkin stand upright?
Shape the pumpkin by tightening the top and bottom stitches. You can also add a small cardboard circle inside the base for extra support.
Q5: Can I make a Minnie version of this pumpkin?
Absolutely! Add a red or pink bow between the ears, and you’ll have a cute Minnie-inspired pumpkin variation.
Q6: How do I clean my crochet pumpkin?
Spot clean gently with a damp cloth. Avoid soaking it in water to maintain the shape and texture.
Conclusion
This Mickey-inspired crochet pumpkin – Step by Step Tutorial has shown you how to combine the warmth of autumn with the playful magic of Disney in one adorable project. From crocheting the pumpkin base to attaching Mickey’s iconic ears and adding finishing touches, every step helps you create a charming handmade decoration.
These crochet pumpkins are perfect for bringing festive joy to your home or gifting to loved ones. They are simple to make, endlessly customizable, and sure to make everyone smile.
Now that you’ve learned all the steps, it’s time to pick up your yarn and crochet hook and bring your Mickey-inspired pumpkin to life! We hope you enjoyed this tutorial—please leave your honest opinion and share your suggestions below. Your feedback inspires us to keep creating more fun and magical crochet ideas!