
If you have been searching for a fun and creative DIY project, this Skull and ghost crochet keychain- Step by Step Tutorial is perfect for you. Crocheting small accessories like keychains allows you to create something practical, cute, and personalized. Whether you want to keep your keys organized or add a unique accessory to your bag, a skull and ghost crochet keychain offers the ideal mix of functionality and style.
Another reason people love this project is because it is beginner-friendly. Even if you are new to crochet, you can follow this Skull and ghost crochet keychain- Step by Step Tutorial and make something amazing in just a few hours. The tutorial breaks down everything into simple steps, helping you learn at your own pace. Plus, these keychains also make fantastic gifts for friends and family, especially around Halloween or for anyone who loves handmade crafts.
In this article, we will go through the entire process of creating a Skull and ghost crochet keychain- Step by Step Tutorial in detail. You will find instructions about the materials you need, basic stitches required, and how to assemble the pieces. The goal is to make sure you finish with a beautiful keychain while enjoying the entire crafting process.
Materials and Tools Needed
Before starting your Skull and ghost crochet keychain- Step by Step Tutorial, it is essential to gather all the materials. Preparation makes the process much smoother and ensures you do not stop halfway through because of missing supplies.
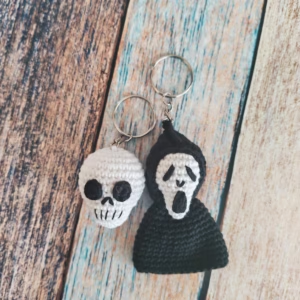
First, you will need some yarn. Most people prefer using cotton yarn because it holds its shape well, making your skull and ghost look neat and durable. White and black yarns are the most popular choices for this project, as they give the perfect ghostly and spooky effect to your keychain.
Second, you will need a crochet hook. The size of the hook depends on the thickness of your yarn, but a smaller hook is usually better for keychains because it keeps the stitches tight. A 2.5mm or 3mm hook works great for most yarn types.
You will also need some stuffing material to give your ghost and skull a little 3D shape. Polyester fiberfill works well because it is lightweight and easy to work with.
Other essential tools include scissors, a yarn needle for weaving in ends, and keychain rings or clips to attach your finished pieces. Make sure you have everything within reach before starting the tutorial.
Finally, optional items like small safety eyes or embroidery thread can help you add extra details to the skull and ghost faces, giving them personality and charm.
Basic Stitches and Techniques
Before we dive into the actual Skull and ghost crochet keychain- Step by Step Tutorial, let’s review the basic stitches you will need. Learning these stitches first will make the whole process much easier and more enjoyable.
The chain stitch (CH) is the foundation of almost every crochet project. You will start many parts of the skull and ghost keychain with a chain, so practice this stitch until you feel comfortable.
Next is the single crochet (SC) stitch, which is simple yet essential. This stitch creates a tight and sturdy fabric, perfect for small projects like keychains where you want the shape to hold well.
The slip stitch (SL ST) is another important one. It helps you join rounds or finish edges neatly without adding extra height to your work.
You will also need to learn how to increase and decrease stitches. Increasing adds stitches to make your piece larger, while decreasing removes stitches to shape the curves of your skull and ghost.
Finally, working in the round is a key technique for this project. Many small crochet items, especially amigurumi-like pieces such as these keychains, are made in continuous rounds instead of rows to create a seamless 3D shape.
With these stitches and techniques mastered, you will be ready to follow the full tutorial confidently and create beautiful crochet keychains.
Step-by-Step Tutorial for Skull and Ghost Keychain
Now that you know the materials and basic stitches, let’s start the Skull and ghost crochet keychain- Step by Step Tutorial. Each part will be explained clearly so you can follow along easily, even if you are a beginner.
Start with the ghost body by making a magic ring and working single crochet stitches in the round. Increase the stitches gradually to form the base, then continue working evenly to create the body’s height. When you reach the top, decrease to close the shape, leaving space to stuff it lightly before sealing completely.
For the skull, begin with a small chain foundation, then work in rounds to form a slightly oval shape. Add a few increases at the sides to give it the right skull appearance. Stuff it lightly before closing.
Use black yarn or embroidery thread to create the ghost’s eyes and mouth. You can make them spooky or friendly depending on your style preference. Safety eyes are another good option if you want a neat and uniform look.
Attach the skull and ghost pieces to keychain rings using a yarn needle. Make sure they are secured tightly so they do not come loose with daily use.
Weave in all yarn ends neatly to give your keychains a professional finish.
Finally, check the overall shape and make small adjustments if necessary, so both pieces look even and well-stuffed.
Creative Ideas and Personalization Tips
One of the best parts about this Skull and ghost crochet keychain- Step by Step Tutorial is the opportunity for creativity. You can customize colors, shapes, and details to make each keychain unique.
For example, try using glow-in-the-dark yarn for the ghost. It adds a fun twist, especially if you plan to gift these keychains during Halloween.
Add tiny accessories like mini hats or bows to give your skull and ghost characters extra personality. These small touches make them stand out and show off your creativity.
Experiment with different facial expressions. Instead of the classic spooky look, try making funny or cute faces for a completely different vibe.
You can also mix yarn textures. Using fluffy yarn for the ghost body creates a softer, cloud-like effect, while smooth cotton works best for the skull.
Another idea is to make matching sets. Create multiple skull and ghost keychains in different colors for friends or family members, so each person has a slightly different version.
Lastly, consider adding small scented beads inside the stuffing. This turns your keychain into both a cute accessory and a mini air freshener for your bag or car.
FAQ About Skull and Ghost Crochet Keychains
1. Is this project suitable for beginners?
Yes, the Skull and ghost crochet keychain- Step by Step Tutorial is beginner-friendly because it uses basic stitches and simple shaping techniques.
2. How long does it take to make one keychain?
On average, it takes 2–3 hours to complete one keychain, depending on your crochet speed and level of detail.
3. Can I use leftover yarn for this project?
Absolutely! Small projects like this are perfect for using up yarn scraps from previous crochet projects.
4. How do I clean my crochet keychain?
Hand wash gently with mild soap and let it air dry completely. Avoid using a washing machine as it may distort the shape.
5. Can I sell keychains made from this tutorial?
Yes, you can sell handmade keychains created using this tutorial, but please credit the pattern source if required.
6. What is the best stuffing for crochet keychains?
Polyester fiberfill is lightweight, easy to use, and keeps its shape well, making it the best choice for this project.
Conclusion
This Skull and ghost crochet keychain- Step by Step Tutorial has shown you everything you need to create fun and unique crochet accessories. From gathering materials to learning basic stitches, assembling the parts, and adding personal touches, you now have all the tools to make your own keychains.
We hope this guide inspired you to try crocheting these adorable skull and ghost keychains.
Please leave your honest opinion about this tutorial in the comments and share any creative suggestions for future projects. Your feedback helps us improve and bring you more exciting crochet ideas!