
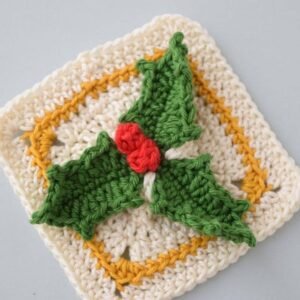
The 3D Christmas crochet holly leaves, granny square.-Step by Step Tutorial is a festive and rewarding project for crafters who want to add a handmade touch to their holiday décor. This design combines the classic granny square technique with dimensional holly leaves that bring depth and charm to any Christmas piece. Working with this pattern also allows beginners and experienced crocheters to enjoy a relaxing and creative process during the holiday season. Because it blends traditional methods with 3D details, this tutorial is a wonderful way to expand your crochet skills while creating meaningful pieces for decoration or gifting.
When following the 3D Christmas crochet holly leaves, granny square.-Step by Step Tutorial, you will discover how easily the basic square can become a beautiful seasonal ornament. The addition of holly leaves and berries elevates a simple project into something festive and eye-catching. It’s perfect for holiday blankets, decorative pillows, gift toppers, or garlands. The 3D elements create texture that looks delightful when displayed around the home. Each part of the process focuses on clarity and simplicity, making the pattern accessible even if you are still learning the fundamentals of crochet.
This project is also ideal for using scrap yarn, giving your leftover yarn balls a charming purpose. Whether you’re stitching while sipping hot cocoa or preparing holiday gifts, the 3D Christmas crochet holly leaves, granny square.-Step by Step Tutorial helps set the mood for cozy crafting. Throughout the tutorial, you will learn techniques such as building a solid granny square base, shaping dimensional leaves, forming small berries, and attaching them securely. These skills are also useful for many other crochet creations, making this project both educational and enjoyable.
Materials Needed for the Christmas Granny Square
To begin the 3D Christmas crochet holly leaves, granny square.-Step by Step Tutorial, you will need to gather a few basic crochet materials. The most important component is yarn in classic Christmas colors such as green, red, and a contrasting shade for the square’s background. You can choose a soft worsted-weight yarn to achieve the ideal combination of structure and comfort. This type of yarn creates clear stitch definition, which is crucial for highlighting the 3D holly leaves.
You will also need a crochet hook that matches your yarn weight. Most crafters prefer a 4 mm or 5 mm hook for this type of project, as it allows for smooth stitching and easy control. A comfortable hook makes a big difference, especially if you plan to make multiple granny squares for a holiday blanket or garland. Pairing the right hook with the right yarn ensures that the entire pattern comes together neatly.
Other essential tools include scissors and a yarn needle. The scissors help cut yarn cleanly without fraying, while the yarn needle is important for weaving in ends, shaping the holly leaves, and attaching the berries securely. These finishing steps significantly improve the appearance of your work, giving your 3D Christmas crochet holly leaves, granny square.-Step by Step Tutorial a polished and professional finish.
Stitch markers are optional but helpful, especially for beginners. They can assist you in keeping track of stitch counts and marking where leaves or berries will be attached. Using markers can prevent confusion and help maintain the accuracy of your design. Even experienced crocheters find them helpful when working with multiple layers or complex shapes.
While not required, blocking mats can enhance the final presentation of your granny square. Blocking helps the square hold its shape and keeps the edges crisp and flat. This step is especially important when your project will be part of a larger collection of squares. A consistent shape ensures that everything fits together seamlessly.
Finally, prepare a comfortable workspace with good lighting. Good lighting helps you see your stitches clearly, especially when working with dark or rich Christmas colors. A pleasant crafting environment contributes to a more enjoyable experience and helps make the tutorial easier to follow from beginning to end.
Creating the Base Granny Square
The base of the 3D Christmas crochet holly leaves, granny square.-Step by Step Tutorial begins with a traditional granny square foundation. Start by making a magic ring or a simple chain loop, depending on which method you find easier. This loop forms the center of your square, and from here you’ll build outward using clusters of stitches. Most granny squares use double crochet clusters, which are easy to learn and create a beautiful layered texture.
Work your first round by forming three double crochets, followed by a chain, and repeat the pattern to establish the corners. The purpose of repeating this structure is to create the square’s base shape. Each corner needs spacing so that the square can grow larger without curling. Once the first round is complete, tighten the center gently and check that the shape looks symmetrical.
As you continue building the square, you’ll add more double crochet clusters in each round. Keep your tension even so your square stays flat. Mild adjustments in tension can make a big difference, especially for beginners. This part of the 3D Christmas crochet holly leaves, granny square.-Step by Step Tutorial helps you gain confidence in your stitch control and counting skills.
You can continue using the same color throughout or switch colors after a few rounds to add contrast. For holiday projects, many crafters prefer backgrounds in white, cream, or light green to highlight the holly leaves later. Whatever colors you choose, aim for harmony so your finished square looks cohesive.
Once your square reaches the desired size, you can gently lay it flat and check the alignment of the corners. If needed, adjust by adding a final round or reinforcing a stitch. This kind of attention to detail ensures your square will support the 3D leaves without warping. The square acts as the “canvas” for the leaf design, so having a sturdy foundation is essential.
When the base is complete, set it aside while preparing the yarn for your holly leaves. The next steps will add excitement and texture to your project as you start working on the 3D elements that make this Christmas square truly unique.
Crocheting the 3D Holly Leaves and Berries
The 3D leaves are the heart of the 3D Christmas crochet holly leaves, granny square.-Step by Step Tutorial, giving the project its festive character. To start the leaves, use green yarn and create a small chain. This chain will form the spine of the leaf. Build single or half-double crochet stitches along the chain, then mirror them on the opposite side. This technique creates a leaf that is sturdy and dimensional.
After shaping the basic leaf, add small picots or tiny bumps along the edges if you want a more realistic holly look. These small details enhance the natural shape and give your leaf extra personality. Crocheting these elements is a great way to practice shaping techniques that can be used in many future projects.
Make at least two or three holly leaves per square. The number of leaves is up to your preference and the size of your granny square. Lay the leaves on your square to determine the best arrangement before attaching them. This preview helps you visualize the final look and prevents the need for re-sewing.
For the holly berries, use bright red yarn to create tiny spheres. You can form these berries by making a small magic ring and working a few rounds, or by stitching flat circles and folding them into shape. The berries should be firm enough to hold their shape, giving the project a delightful pop of color.
Once your leaves and berries are ready, position them on your granny square. Attach them securely using a yarn needle, sewing only through the back stitches so they maintain their 3D structure. This part of the 3D Christmas crochet holly leaves, granny square.-Step by Step Tutorial is important for ensuring your decorations stay in place even after extended use.
After everything is attached, gently fluff the leaves and berries so they stand out beautifully. The textural contrast between the flat square and the 3D elements creates a striking holiday effect, perfect for decorating or gifting.
Finishing Touches and Project Ideas
When the main elements are complete, the final part of the 3D Christmas crochet holly leaves, granny square.-Step by Step Tutorial focuses on finishing and creative use. Begin by weaving in all loose yarn ends carefully. Neatly finishing these ends helps maintain the overall quality and appearance of your project.
Next, block your square if needed. Blocking helps shape the piece and align the edges, ensuring that your holly leaves remain centered and balanced. This step is especially important if you plan to connect several granny squares into a larger project.
This square can be used in countless Christmas-themed creations. Many crocheters enjoy assembling multiple squares into festive blankets. The 3D effect adds texture, making these pieces truly unique. You can also attach these squares to pillow covers to create cozy holiday accents.
For smaller decorations, use a single square as a hanging ornament or wall piece. The bold colors and dimensional details stand out beautifully on mantels, doors, or Christmas trees. The versatility of this tutorial allows you to adapt the project to your personal decorating style.
These squares also make thoughtful handmade gifts. A set of several squares can be prepared as a bundle for other crafters, or sewn together into a table runner or holiday placemat. Each piece carries the charm of handmade work and the joy of the season.
Consider experimenting with different color combinations to match your holiday theme. While traditional Christmas colors look classic, modern tones such as gold, silver, or icy blue can create a fresh twist on the design. Creativity is encouraged throughout the 3D Christmas crochet holly leaves, granny square.-Step by Step Tutorial.
FAQ – Frequently Asked Questions
1. Is this project suitable for beginners?
Yes, the 3D Christmas crochet holly leaves, granny square.-Step by Step Tutorial is beginner-friendly. The base square is easy, and the leaves are simple once you learn basic shaping.
2. What yarn is best for this project?
Worsted-weight yarn works well because it provides good stitch definition for the holly leaves and berries.
3. Can I make the square larger or smaller?
Absolutely. Adjust the number of rounds in your granny square to achieve your desired size.
4. How do I keep the 3D elements secure?
Sew the leaves and berries carefully using a yarn needle, stitching through several layers to ensure stability.
5. Can I use these squares in blankets or pillows?
Yes, these squares are perfect for assembling larger Christmas projects such as blankets, pillows, or table runners.
6. How many squares do I need for a full blanket?
The number depends on the blanket size, but most lap blankets require 20–40 squares.
Conclusion
The 3D Christmas crochet holly leaves, granny square.-Step by Step Tutorial offers a festive and creative way to enhance your holiday decorations.
By learning how to craft the base square, shape 3D holly leaves, and attach tiny berries, you gain valuable skills that can be used in many future crochet projects.
This tutorial helps you explore texture, color, and creativity in a joyful and meaningful way. If you enjoyed this article, please leave your sincere opinion and share suggestions for future tutorials.